Audi A4 B7: How to Replace Low Pressure Fuel Pump (LPFP) on Quattro
Fuel pump replacement in the A4 Quattro is a bit different than in the non-Quattro cars. Find out how to replace it in this article. It isn't overly difficult, but requires a couple of extra tools to make the job easier and take less time.
This article applies to the Audi A4 B7 2.0t Quattro (2005-2008).
The 2.0t engine utilizes two fuel pumps: a high pressure pump driven off the engine and a low-pressure pump situated in the fuel tank, feeding fuel towards the engine. Just like the non-Quattro A4, replacing the low pressure fuel pump is not overly difficult. If you are moderately handy, you can complete this without too much of an issue. It is very important to replace the fuel pump when you find it failing you, because allowing it to die has the distinct possibility of leaving you stranded at the most inopportune moment. If you believe getting the pump in and out may be too difficult, it just might be. If so, leave it to the professional. Be careful of the gas fumes and perform this task in a well ventilated area.

Materials Needed
- Phillips head screwdriver
- Nitrile gloves
- Eye protection
- Special fuel line pliers
- Small bucket
- Black Sharpie permanent marker
- Fuel tank wrench
Before you start this job, ensure you have less than 1/4 tank. The closer to empty you have it, the better. If it is over 1/4 tank of fuel, you will cause a fuel spill inside your passenger compartment due to how the tank is designed with the fuel pump location. To prevent any sparks or ignition sources, disconnect the battery. Also, it is highly recommended you change out the fuel filter whenever the pump is changed.
Step 1 – Remove rear seat bottom
On the front of the rear seat, at about the 1/4 and 3/4 points across the width, pull up firmly on the seat to release the connectors. If equipped with rear seat heaters, carefully lift the rear seat bottom up to find the wires and disconnect them from the seat bottom. Pull the seat bottom out of the car and set it aside to allow for easier access to the pump area.
Step 2 – Disconnect pump
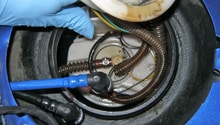
On the passenger side, find the pump cover where the back seat cushion would normally sit. Remove the three Phillips head screws and remove the plate. Find the pump assembly head as seen in Figure 2.
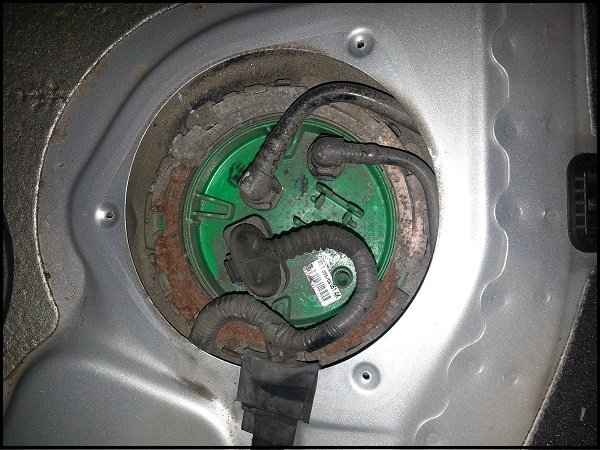
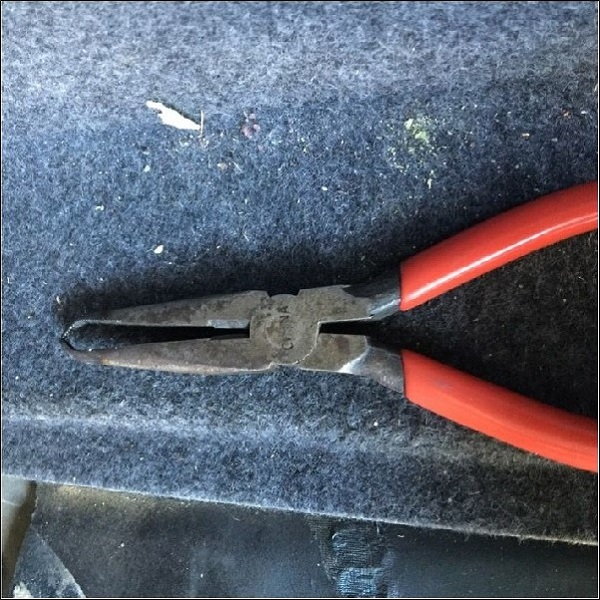
Find the fuel filter located in the front of the passenger side wheel well. Disconnect the fuel line to relieve the fuel line pressure. Use the bucket to collect the fuel, as it releases the pressure. Back inside the car, using compressed air and vacuum (or whatever you have at your disposal), clean the area around the fuel pump head as best as possible. Disconnect the power connector from the fuel pump head. Push down on the gas line fitting, then using a set of modified needle nose pliers (Figure 3) or some ninja skill with a couple of small flat tip screwdrivers, squeeze the side catches and then pull up on the fuel line to disconnect it from the fuel pump head. Disconnect both fuel lines.
Step 3 – Remove the pump
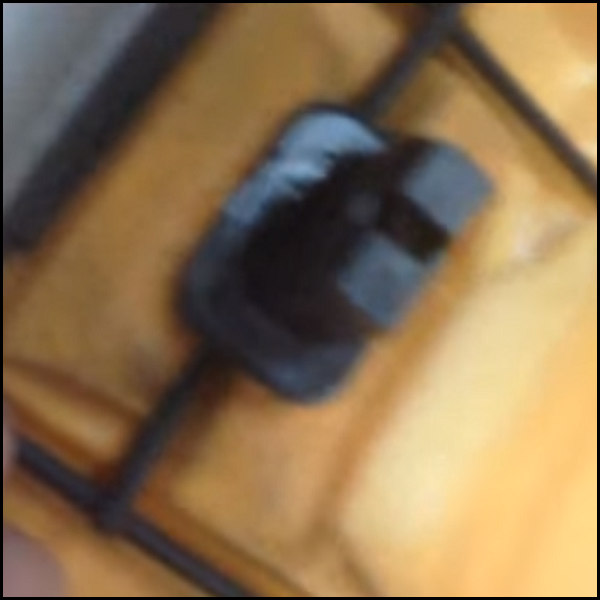
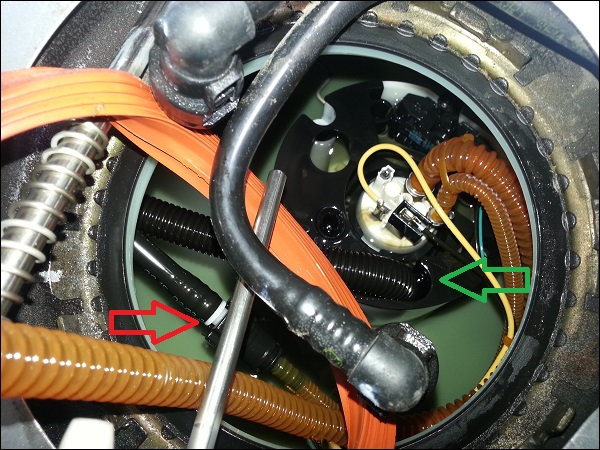
Using a Sharpie marker, clock the fuel pump ring by putting a mark on both it and the fuel tank. This will allow you to know what position it will sit when putting it back together. Using the fuel tank wrench, turn the fuel pump ring counterclockwise to release it from the tank and set it aside. Alternatively, you can use a flat tip screwdriver and a hammer to lightly tap the ring until it releases, alternately hitting the ring around on its notches until the ring releases. Pull up on the pump head slightly to reveal the rest of the pump, which resides in the tank. Before you can remove the lower pump assembly, you'll need to disconnect two more tubes, a thinner black line (red arrow in Figure 4) and a thicker ribbed line (green arrow). The thinner one is a push, squeeze, pull type disconnect. The thicker one just pulls out of the pump. Pull the rest of the pump out of the tank. Ensure you have the bucket nearby to put the pump into, so fuel spillage from the pump basket doesn't occur.
Step 4 – Install new pump
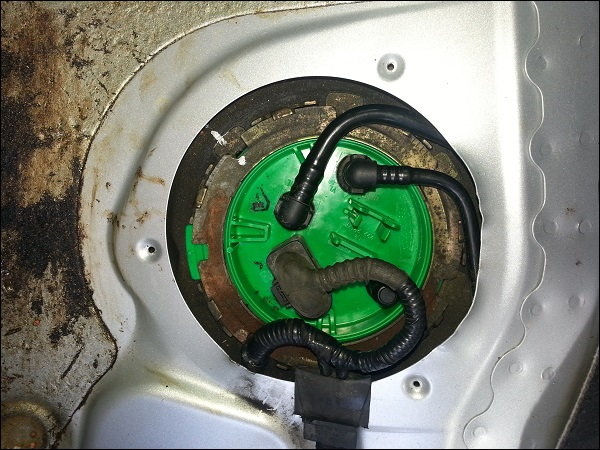
Place the lower portion of the fuel pump down into the fuel tank, leaving the upper portion off to the side. Be careful not to damage the fuel level sender or get it stuck somewhere, so it won't register once all is back together. Reconnect the two pipes inside the tank which you disconnected in Step 3 (green and red arrows in Figure 4). Ensure the top part of the fuel pump and the bottom part are firmly together. Maneuver the new tank gasket over the top of the fuel pump head and fit it to the fuel tank with the ribbed side up. Place the fuel pump head back into the hole and ensure it is secure on the seal. Place the fuel pump ring back on the fuel pump head, orienting it as you took it off. Tighten the ring down, so it is back into position. Reattach the two lines and wiring securely (Figure 5).
Step 5 – Start the car
Before installing the pump cover, prime the pump and fuel system. Reconnect the battery. Turn the key to the on position without trying to start it. You should hear the pump run briefly. Bump the starter by turning the key over to the start position just briefly without trying to start. You should hear the pump run again. Do this several times to ensure the pump is primed. Attempt to start the car. It may still take a little to get the system fully primed. Once started and there are no leaks or issues, reinstall the fuel cover plate. Reinstall the rear seat. Remember to reattach the rear seat heaters if so equipped.
Related Discussions
- Low Pressure Fuel Pump DIY Replacement - AudiWorld
- 2006 A4 2.0t Misfiring - AudiWorld
- A4 Has No Power Shuttering Down Road - AudiWorld