Audi A6 C5: How to Replace Transmission Control Module
When the drain for the battery tray becomes plugged, all it takes is a good rain storm for it to fill up with water and then a little drive will splash it down into the passenger side footwell. This can easily destroy the Transmission Control Module (TCM). Replacement is not difficult, so read on to understand how to replace it on your own.
This article applies to the Audi A6 C5 Platform (1998-2004) equipped with a Tiptronic automatic transmission.
The Transmission Control Module (TCM) is a computer which tells your transmission to shift, at what time and at what speed. It is a small box located under the carpet on the passenger side of the car. If this unit gets wet or goes bad, replacement is necessary, unless you are an electronics genius. Replacement is very straightforward and easily accomplished with even the most rudimentary of hand tools and DIY skills. Considering what it costs at a dealership, changing it out on your own is a no-brainer.

Materials Needed
- Screwdriver
- Small piece of 2 x 4 scrap wood
It is imperative the passenger side interior is completely dry before doing this repair. If it is still wet, the replacement module will run the risk of also being damaged. It doesn't make sense to replace it just to replace it again. There are several ways to get a replacement for the TCM; the easiest is on eBay buying a used one. When you do go to buy one, it goes without saying to purchase one which has a warranty from a known seller. There is also the option to purchase aftermarket modules, which also changes the performance (shifting) aspects of the transmission. Do your homework before you purchase to ensure you are getting what you actually want.
Step 1 – Remove passenger side kick panel
Move the passenger side seat all the way back. In the passenger side kick panel, remove the small tab along the bottom which hides the screw. Remove the screw from hole left by the removed tab. Remove the upper screw in the kick panel. Pull out slightly on the bottom of the kick panel, then pull down and away to remove it.
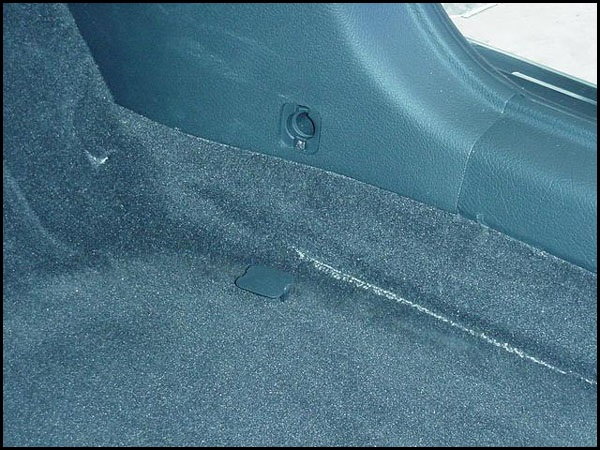
Step 2 – Remove carpet trim piece
On the plastic carpet trim piece, pull directly up starting towards the front of the car. There will be three clips holding it in place moving towards the B-pillar of the vehicle. Remove the piece and set it aside.

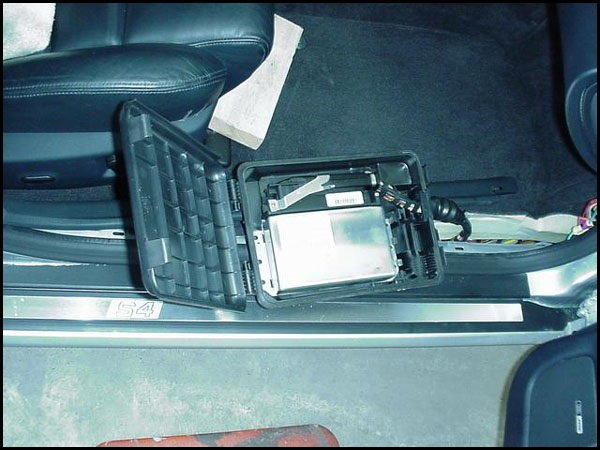
Step 3 – Remove TCM
From the front of the vehicle, lift the carpet, continuing back towards the seat. Place the small piece of 2 x 4 scrap wood between the carpet and the side of the footwell to help suspend the carpet, making it easier to retrieve the TCM. Looking under the carpet, the TCM should be easily found inside a black box. Remove the black box from its containment, pulling it out the side from under the carpet for easier access. Release the two clips on the wire side of the black box to open the lid. Inside, find the TCM (Figure 3). Pull the TCM and wiring from the black box. Pull the retaining clip up and over to release the connector from the TCM. Wiggle the connector free if needed.
Step 4 – Install replacement TCM
Connect the wiring harness connector to the new TCM, pulling the retaining clip back over to lock it into place. Place the TCM back into the protective black box, ensuring the wiring harness is placed back properly to help keep moisture and debris from entering inside. Place the black box back into its holder in the footwell. Place the carpet back into place. Snap the plastic carpet trim piece back into place, ensuring the carpet is captured underneath of it. Replace the kick panel using the two screws, then replace the small tab at the bottom.
Featured Videos: Flooded Audis and Transmission Problems
-
Water Leak, Transmission Not Shifting
-
Audi Flooded, Transmission in Limp Mode
Related Discussions
- Replacing Transmission Control Module - AudiWorld
- TCM Location A6 - AudiWorld
- TCM Question Please Help - AudiWorld
- Ouch CVT Transmission Needs New TCM Common Oroblem - AudiWorld
- Transmission Control Module - TCM - AudiWorld