Audi A6 C6: How to Remove Intake Manifold and Clean Carbon Deposits Off Valves
Carbon buildup on your intake is a common issue with these cars giving you rough idle, cold morning starts that shake, and decreased throttle response as well as poor mpg rates.
This article applies to the Audi A6 C6 (2005-2010).
Cleaning the carbon off the intake manifold is a fairly simple process on the Audi A6. This is a task, in fact, that should be included in your regular maintenance intervals. Periodical cleaning of these carbon deposits will go a long way in extending the life of your engine. This is a job that can be done in your own garage with your own free time. You may need up to a full day to really get at this and do a professional cleaning. The first part of the job will be done in about an hour and will tell you if you need to go in deeper.
A professional is going to charge you a pretty penny for this work, and it is all work that you can do on your own. If you know that you just won't have the time or are too queasy about really opening up your engine, then seek a qualified professional who is familiar with these engines and will do a good job for you. If you are ready to take it on, continue reading to learn how to get this job done.

Materials Needed
- Torque wrench
- Flat head screwdriver
- T20 and T30 Torx bit and driver
- Brake cleaner or carb cleaner
- Replacement injector O-rings and split ring seals
- Manifold gaskets
- Replacement PCV valve (recommended)
- Spline tool and crankshaft wrench (can be borrowed or rented)
- Zip ties
Step 1 – Depressurize the gas from the lines and rails
Your Audi has very high pressurized gas in the lines and in the rails. You would not normally have to worry about this if you knew that the intake was clean and didn't need tearing out to clean up. Since we do not know this yet, depressurizing the system now is much better than having to put her back together, and just do it right over again. If you have the Windows VCDS app, this is quite easy.
- Start your engine.
- Plug in the connection cable and then start the VCDS app.
- Choose the following path: Engine > Basic Settings > 140 for group > "ON".
- The pressurized indicator will drop to zero, then shut the engine off.
- Pull the fuel pump fuse.
- Attempt to start the car until it completely stalls.
- There may still be a little pressure in the line and a little gas, so take care when removing the rails and disconnecting the physical lines.
- If you do not have the VCDS app, just pull the fuel pump fuse, but there will still be a lot of gas in the lines and they will still be highly pressurized.
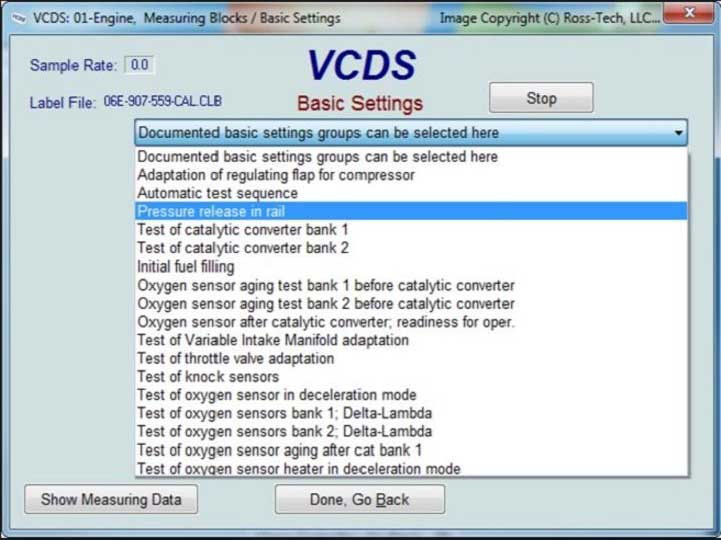
Figure 1. An example of the VCDS app. 
Figure 2. Don't forget to pull the fuel pump fuse.
Step 2 – Remove the engine covers and intake hose
Remove the front and rear engine covers. They just pop or pull right off. Set them aside. Remove the large intake hose by loosening or taking off the clamps on either end.
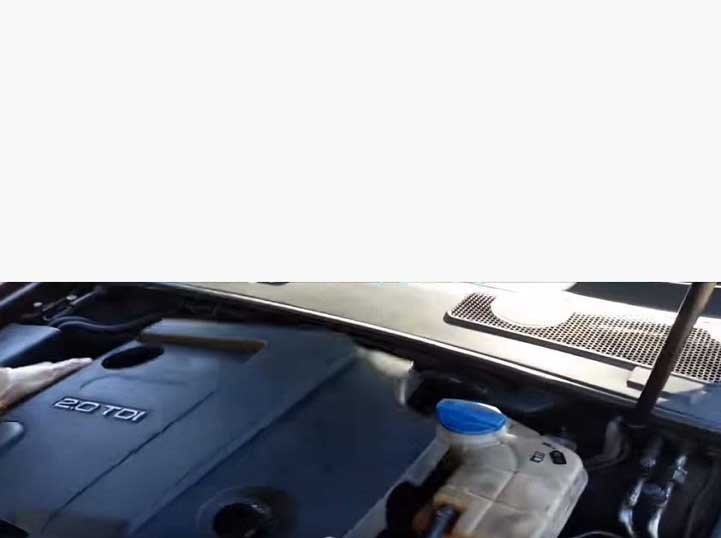
Figure 3. Remove engine covers, front and back. 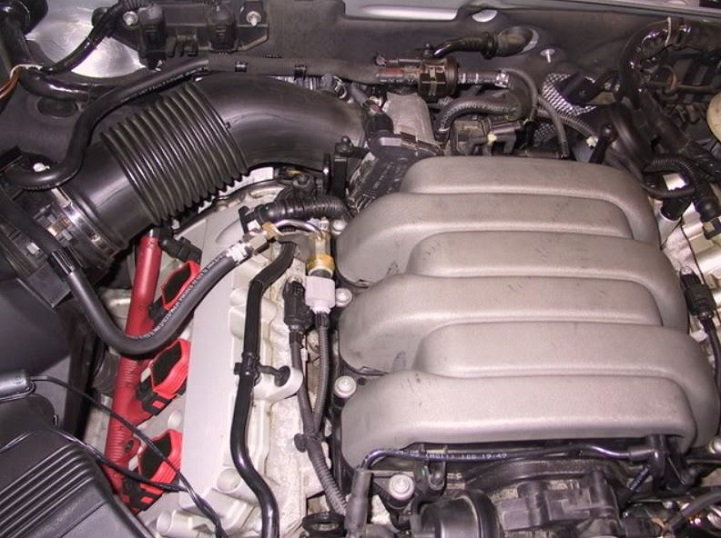
Figure 4. Remove the two hose clamps and pull the intake hose.
Step 3 – Remove vacuum hoses
There are several vacuum hoses to remove. They are all attached with small standard hose clamps.
- The brake booster vacuum hose is located on a bracket under the throttle body.
- Remove the other two vacuum hoses from the upper intake on the back side.
- Pull the five electrical connections apart.
- Disconnect the two smaller vacuum tubes.
- Un-clip the the wiring harnesses and push the mass of wires out of the way, preferably behind the oil filter.
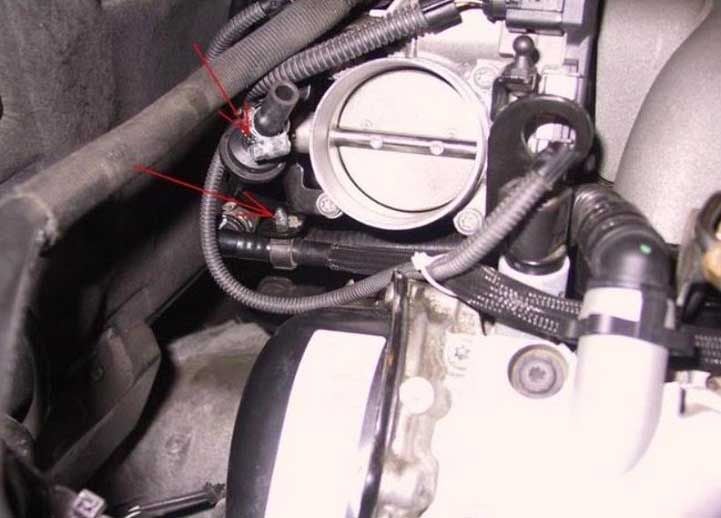
Figure 5. Remove the brake booster hose. 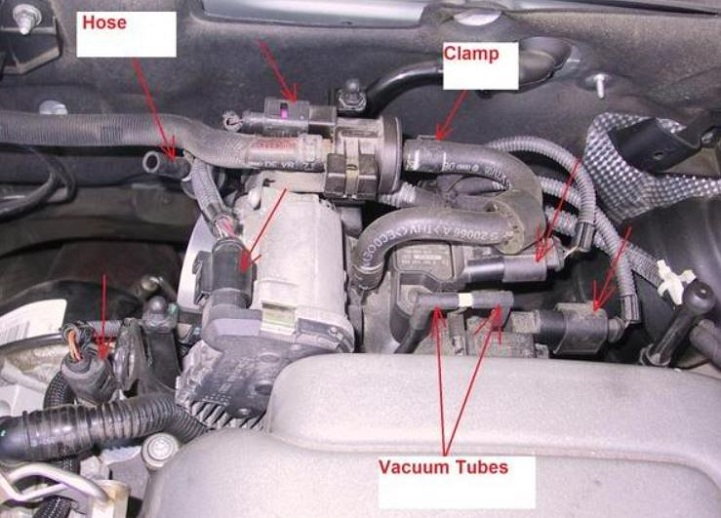
Figure 6. Remove the remaining vacuum hoses and electrical connections.
Step 4 – Remove hoses from the front of the upper intake
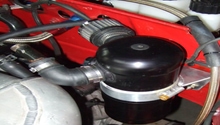
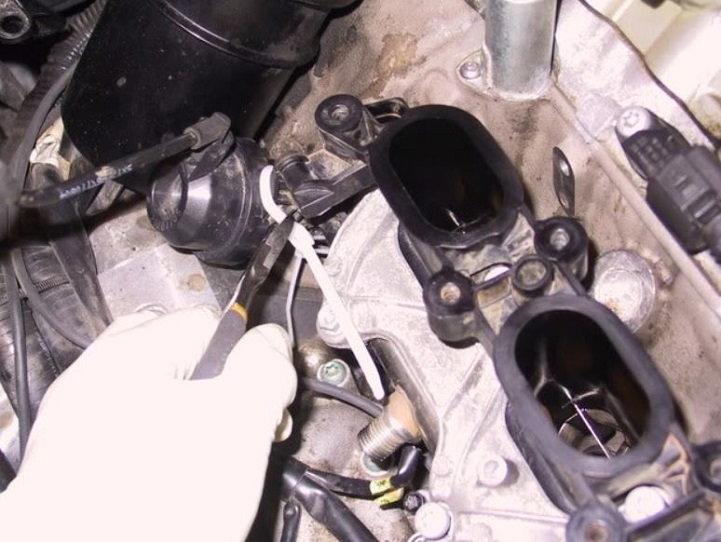
Move around to the front of the upper intake. There are two additional electrical connectors and a vacuum line that needs to be disconnected. You will also find the PCV valve bolted to the upper intake with a T20 Torx bit. Remove this and set the PCV valve aside. You may want to toss this PCV and replace with a new one, since you are here.
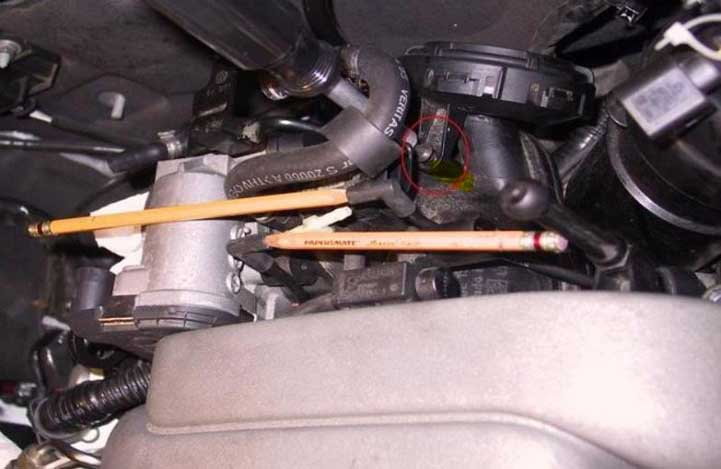
Figure 7. Remove the PCV valve. 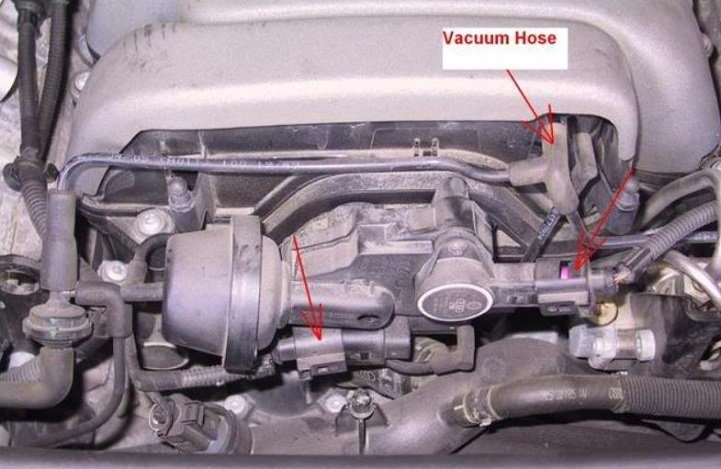
Figure 8. Remove the vacuum hose and the two wiring harnesses from the front of the upper intake.
Step 5 – Remove the upper intake from the lower
There are about a dozen T30 Torx bolts that marry the upper and the lower intake together. Remove these 12 bolts and pull the two halves apart. You will have to slide the intake to the rear in order to clear one of the vacuum lines. Lift the upper intake off the lower and set it aside.

Figure 9. Remove the T30 bolts and pull the upper intake from the lower. 
Figure 10 Upper intake removed.
Step 6 – Clean intake of carbon residue
The intake flaps need to be opened in order to get in and inspect or clean them up. There is an actuator rod that can be pulled on, which will manually open up the intake flaps for a good look inside. If you have carbon buildup in there, you'll want to give it a real good cleaning with some carb cleaner or brake cleaner. Use a toothbrush to get inside, both sides of the flaps, making sure to get the gunk out of any moving joints and pins.

Step 7 – Remove and clean the lower intake
This is where the job at hand starts getting a little more complex. You will need some special tools, particularly a spline tool set and a crankshaft wrench specifically made for Audi. You may be able to borrow or rent what you need from your local auto parts store, or pick them up online for relatively little cost.
- Use a 6mm and an 8mm Allen bit to remove the three Allen bolts that mount the engine lifting ring (entire bracket) from the side of the block at the left cylinder head on the fuel pump.
- Remove the seven T30 mounting bolts for the high and low pressure fuel lines.
- There are a couple more flare nuts holding the highly pressurized fuel line to the pump and to the rail. Remove those and the line can be set aside. Have a shop rag handy for any fuel spills or leakage and cover the exposed or open ports.
- Remove the five bolts and two nuts to get the lower intake up and out. It will take some wiggling; have another shop rag handy, as there will be a little more fuel leakage from the rails.
- Remove the intake splitters, the O-rings and split ring gaskets underneath them on the fuel injectors. Once the splitters are removed, you can get into the intake ports to clean out all that nasty carbon. Make sure the injectors are covered up while cleaning the ports.
- You will need a zip tie to hold open the flaps on the lower intake to get into the ports and get them cleaned up.
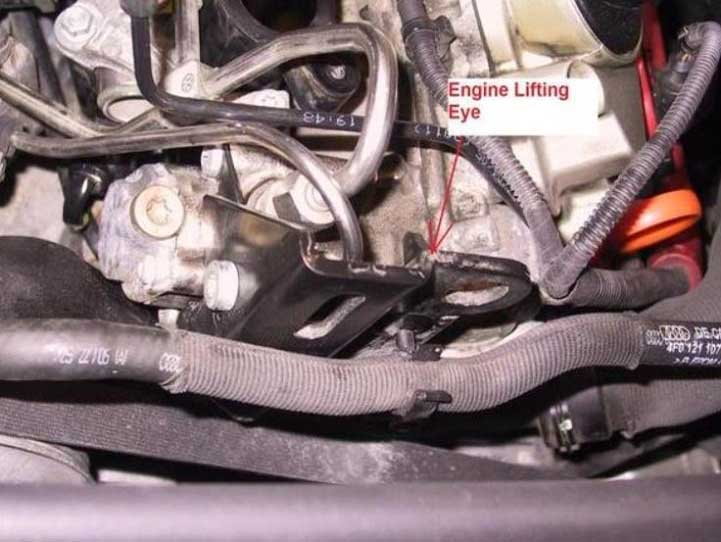
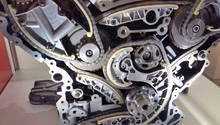
Figure 12. Remove this lifting bracket from the side of the left cylinder head to get it out of your way. 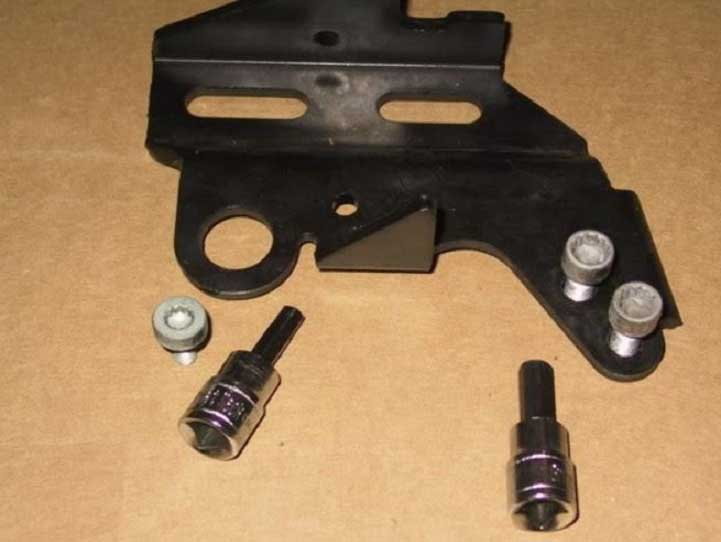
Figure 13. The "ring" is what you can see when mounted. It is actually an entire bracket. 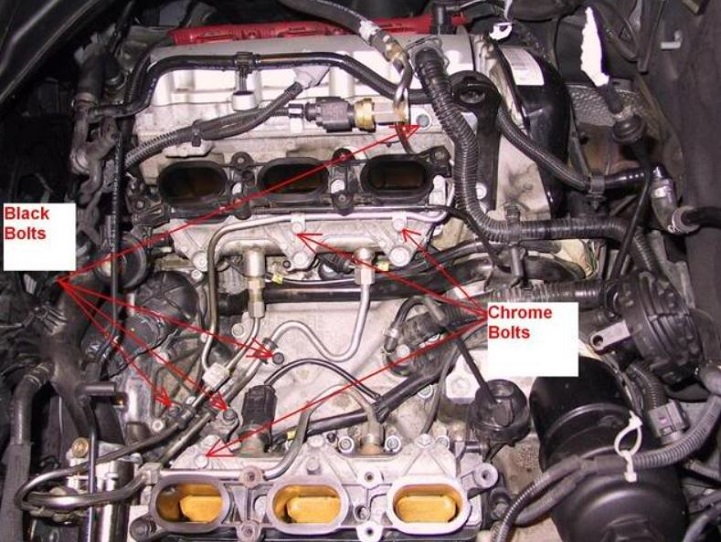
Figure 14. Remove the seven bolts mounting the pressurized lines to the lower intake. 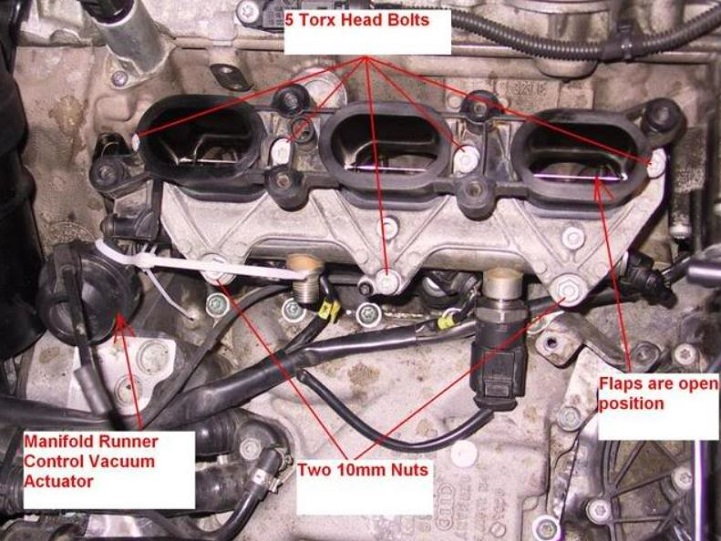
Figure 15. Remove the five bolts and two nuts, and work the lower manifold out for cleaning.
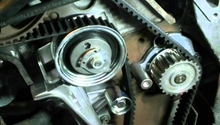
Step 8 – Clean your heads
In this step you will need a special tool to turn the crankshaft. Your engine does not have a crankshaft turning bolt in the center, so you will need to borrow or rent the tool specific to Audi.
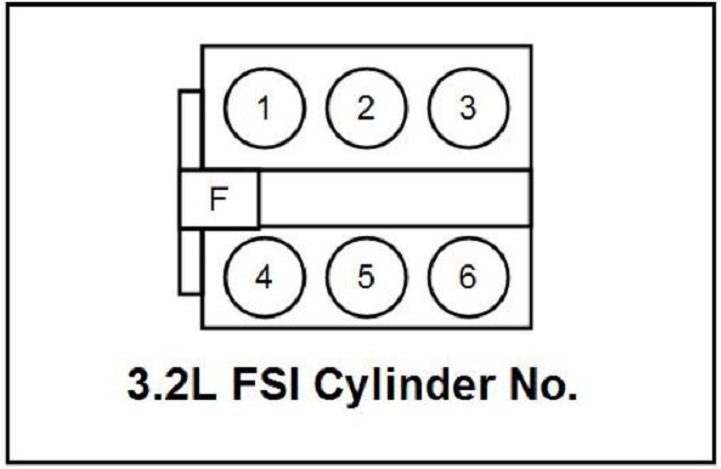
- Use the special tool to turn the crankshaft until valves for cylinders 1,2,5 and 6 are closed.
- Spray some brake cleaner or car cleaner and let it soak for a while.
- After soaking, clean up excess and chip away the carbon buildup with something strong and softer than metal to avoid damaging the heads.
- Turn the crankshaft to close cylinders 3 and 4, then repeat. You may have to perform this cleaning process several times to get all the buildup out of there.
Step 9 – Put her back together
Button her back up in basically the reverse order, but you need to replace your O-rings, spacers, seals and other items that were either not re-usable or damaged on the way out.
- Replace the split-ring seals and the O-rings on the injectors.
- When installing the lower intake, you will need to push down on it with a decent amount of pressure to get the bolts to bite.
- Torque the five bolts and two nuts on the lower intake to between 7-8 foot pounds.
- Make sure to remove the zip tie that is holding the flaps open.
- Install the low pressure fuel line and hand-tighten all the bolts, but the flange nuts must be torqued to about 18 foot pounds.
- Install the high pressure fuel line in the exact same manner and specs as the low pressure fuel line.
- Once the fuel lines are in place, lined up and installed correctly, go back and torque all the bolts (except the flange) to 7-8 foot pounds.
- Reinstall the engine lifting bracket.
- install the upper intake and take care to not get the two vacuum hoses stuck in the back. Replace the old seals with new ones while performing this task.
- Install a new O-ring on the PCV valve (unless you have replaced with a new PCV valve) and secure it with the T20 Torx bit.
- Reinstall the 12 screws on the upper manifold and torque them to 4-5 foot pounds.
- Reconnect all of your vacuum hoses and lines, electrical connectors and your large intake tube. Be sure to replace your hose clamps on either end
- Start her up and witness the joy of a job well done.
Featured Video: How to Remove Carbon Build Up
Related Discussions
- 3.2L FSI: How to Inspect and Clean Intake Manifold - AudiWorld
- Intake Manifold Removal Video - AudiWorld
- 3.2L FSI Surging at Light Throttle - AudiWorld
- Audi 3.2 FSI Write Ups - AudiWorld