Audi A6: How to Repair a Faulty Trunk Latch
A trunk lid that won't shut can be very frustrating. This article will show you how to fix a faulty trunk latch on the Audi A6.
This article applies to the Audi A6 C5/C6 (1998-2011).
Fewer car problems are more frustrating than a trunk lid that won't stay shut. The Audi A6 in particular has a problem with faulty trunk latches that just won't keep the lid shut. This problem frequently shows up during winter when the temperatures get colder. Lubricating the trunk latch will fix the problem, at least temporarily, but in many cases it's necessary to replace the latch entirely. Audi is aware of the trunk latch problem and has released an update to the trunk latch design. If your Audi A6 is still in warranty and has the trunk latch problem, then your local Audi dealer may replace the trunk latch for free. If not, then this article will cover a few things you can try to fix the trunk latch yourself.

Materials Needed
- Metal cleaner
- Towel or rag
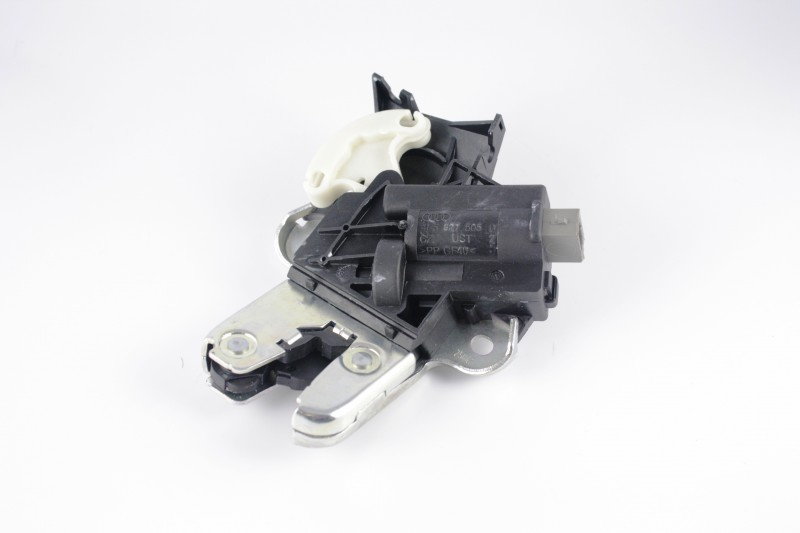
- Redesigned trunk latch (Part #4F5-827-505-D) (optional)
- Ratchet w/ 10 mm socket
- Lithium grease
- Plastic trim tool
- Flathead screwdriver
- Phillips screwdriver
Step 1 – Inspect and clean the latch
Open your trunk and inspect the upper deck latch by removing the plastic cover. If you notice any dirt or grime buildup, this could be what's preventing the latch from working properly. Clean the latch thoroughly with a simple metal cleaner and a rag.
Although it's not a permanent solution, if you've noticed that the latch only fails during cold weather, you can try applying lubricant to it. WD-40 is somewhat effective, but lithium grease tends to last a little longer. Lubricating the latch should be enough to help you get through the winter months.

Step 2 – Remove the trunk latch
If simply cleaning the upper deck latch did not resolve the issue, then removing the entire trunk latch is going to be important for diagnosing or replacing it. You'll first need to remove the trunk lining. There are two Phillips screws that need to be removed, one behind the emergency handle and another behind the plastic handle on the opposite side of the trunk. Go along the edge of the trunk and pry up the lining. The trunk lining is held down by a series of eight clips along the edges of the lining.
Once the trunk lining is removed you'll be able to access the trunk latch. Remove the two nuts holding the latch to the trunk, then pull it out. Disconnect the electrical connector. Then, pull and disconnect the lock cable attached to the trunk latch. Thoroughly inspect the latch for excessive wear, corrosion, or any other visible issues.
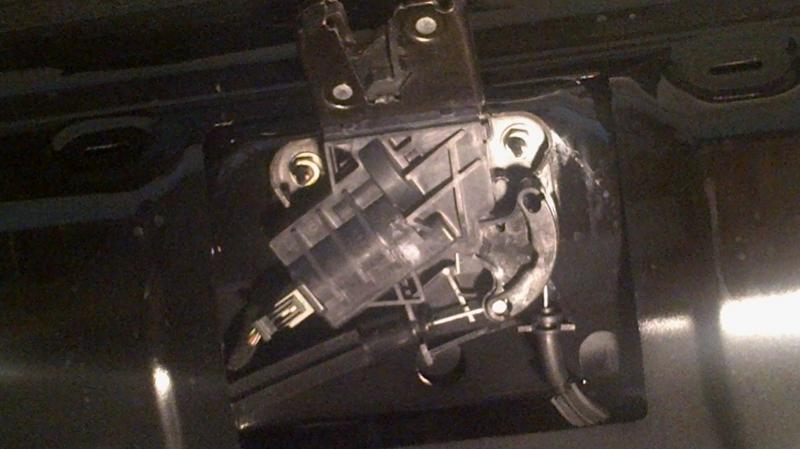
Pro Tip
Sometimes trunk latch problems can be caused by a loose electrical connection. If your trunk lid shuts, but you're still getting an error saying the trunk lid is open, this may be the cause of the problem.
Step 3 – Replace the trunk latch
The only real permanent solution is to replace the trunk latch with the redesigned latch. To do this, simply install the redesigned latch in the reverse order that you removed the old latch. Attach the lock cable. Plug in the electrical connector then fasten the latch to the trunk lid. Then, return the trunk lining. It's really simple, and it will work much better than the old latch did.
Related Discussions
- Trunk Latch Problem - AudiWorld.com
- Trunk Latch Not Working - AudiWorld.com
- Trunk Latch and Driver's Side Tail Light Fix - AudiWorld.com
- Trunk Latch - AudiWorld.com