|
|
Ok here's my take on installing a Lidatek LE-30 (single transponder) in my '01 A6 2.7T. Of course, all of the usual disclaimers apply and I can't be held responsible for you breaking your car, burning it up, etc. I have tried to give credit to every AW-er with relevant posts, but I'm sure that I left a few out. The pictures aren't great, but they'll give you an idea. If you need more details, I have them all at 2x the resolution and some rejects too. I did this project at a relaxed pace of 12 hours over 3 days, there's no reason why it can't be done in one day. So here goes: Pour yourself a frosty pint of Newcastle (ala Chipchase) and start doing some planning. Send girlfriend to store for another half-dozen pints. Begin by removing the plenum chamber cover (back of engine bay, over the battery) by pulling off the weather stripping and lifting off the cover. This is a great time to shop-vac out the leaves and pine needles, and get a good look at your pollen filter...  Locate the grommet to the right of the master cylinder. This is where I chose to route my transponder cable through the firewall. There is another grommet visible from the cabin side, but I think it's behind the battery and I'm just lazy. The grommet has a little nipple in the middle that I just snipped off with a pair of diagonal cutters. This pic shows the grommet with the wire already started. (white arrow)  and here's the view from inside the cabin, after removing the knee bolster. (red arrow)  I was lucky enough to find a 3/8" piece of PTFE tubing in the garage which made for a slick and easy pull through the grommet. Once I got the tubing through, I just stuck the molex connector end of the transponder cable in the tubing and pulled it into the cabin. Quick and easy routing.  Instructions for removing the knee bolster can be found by clicking here. Begin planning your transponder location, doing your best to stay close to the license plate and centerline of the car. I've chosen a location low in the grille, just to the right of the rings.  Configure your Lidatek Erector set brackets to hold your transponder in the position you have chosen. I used some green electrical tape and zip ties until I was happy with the final location, then I took a couple of swigs, a deep breath and fired in a few 1/2" self-drilling/ self-tapping screws.  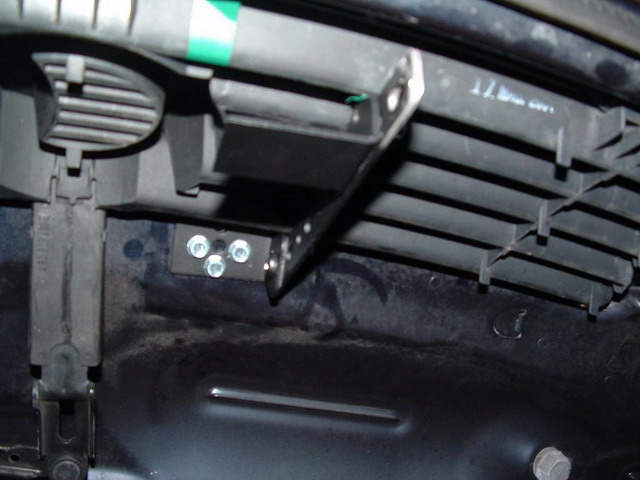 For my installation, I had to cut a few pieces of the supplied bracketry so before I put everything together with copious amounts of Loctite, I gave everything (including the bolt heads) a good coat of chassis-black paint. I stuck the Transponder unit onto the bracket with the supplied tape, but I took an extra few minutes to clean both sides with alcohol and hit them with a heat gun to ensure proper adhesion. After building the bracket, I checked the alignment of the transponder with my marks one last time, then went to town on the backside of one of the horizontal members of the grille. This was necessary to expose the transponder at the right depth. I eventually had to make the cut a little wider than I had initially planned in order to aim the transponder straight ahead. This is a case where a little better planning would have made for a neater job, but it's still not bad.  For the interior, I chose to use the power taps and common grounds under the dash. 75X is the post which comes on with the ignition key and can be found in NSX JR's post here You may choose to mount your switch and LED wherever you like it. You can change the illumination of the Lidatek LED to constant red with a green flash (as opposed to constant green) by simply reversing the wires in the connector. I went a little further and built a custom switch, complete with illumination, and mounted it in the empty hole next to the ESP switch. On a side note... while my car was in for service some a$$hole at my local dealership was undoubtedly investigating my creation and broke it. If you're reading this, you know who you are. Way to own up to it buddy... How long did you think your electrical tape repair would hold? Switch #2 will soon be reated, just waiting on parts.  After you've done your preliminary wiring, it's time to test fire the beast before you button everything up. If you've got all of the right beeps and flashes (according to your Lidatek instructions), go ahead and clean things up. I chose to route my transponder wires under the hood liner and through the wiring cover at bottom/back of the hood, then give things a little of the factory look with some split loom that I had laying around. The bulge in the split loom inside the white circle is where my transponder connection is made, and the red circle/ arrow shows where the wire was routed.  I did have to dremel out a small area of the wiring cover to allow the transponder cable to pass through  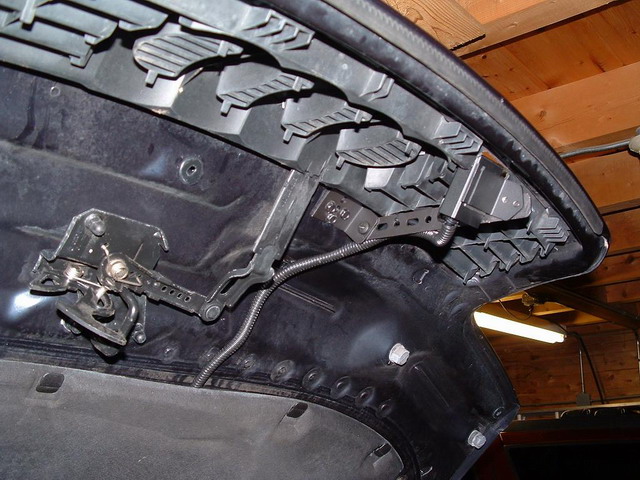 One more round of leveling and everything seems to be good. I even had a friend hold the level with my fat ass in the car, thankfully it didn't really change.  |
|
Advertising |
Contact Us |
Cookie Policy |
Privacy Statement |
Terms of Service |
Do Not Sell My Personal Information
© 2020 MH Sub I, LLC dba Internet Brands |