|
|
Last year I tried but failed to get the warning to go away. So I drove the whole summer with a red air bag warning lit. The problem is you are not 100% sure if the air bag system will work properly when the light is on. OK so let's back track to last year and my initial go at it. When you unbolt the seat (4 bolts) from the chassis, it comes out complete with its rails attached to it. You can move it back quite a bit to make room to get access to the seat's wire harness that is connected to the car in the floor. You will have to pop open the trap door and unclip the main harness. You can see the plastic cover (open) and the seat's main harness (to the right). The harness splits up into many wires that connect to four individual connector boxes. The first one to the left of the picture in a yellow color is the main air bag connection. The second one is red in color and the third one is green followed by the fourth in black. These last three have their own function in the operation of the seat but I'm not sure exactly what they are (not for now at least).  Remove the plastic cover, unclip the main harness from the floor and then unclip each individual connector.  Now here comes some of the tricky stuff. We need to fool the air bag system into thinking it is still plugged in to the OEM seat. To do this we need to buy an air bag connector (yellow one) from Audi. Then we have to insert a resistance into it to make believe to the air bag system the seat is still there. However, the problem is to find the right resistance. Since we are fooling around with a safety device that is there to potentially save your life, I wanted to get it right. I was lucky enough to have a buddy that works as a top notch Audi tech at the dealer I deal with. He showed me the resistance he used to test the system and lent it to me so that I could go shop around for one. The problem is no electronic shop at it. I even called some big time shops in the USA (Fry?) with no luck. The problem is when I went to a specialist and showed him the resistance; he told me that it was one of "precision type" with tolerances of better than 1%. Most shops carry at best the 3% type so I was told. So when I told my buddy this he basically turned his back and said softly "keep it, I'll get another one". Needless to say I left it at that and went on my way. OK, OK enough story telling but I just wanted you guys to know about the "precision thing". Perhaps a resistance with a 3% tolerance would work fine too but I did not want to take a chance. So here we have the yellow connector that actually comes in several pieces that you have to assemble and that precision resistance.  Back home I rushed to insert my new found friend into its proper receptacle. I plug in the Vag Com, select "Air Bag", turn on the ignition et voila! Oh sh!t what's this? The red air bag light is on! What is wrong? What did I screw up? So I take my home made plug out and reconnect the OEM seat with all its connectors, clear the fault with the Vag Com and retry. Great everything is fine. This time I decide to reinstall my Home made Yellow air bag plug and keep all the other OEM seat connectors plugged in and see what comes up. Great the system works fine and that means my home made plug works too. I the decide to pull out the remaining three plugs one at the time and bingo one of them triggers the red air bag light. 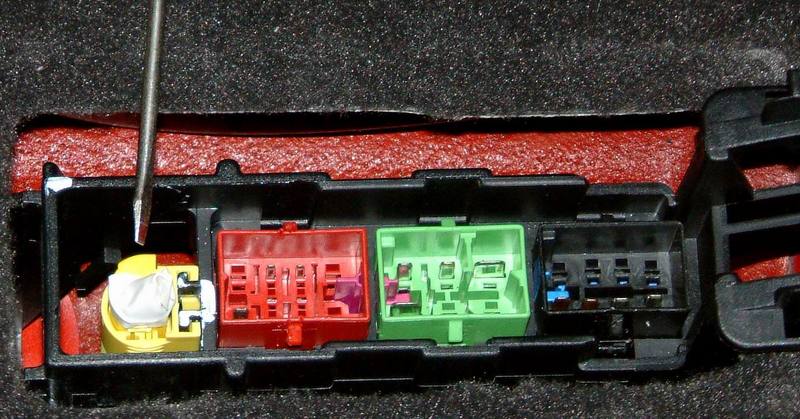 The culprit is the last connector, the black one. After taking a look at it I see it's got four wires to it. One blue, one yellow, one green and one brown. I trace them back through the main harness to the seat's belt buckle, the one on the inner one, the one between the seat and the driveline tunnel, the female buckle. Some how Audi as designed the air bag system on the B6 to include the safety belt system as part of the overall system. I tried to loop the system but finally gave up on it. That was last year.  Fast forward to yesterday morning when I decided along with a friend to tackle this problem once and for all. Here's that seat belt buckle I'm talking about. I need to remove it from the seat because I need to install it with the race seat.  Here's a close up view of that belt's harness. All four wires match the ones from the connector that plug in to he floor.  So I bought what is essentially the male connector (black) so that I can as I did with the main air bag connector (yellow) fool the system once again. Once again the male connector comes in two pieces. To make one complete unit you have to assemble it. The next two pictures show this. Two halves make a ...  ... A complete unit, the black connector.  So the testing started. We found out that Audi had wired the seat to be an integral part of the air bag system. Because all the four wires ran to the inboard seat belt buckle, it needed the outboard one to be connected or latched into the female buckle to close the circuit. The blue and yellow wires were responsible for the red air bag light and the chime (more on this later). The other two wires, the green and brown are most likely responsible for the in seat air bag and the seat belt pre-tensioning system, the one that controls the explosive charge to real in the belt tightly towards you in case of a severe accident. So after taking some measurements with an Ohm meter, it was decided a 100 ohms resistance was required in line between the blue and yellow wires. So our testing proved conclusive. Not only did the red air bag light not come on but the "dreaded seat belt chime" is now gone because we have now permanently closed the circuit as if the belt was buckled all the time, an unexpected bonus. Because the system is fooled into thinking the seat airbag is still there and functioning properly and that the seat belt is buckled, the seat belt pre-tensioning system should work normally too. Here's a picture of the black connector with the 100 ohms resistance.  After the testing it was time to finish up the job with a permanent installation. Here we secured the main air bag connector (yellow) and covered it with black tape.  Same thing was done with the black or seat connector.  And finally an overview shot.  NOTE: I'll have to get back to you perhaps tomorrow on the exact values of the two resistances used. I'm not sure I took down all the proper notes and I have to confirm some things with my friend and my Audi tech buddy. DISCLAIMER: I feel what I have done here is safe. However it is a major modification to a safety system built to protect you in case of an accident. If you attempt this on your own on your car, in no way am I responsible if you encounter some problems or if you have an accident and the system fails to protect you adequately. You are on your own. |
|
Advertising |
Contact Us |
Cookie Policy |
Privacy Statement |
Terms of Service |
Do Not Sell My Personal Information
© 2020 MH Sub I, LLC dba Internet Brands |