|
|
Does your climate control head unit not seem to be doing anything? If you push the buttons, nothing happens? Or, you can see the display, but the backlighting is not working? This how-to will help you get things working again. The fix for the inactive display is pretty invasive, so be warned. If you are not reasonably good at soldering on circut boards, find a friend who is. This will apply to 1996 and possibly 1997 Audi A4, possibly A6 models. Step one is to remove the radio. If you have an aftermarket radio, you should be able to just remove the trim plate, and unscrew the big wood trim plate. If you have the stock radio, you will NOT want to disconnect the harnesses unless you have the code handy. It is not really necessary to remove the harness anyway, as you should be able to slip the big trim over the radio and set it off to the side. *NOTE* removing the stock radio requires special tools. You can get them at 'better' stereo shops, and at many VW/Audi Dealers. You insert them in the little slots in the radio, and pull the radio out using the tools as handles. Once you get the trim off, you need to remove the CC head unit. There are 2 6mm Allens holding it in.
Now comes the moment of truth. You have the circut board free, and you can re-solder the ribbon cable socket. In the image I circled the points you will want to re-solder. Use care here. Its a good idea to check for continuity on all of the various contacts throughout the board. Use a multimeter set on continuity check, and check between the contacts for the switches, and the ribbon cable studs. (NOTE, in the picture, I pointed to 2 contacts, there are more than 2, obviously. Under each of the little rubber buttons is a contact.) When you pull the CC head unit out, unclip the harness connectors (4 of them) from the back of the Head Unit. Keep in mind their order, though it would be pretty hard to get them back in the wrong order.  At this point, if you only have a burned out bulb, you can replace it (them). As you can see in this image, the 4 colored screw looking things are the bulbs. Use a flat tip screwdriver to remove the offending bulb. The inner 2 are for the display lighting, the outer 2 are for the lighting when the dash lights are switched on.  If you have an inactive panel, you will need to take out the 3 screws from the back. You can see the top 2 screws in the above picture, and there is a 3rd on the other side. Once the screws are out, you can pull the face off. It's a good idea to hold it with the bottom up, so you can unclip the ribbon cable from the face. Use extreme care here, you don't want to break things worse than they already are. 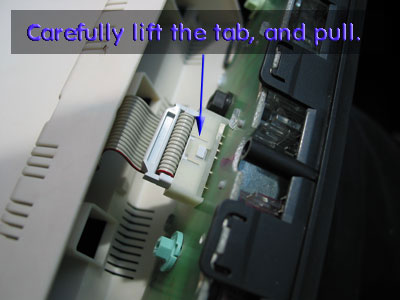 Now comes the hard part. There are 4 tabs on the bottom, and 2 tabs on the top. It is VERY important when you are pulling the face off to keep the buttons facing DOWN. Once you get the board free of the front panel, the buttons and light conduits will be free to fall out all over the place. You have been warned. Luckily it's not too hard to get it all back together if you do happen to tip the face plate the wrong way (ask me how I know!)  
|
|
Advertising |
Contact Us |
Cookie Policy |
Privacy Statement |
Terms of Service |
Do Not Sell My Personal Information
© 2020 MH Sub I, LLC dba Internet Brands |
