| Tech Article Title |
Author |
Date
|
| OEM Bluetooth Install |
Boston Driver |
2007 |
I know, I am a well-known critic of the OEM bluetooth setup, but I had to try it out to see what all the fuss is about. I still think Motorola HF850 bluetooth hands-free kit is a great solution for bluetooth, but converted to OEM anyway...It rates pretty high on the gadget scale, and has some nice features that only the OEM setup will provide.
Bye-bye to this...

And hello to this...

Background
My major complaint about the OEM setup is the cost, and although the features are nice, I still think the components are too expensive (although we DO drive expensive cars anyway, right?). I do not necessarily think the added features are worth the extra $$$, but that is just my opinion. Despite my reluctance based on cost, I still watched the various classified sections and finally found a complete setup for what I considered a bit more affordable. After my install, I will admit that I like it, but I still think it is too expensive when compared to other very affordable and functional solutions. I have actually lost some functionality that I will really miss, more on that later (I'll have a complete list of what I perceive as advantages and disadvantages at the end of this post).
For anyone wishing to do an install, it is really not that hard. Of course, I decided to make it more difficult for myself by building new customer wiring harness (similar to what TeddyBGame does for his customers on the NavPlus forum). The custom harness was becuase I was tired of using in-line wire taps to make connections. They work, but they are bulky, and if I wanted to remove anything, I would ahve to patch a wire. In addition, I was also connecting my multi-media adaptor for my DVD player which plays movies on the RNS-E, and that adaptor, like the OEM BT moduel, taps into the CANBUS wires...so two sets of other wires tapping into the same setup.
The new harness has longer wires, which makes it much easier to slide the unit into place without the connector blocks getting in the way. The longer wires allow me to tuck the connector blocks in the space behind the climate control.
Custom RNS-E Harness
Here is a picture of my original wiring harness before surgery:
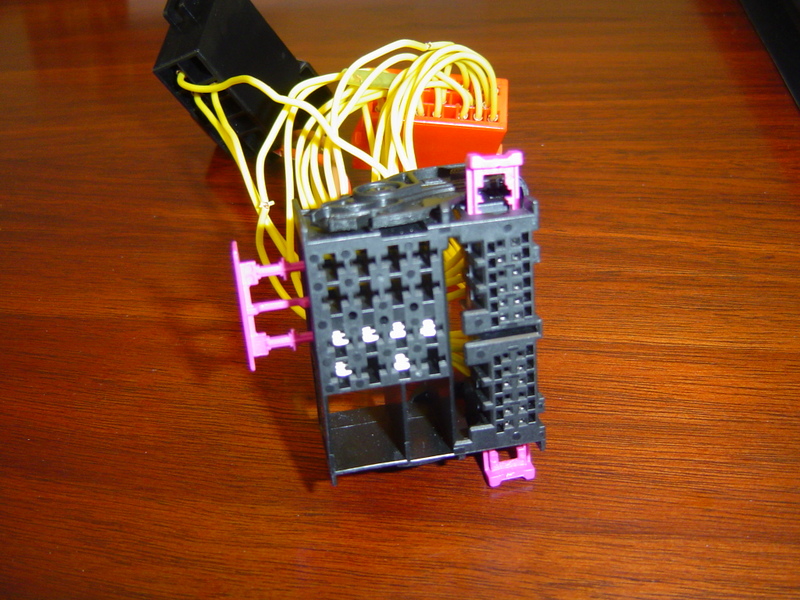
I decided to take this harness apart and use the connector blocks, since many of the normal sources (like europarts.us) were out of stock at the time. I removed the locking tabs on the RNS-E adaptor:
Although it was not that hard (I have a set of the pin extracting tools pictured below), a couple of safety pins or a small jeweler's screwdriver will work with a bit of patience. I have no patience. Here are the tools that basically depress the little fins that lock the pins into place.

Once those fins are depressed with the tool, the pins can slide out of the housing.

Once the wiring harness was apart, I bought a few sets of pins and repair wires for my harness. The OEM repair wires were long enough that I could cut it in half and have two wires, each with one end having the appropriate connector, and the other end bare onto which I could crimp a new pin for the appropriate connection:
Here is one of the repair wires:

...and the pins:

I also spent a LOT of time studying NSX_JR's RNS-E adaptor chart over and over again, and came up with a custom configuration that allows me to connect the OEM bluetooth and the multi-media adaptor to the RNS-E adaptor with plug-in type connectors. No more "splicing" or "tapping" as I had done in the past. This way, if I need to reverse anything, I will not have to replace any wires, but simply unplug the peripheral device. Anyway, I will update this post later with my wiring chart, but it was pretty much the same as the one done by NSX_JR except I connected up to three wires to a single pin.
Here was my pile of wires ready to make all the connections between the RNS-E connector and the ones from the car.

Here are the connectors that I used, courtesy of the local DIY electronics shop nearby. They are mini-plug connectors, and although have different pins than the OEM pins, they use the same pin extraction tool that I have for the Audi pins.

Once I checked and double checked everything, I finished making the harness.
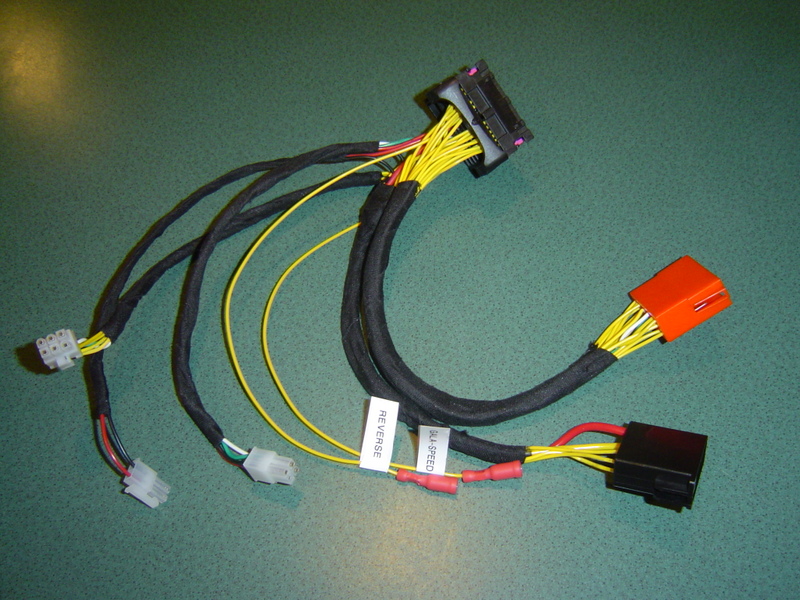
I found a roll of cloth tape that worked very well for making the harness very OEM-like, cloth hockey tape at the local sports shop. Not as "sticky" as the OEM stuff, but very good for this application.

BT Component Installation
Once the harness was done, the easy part was the installation and making all the connections. Here are a few pictures of the BT components:
The module [part# 8P0-862-335-G, est. $440 retail] (playing card used for scale):

The matching black dome light, BT antenna [part# 8P0-035-503-E, est. $25 retail], and the BT microphone [part# 8L1-862-373-A, est. $175 retail] (snapped into the wrong side...I moved it to the other side prior to the installation):


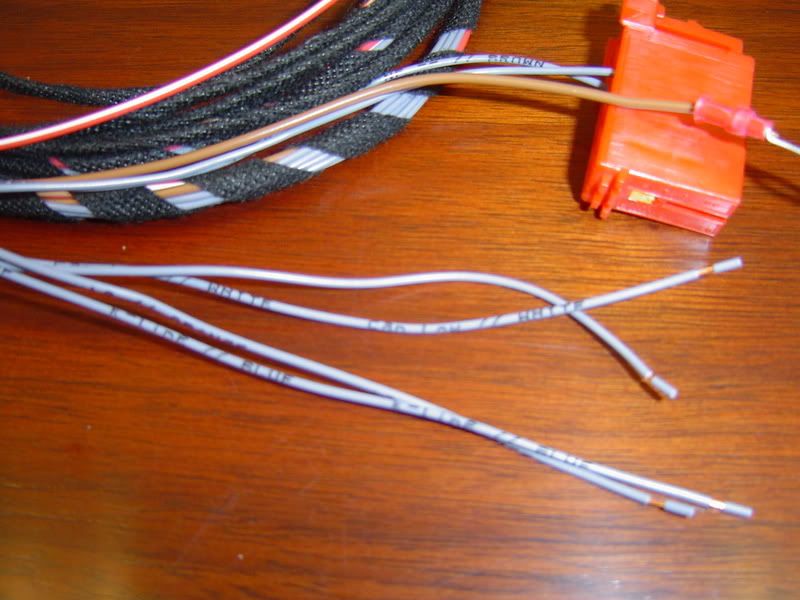
The BT harness (I think from Kufatec, it came with my kit):
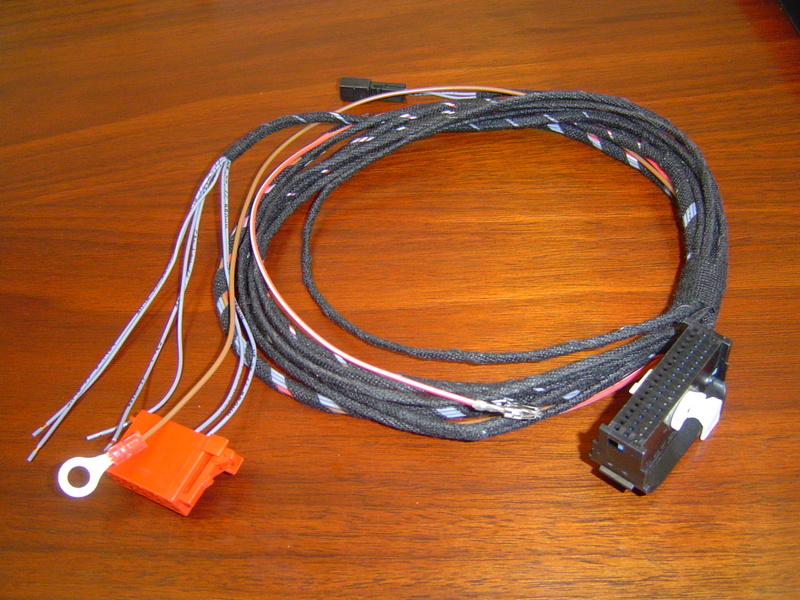
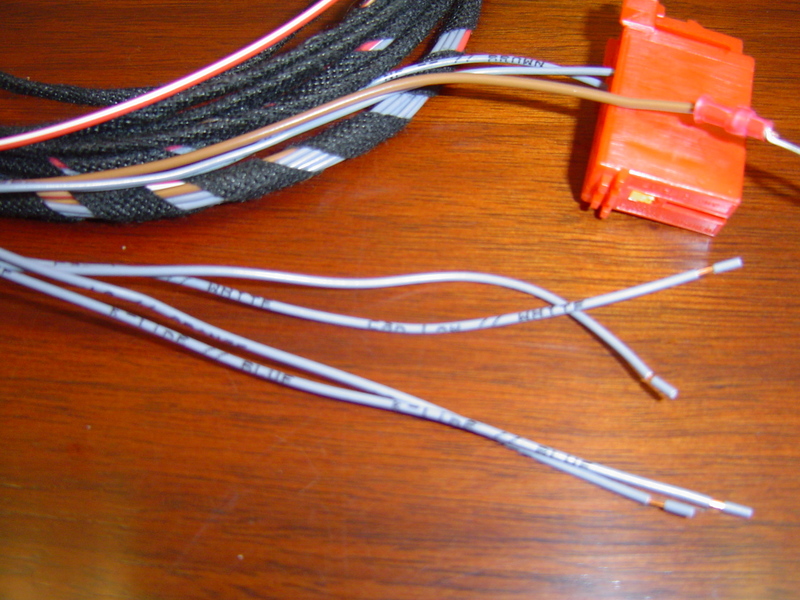
Here is a close-up of the BT harness that will be changed to accept the male end of the custom connectors used earlier (but the male end accepts the female pins). You can barely make out the writing on the wires for CAN LOW // WHITE, K-LINE // BLUE (they are all marked):
The harness is also desinged to run to the fuse box and the central ground pin under the dash. However, I decided to cut the power and ground wires and connect those directly to the RNS-E harness. Pin 16 in connector block D of the RNS-E connector is unoccupied (refer to NSX JR's PDF guide again), and provides battery power out and the ground wire is connected to the other main ground pins in the harness (I also used this pin for power to the multi-media adaptor for the DVD player).
As far as the module, I found many installation posts talk about placing the module under the passenger seat, but most of those posts were for the A4 platform. TeddyBGame mentioned that the RS6 location of the OEM OnStar module is against the firewall, and under the carpet on the passenger side. I did not like either location, especially since my car encountered the "wet carpet" syndrome when the battery tray drain got clogged last summer, a common ailment for the C5 platform cars (A6/S6/allroad/RS6).
I decided to use the location behind the glovebox for the module, which was currently occupied by the video adaptor for my DVD player. I removed the glovebox by removing five 8mm bolts. Three are here along the upper edge once the door is open:

And one each in the lower corners (sorry for the bad picture, but can see the holes where the bolts are located):
LOWER LEFT

LOWER RIGHT

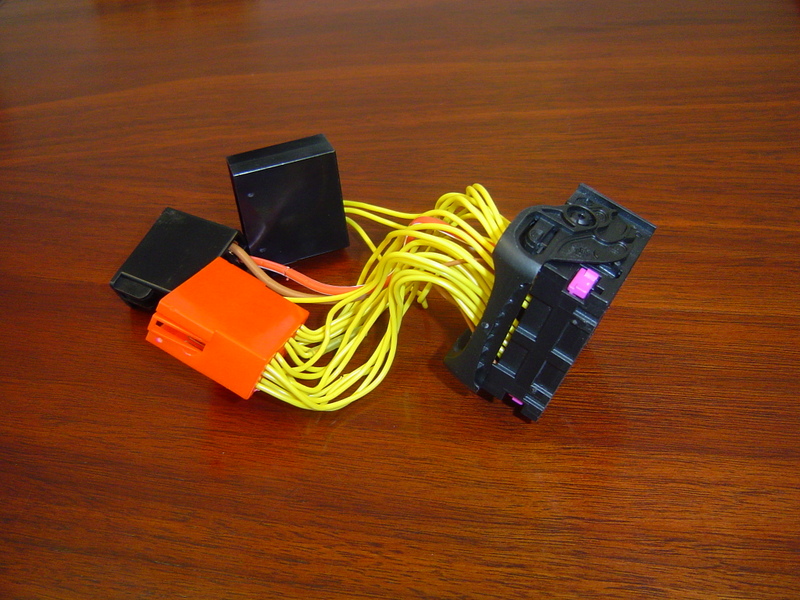
Once the glovebox was out, I removed the multimedia adaptor from the back surface of the glovebox. I never did like that location for the multimedia adaptor, so this was a good thing, if anything, to clean up my prior installation. I removed all this stuff from the glovebox (except for the GALA switch with the orange wires for video in motion)

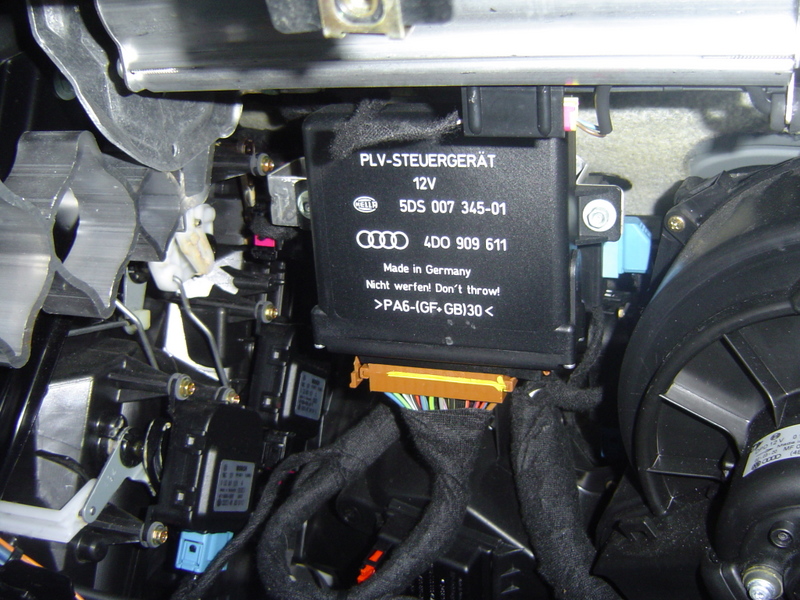
However, the BT module is a bit larger than the multimedia adaptor that was previously in that location. Anything bigger, and the control unit for the power tilt/telescope steering wheel) is kind of in the way:
I removed the control unit from the bracket, and decided to invert the module, similar to what NSX_JR does to make room for a glovebox mounted DVD player. The bracket has all that extra room, but the module mounting tabs have these annoying little wedges:

I cut the wedges down with the Dremel so the mounting tabs are now flat, and allow me to install the module in the bracket inverted (letters facing inward). Once the control module was reinstalled in the bracket, I did a test fit of the BT module mounted onto the inverted control module as you can see, there is enough room for the BT antenna (upper left of the module) and the wiring connector (lower left). You can also se the little black mounting tabs from the control unit underneath:

Note: According to NSX_JR, the OEM BT module will actually fit UNDER the steering column control module, within the raised braket, and secured into place with the steering column module itself. No need to alter the module and invert it in the bracket. I have not confirmed this on my own setup, but I have no reason to doubt this advice from NSX_JR.
Anyway, once I confirmed that the BT module fit perfectly under there, I pulled the lower dash panel to remove all the Motorola BT kits hardware, pulled the A-pillar to run the new microphone wire to the dome light, finished making all the connections to my custom harness.
Harness plugged in and the connector run behind the radio:

I had to do a few things with the VAG COM, such as coding the BT module, the steering wheel for radio and telephone, and the instrument cluster. Once everything was done, voila! Called a fellow AWer to test things out...

...and I guess we talked for a LONG time, eh?
...Yeah, I know, the car is dusty...I am ashamed...
So after playing around with some of the features, here is a list of my likes and dislikes of the OEM BT kit:
Likes
1) Integration - Very slick integration with the car and the RNS-E. When a call is placed, I can see the number on the instrument cluster, and the name (if stored in the phonebook of the handset or the BT kit). I love the fact that everything is hidden from view. You would not know that there is anything installed unless you saw the microphone grille up by the dome light.
2) Steering wheel buttons - I can now place and answer calls without removing my hand from the steering wheel. The lower left (currently the (<) button but should be the (R/T)button) activates my phone's stored names, and I can then use the (v) or (^) arrows on the left to scroll the listings. If I hold the button, it skips by first letter of the listing, so I can jump quickly to the B's if I have a lot of A's lited in the phone book. Once I find the number I want to dial, I press the lower right button to dial (currently the (>) button but should be the little phone icon).
3) Caller ID - Often, I answer a call in the car without knowing who is calling. Not a huge issue sinci I could just have the handset sitting somewhere where I can reach it. However, having caller ID on the instrument cluster is a neat feature, adn the phone can stay in my pocket for the entire ride.
4) Volume control - I can use the (^) and (v) on the right to increase or decrease the volume of the phone conversation. Previous Motorola BT kit had volume control, but it made this annoying beep when adjusting volume, even during a phone call.
5) Voice Tags - Voice tags are pretty cool, but this is also listed below as a disadvantage as well. The advantage of the voice tags is that you can dial by name, and that you the BT module actually stores a "tag" (i.e. - recording) of your voice. It can either be tagged to a number in your handset's phone book, or tagged to a sepeate number self-contained with the BT module. Simple process of pressing the lower right button to access the voice dialing menu, and very accurate selection of the phone number you want to dial. Kind of neat, although not stored in the phone. I can simply press the voice-dial button on the steering wheel (lower right) and say commands. For example, if I say "select name," BT lady says "please say the name," I say "Dave Press work," my voice tag is played for confirmation, then I just say "dial" and BT lady says "the number is being dialed. Pretty slick!
6) Cleaner wiring - Even if I did not pursue the custom harness, the OEM wiring under the lower dash is much cleaner, even if I had not tapped my custom adaptor for power and ground. The microphone wire has to run through the lower dash anyway to get up by the dome light:
BEFORE:

AFTER:

Thick black cable is the shielded video cable, and the thick blue cable is the shielded audio cable for the DVD player. You can see the new location for the multimedia adaptor (on the right side of the AFTER picture) where the yellow video wire plugs into the module. The other wires are for the passport remote display (currently being revised) the Reverse wire (purple) and wires for the power sunshade switch. Again, it was a good excuse to clean up the wiring from previous projects. I still need to do some more tidying up of this area, but overall, a LOT better than before.
7) Display in RNS-E - The RNS-E shows on the bottom line the signal strength of the cell phone, and the little BT icon to confirm that the phone is connected to the handsfree kit. When on a call, nothing really happens unless you are in Phone-mode on the RNS-E itself, but as usually I am in Nav mode with the map showing, or a movie is playing on the DVD, I will probably not benefit from that display. It really just shows the number I am connected to and the time elapsed.
Dislikes
1) Cost - I think some of the sellers list the plug-n-play kit for under $800 (which is about $700 in parts and $100 in labor for the custom harness). I believe the labor is reasonable, especially since it is based on the indivdual's expertise/knowledge, and not everyone has the right tools to do the job. It really comes down to the cost of the actual components, which themselves are just too pricey (IMHO). I paid about $500 for everything, plus another $50 in parts to customized my harness. Not outrageous, but ceratinly not as inexpensive as Parrott or Motorola BT kits.
2) Sound Quality - Once this setup was installed, I called a few folks that I frequently call from my car, and all but one said the sound quality was worse than my previous setup. I attribute that to the "hidden" microphone behind the dome light panel vs. the Motorola Microphone that was mounted right on the ceiling near the map light. I like the hidden microphone, but I liked the sound quality of the Motorola microphone better (pictured below). I'll still play around with VAG COM settings for microphone gains, and maybe upgrade the wiring harness to use a shielded wire (as suggested by the NavPlus gurus), but I am thinking that it is functional now and maybe I am overly critical of the sound quality because of the quality of the setup I previously had.

3) Voice dialing - As previously stated, an advantage AND a disadvantage. The major disadvantage is that there is a limit to the number of voice tags you can store (I have read that the limit is 50). The Motorola BT kit I removed allowed me to access my handset's voice-dialing feature, which did not require any recording of voice tags. Rather, my handset uses speech pattern technology to match up what is requested to the handset's phonebook entries. This basically allowed me to voice-dial anyone and everyone stored in my phonebook simply by saying their name. I will admit that the handset's voice-dialing feature had about a 75-80% accuracy rate, as sometimes it would pickup the wrong name (like "Dave Press work" vs. "Dave Press cell"), but it would always ask to confirm the selection before dialing. If I said "no" it would simply take the next closest selection. Not as accurate as the OEM BT setup, but not limited to 50 tags.
4) Disconnecting (manually) - Every now and then, I do have to pick-up the handset so I can take a call private if others are in the car. Perfect example is if Jr. Driver was happily riding along, and I got a call about a birthday gift. Of course, it would be nice to take the call private without having to press a bunch of keystrokes on the handset. The Motorola kit had a button to press to disconnect from the BT kit. Once the call was finished, it would reconnect to the BT kit automatically. The OEM kit does not do this. However, as I must take out the handset anyway to take a call private, not a huge deal, but easier to reach for a button on the dash than navigating the menu on the handset. Eyes on the road, right?
5) Disconnecting (automatic) - When the car shuts off and the key is removed, the BT kit disconnects automatically, which means that before I take my key out, I have to open up the handset or I'll drop the call. In the Motorola kit, the call would stay in BT mode until I either end the call or hit the button to disconnect. I liked the way the Motorola kit worked a bit better, since I could still remove my key and stay on a call. Supposedly there is a setting that alows me to delay the time that the BT kit powers off after the ignition key is removed, but I have tried a few settings, but it continues to disconnect when I remove the key from the ignition. I did verify that the D-16 pin I used as a power source is constant, not switched. Still playing around with that...hopefully a solution will be found.
Muting - The Motorola kit has a mute button right on the control switch. One step to mute, one step to un-mute. The OEM kit, muting is a two-step process. Not a huge deal, but yeah, every now and then, muting the microphone is necesary. You have to press the Options button on the RNS-E while in Phone mode, then select Mute. It is a further reach to mute on the OEM (depending on where you mount the control button for the Motorola kit), and one extra step.
Conclusion
In the end, I would still highly recommend the Motorola BT kits (or the Parrott kits but I have no personal experience with those) for anyone considering a BT solution for their car IF all you need is basic functionality, since these kits offer the essential functions for a VERY affordable price. You can still place and receive calls and automatically mute the radio just like the OEM kit, but you can voice-dial anyone stored on your phone with no extra programming (if your phone is so equipped).
However, you will not have caller ID on the instrument cluster, phone controls on the steering wheel, and visible access to your stored numbers on the instrument cluster or the RNS-E. I am not sure if everyone would think that it is worth hundreds of dollars for those features, but it is an individual choice. But, if you are a gadget junkie and must have the best available no matter what the cost, then by all means, buy the OEM kit.
If anyone is interested, I'll throw up another post with more detail about the harness (part numbers, etc.) but most everything you need is at NavPlus.us.
|