| Tech Article Title |
Author |
Date |
| A3 Portable Nav Unit Hard Wire |
passingthrough |
2007 |

In general this is not a very difficult job, with one exception:
modifying a mini-USB plug to fit flush with the Nav unit -- this is a
PITA for sure. If you can find a flush mount mini-USB connector for
sale that would be ideal (I couldn't), otherwise info about this step
is at the very bottom for those who are interested in the gory details.
Total Cost: should be under $150, but you may also go through a couple of mini-USB cables.
Basic instructions:
1) Decide if you are able and willing to deal with the mini-USB
modification (see very bottom). If not, do not proceed and instead
enjoy the free-time you have just wisely gained.
2) Buy a Navigon N100 ($99 at Amazon currently). This unit has 2.8"
screen and is the only one I know of that can fit in the space (except
for a Mio unit but that one has a goofy looking case). Map includes all
of US and Canada, Europe versions sold elsewhere. FWIW, I like this one
better than my 1st gen. TomTom unit: better graphics, great voice,
text-to-speech for major roads, nice features, good POI. However, make
sure this inexpensive unit is for you, especially if you're used to a
high end one now.
3) Buy a can of charcoal paint to match interior. ($7 at hardware store).
4) Remove faceplate of N100, tape screen and back of unit where velcro
will be applied. Optional: lightly sand N100 faceplate and case area to
be painted.
5) Spray paint device and face plate, at least a couple of coats.
6) Buy Add-a-fuse ($8 auto store) to tap into a switched fuse and run
the N100 power cable from fuse box to behind radio and up to N100. Do
not wire the N100 directly into the fuse box though - you must use
something like the car plug provided with the N100 (I wired a
receptacle to the fuse box and then connected to this, and put a 1-amp
inline fuse in - $15 at Radio Shack).
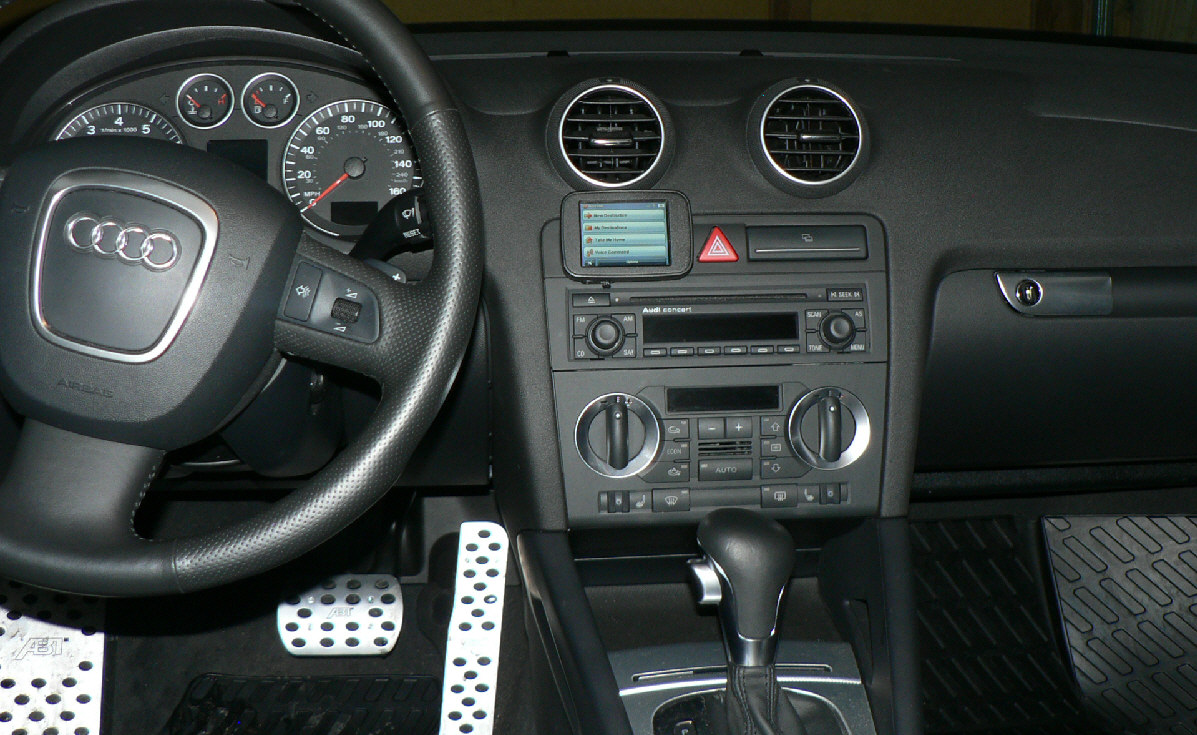
7) Optional: I removed the 3 button faces from the dash b/c I wanted to
get the Nav unit as flush as possible with dash & I have no desire
to turn off ESP. The control units are still there, just pushed back a
bit and with the button faces removed. I cut a piece of rubber to fit
in the space so it looks clean even with GPS unit removed.
8) Attach two thin strips of velcro to the dash, just above and below
the button space. Attach matching pieces on the back of the N100 unit
(cut them where needed so you can still remove the battery if needed)
and stick in place. The unit is discreet and looks OEM so I do not plan
to ever remove mine.
9) Enjoy!
The mini-USB connector problem:
The problem is that the supplied car charger, like all mini-USB plug I
have ever seen, extends very far from the device it's connected to.
This looks bad and it interferes with the CD eject and head unit volume
knob so is not an option. So I had to disassemble a mini-USB cable, cut
off just the very end with the pins and part of the metal sleeve
intact, and then soldered two thin wires to the 5 pins. The supplied
car charger cable has one main wire and a ground wire. Pin #1 needs to
be connected to the ground wire and pin #5 to the power wire. The other
3 pins in the connector are not used but you can solder pin #1 directly
to pin #2 if you don't want the Nav unit to turn on every time you
start the car -- this is what I did. I used black "paint on" electrical
tape/compound when done to keep it all together. Someone really skilled
would get power into the unit from the back of the case rather than the
bottom mini-USB port but that was beyond me.
|