|
|
Tools: Time Required: Several hours This article describes how to outfit an Audi A4 B6 with a Class I tow hitch and 4-pin wiring harness, suitable for towing a small trailer. Note that the suspension, brakes, and engine aren’t equipped to tow large loads, so check your owners manual for the maximum load. The hitch bolts under the spare tire well and to the tow-hook. The wiring can be hooked into the wiring to the rear lights, but requires a module to isolate the trailer wiring – the Audi electronics will not work with additional loads if you try to power trailer lights directly from the rear lights. Hitches for the A4 are available on the hitch-web.com. Just plug in your Audi model and it will find your hitch. The Hopkins parts are available at amazon.com.
Step 1: Clean out the trunk, remove the trunk floor mat, and take out the spare tire. Step 2: The hitch mounting instructions are fairly complete. Fit hitch “wings” to underside of the spare wheel well. Mark and drill, from underneath, 4 holes into the spare tire well, two holes per wing. The fit isn’t perfect, you may need a vise to bend the “wings” on the hitch to get a correct fit under the spare tire well. This part takes some trial-and-error to get a nice fit. The hitch must also sit securely on the factory tow loop. Step 3: Mount the hitch in 5 places: 4 bolts into the spare tire well, and a clamp on the tow-ring. Unfortunately, the bolt holes on each side of the spare tire well are very close together and don’t allow the use of big washers. On each side you will need to cut one of the washers with an angle grinder or Dremel tool to enable it to clear.
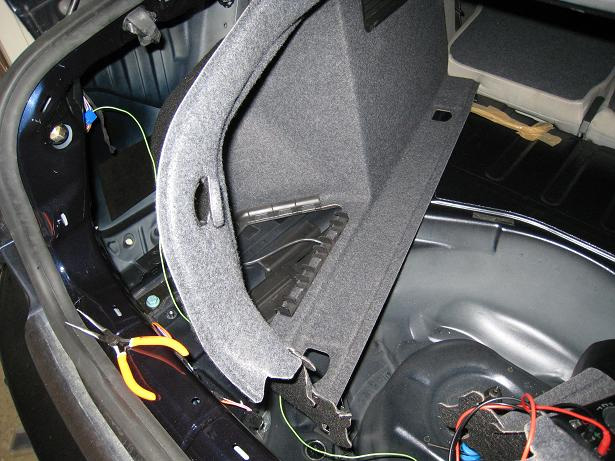
Step 4: Remove the 4 tie-down rings in the trunk. Unscrew the two Torx bolts and remove and set aside the hardware. Step 5: Remove plastic liner at the rear wall of the trunk. Unscrew the two hex nuts using a hex driver or socket and pull up. The liner is held in place by several clips which will unsnap as you pull up. Disconnect the wiring harness to the trunk light and remove the liner. Step 6: Pull out the storage bin in the left side of the trunk. Step 7: Remove the wall liners from the sides of the trunk to access the wiring harnesses. These don’t need to be completely removed but they do need to be moved away at the rear of the trunk. First, look up at the trunk roof where the liner attaches – you should see a round, black plastic snap holding the liner to the roof around the middle of the trunk. Pull this down and out. Next, using a flat bladed screwdriver pry the wall liner out where the trunk opens – there are three clips that hold it in place.
The liner should now be held in place only by this metal tab as shown below. Push the liner up and over this tab – you may also need to bend it slightly.
Then the liner can be pulled away (it is still attached at the front but you should be able to move it out enough to reach the wiring).
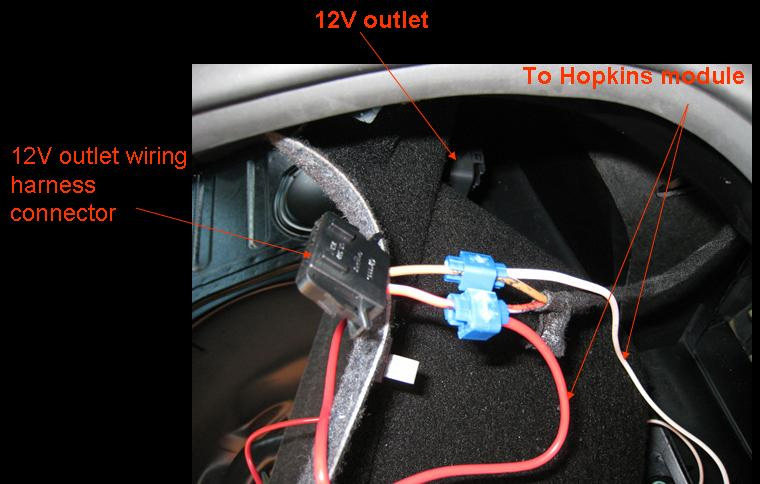
Step 8: Disconnect the wiring harness to the 12V accessory power outlet in the right wall. I chose to power the Hopkins module from this rather than run a line to the battery. It is connected to a 30 amp circuit so unless you are pulling any serious power from that outlet there should be no trouble. Step 8: Install the Hopkins module. I chose to mount the module behind the right wall because that’s where the power outlet was. Splice into the 12V outlet wiring harness and connect to the red power and white ground lines of the Hopkins module. The Audi color code for the 12V outlet is brown wire is:
Step 9: Connect the brake light, right turn signal, and tail light wiring to the right tail-light harness using wire splice connectors. The Audi right tail light set wiring is as follows: Step 10: Run a the left turn signal wire over to the wiring harness behind the left wall. Route the wire against the rear wall where it will be hidden by the plastic trim piece. The Audi left tail light set wiring is as follows:
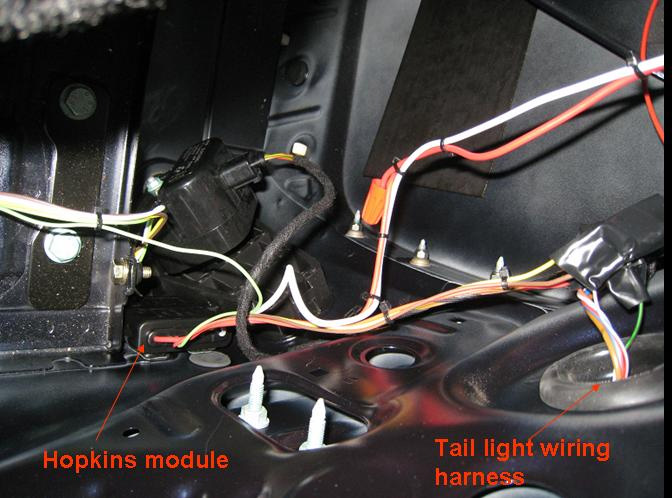
Step 11: Secure the Hopkins module. I wedged it up against the rear wall and used velcro tape to hold it in place.
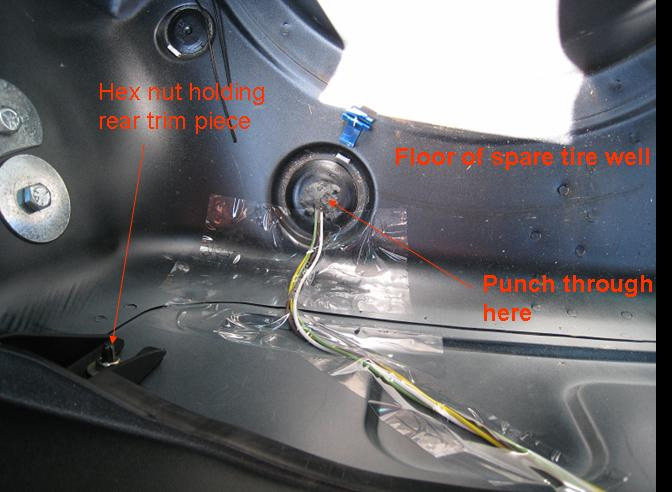
Step 12: Tidy up wiring using cable ties. Step 13. Run the 4-wire trailer connection behind the rear trim piece and into the spare tire well and through to the underside of the car. I punched through this plastic insert and then filled it with some JD Weld putty to seal around the wiring. I used plastic sealing tape to keep the wires up against the well.
Step 14. Test the brake, turn, and tail lamp connections. Step 15. Reinstall trim pieces in the reverse order they were removed. Make sure the rubber gasket around the trunk opening sits on the outside of all the pieces – this can be worked up over the trim with your fingers or any soft tool. Step 16. Mount Hopkins Knockout Mounting Bracket and adapter to tow hitch and plug in. I welded mine to the tow frame but you can drill holes and install with the included nuts and bolts.
Step 17. Tow your trailer!
|
|
Advertising |
Contact Us |
Cookie Policy |
Privacy Statement |
Terms of Service |
Do Not Sell My Personal Information
© 2020 MH Sub I, LLC dba Internet Brands |