| Tech Article Title
|
Author
|
Date
|
| Installing 3-Car Garage Opener Remote in Headliner
|
David Pincus
|
1998
|
I have successfully installed a three car garage opener remote into the headliner of my A4. 95% of the install is completely invisible and the whole thing can be removed without a trace. Very slick! This modification requires tools available at any electronics store including Radio Shack.
Do NOT attempt this unless you are an electronics NOVICE or better. I assume no responsibility for any damage to your property. Proceed at your own risk.
The install is easy and should take about fifteen minutes. If you don't want to mess around with building one yourself I'd be happy to build one for a reasonable price. Drop me a note.
Now, with that out of the way, lets have some fun! Go out to your local Target and buy a "Clicker" 3 car garage remote. It will be about the size of the folding key FOB and cost $20. SAVE the instructions! Using a flathead screwdriver pop open the case. Set aside the top half. Remove the screw in the center of the circuit board with a small phillips screwdriver. Remove the circuit board from the bottom half. BE CAREFUL not to loose either lithium battery or the clear plastic piece of mylar.
Desolder the LED and the three push button switches and carefully remove from the board. Now you will need to put jumpers in the vertical holes where each switch was. Take a 12" ribbon cable with 4 wires and separate and strip the ends. Connect one wire to the ground terminal of any one switch. Connect the next wire to the non-ground terminal of switch 1. Repeat for switches 2 and 3. Take a second 8" ribbon cable with 2 wires and separate and strip the ends. Solder wires to where the LED was connected. Solder the LED to the other end of the wire making sure the polarity is correct.
Put the circuit board back into the bottom half of the remote making sure the batteries are in the correct position and the clear piece of mylar is in place. Fasten the screw. Take the top half of the remote and remove the center light blue "push switch". Feed the wires and LED through this hole and snap the top back onto the remote.
Solder the switches you just removed to a piece of perf board about the size of a stick of chewing gum. You can place the buttons however far apart you want. Solder a wire between one pin of each switch. Connect the ground wire to this. Solder the wire from button 1 to the other half of the first switch. Repeat for switches 2 and 3. Attach a piece of double sided foam tape to the back of the button board. This should hold the wires in place. Don't remove the backing on the other side till you are done.
Follow the instructions in the FAQ to remove the control console with the reading lights and sunroof control. Proceed once this is hanging down.
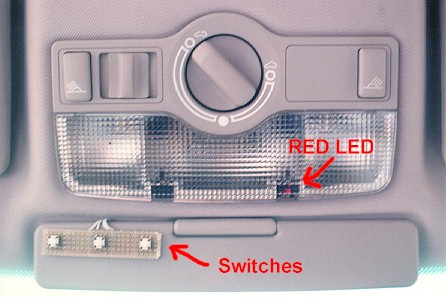
Wrap a piece of thin anti-static foam around the entire remote and secure. Put the remote into the headliner "hump" in front of the sunroof towards the rear passenger side. Make sure the front of the remote is facing the front of the car! Remove the center sun visor with a phillips screwdriver. Separate the headliner from the roof slightly where the screw was. Take the control board and slip it between the headliner and the roof. Reattach the center sun visor making sure the wires go between the roof and the hinge. The control board should be dangling in front of the visor with the wires going up into the fold and disappearing. Position the control board where you like it and attach with tape.
When you removed the overhead controls you had to depress two metal tabs to release it. Feed the LED into the center of the right clip. Make sure the LED does not extend past the front of the light fixture. Carefully reinstall the sunroof controls. It will snap in place. Replace the screws. Snap on the plastic diffuser. Fin!
When you press a button on the remote you will see a red LED glow from the corner of the right reading light. Invisible when not in use. Slick! Dummy switches in the dash probably look better, but this does three garages and is five times cheaper!
|