*MANY* thanks to Howard_A6 for providing the schematics for 1999 A6 fog light wiring.
With his help, I've finally been able to develop a simple, easy way to enable the fog
lights independent of the low beams.
It turns out that the fog lights are driven off of the switched low-beam power: passed
through fuse 36 and then through the fog light portion of the headlight switch. Thus,
without the low-beams on, there is no power to feed the fogs - despite the fact that
the fog light portion of the switch happily enables them. To enable the fogs whenever
desired, one need only power the *LOAD* side of fuse 36 from another source.
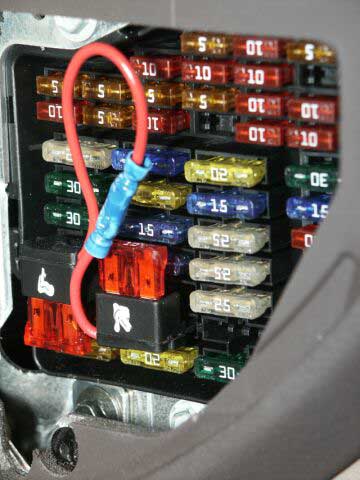
This weekend, Mr. Voltmeter and I looked inside the fuse box on my MY2000 car, and
sure enough, pulling fuse 36 kills only the fog lights. Sure enough, the hot side of
position 36 is only hot when the low beams are on.
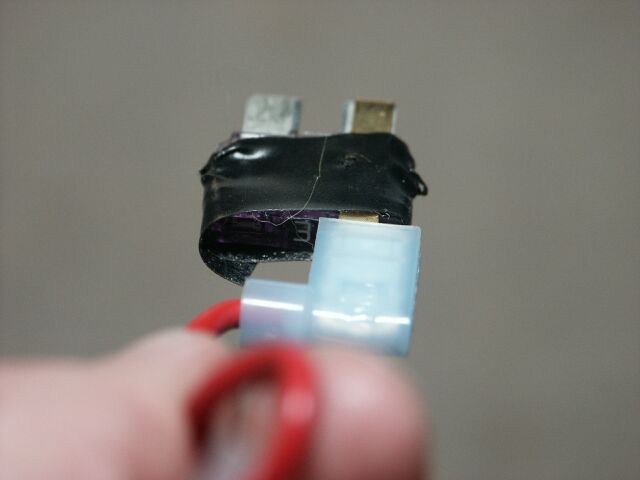
Radio Shack sells "Fuse taps" (4/$0.99) which fit over the leg of a fuse and provide a
blade connector "tap". R/S also sells the female blade connectors to fit the taps and a
nice inline fuse holder for blade fuses ($1.99) with two lead wires attached. It's a simple
matter to replace the 15A fuse in position 36 with a dead fuse (free) having one fuse
tap on the LOAD side (should be right hand leg when facing fuse box). Attach a second
fuse tap onto the FEED side (should be left hand leg when facing fuse box) of a
convenient source fuse (e.g. position 27 which feeds the non-existent rear wiper and
heated wheel - in many sedans). Now you have two blade connecters sticking up from
your fuse box: one in position 27 which should be hot with the key on, one in position
36 which should not be hot at all - regardless of key and low beams - at this time.
Crimp a female blade connector onto the end of each of the two lead wires from the
nice inline fuse holder (get the nice fully-insulated connectors if you can find them).
Insert a 15A fuse into the holder. Connect one leg of the holder to each of your two
male blade connectors, making a fused connection between your new FEED and the
existing LOAD of position 36. Presto! Turn key on, turn headlight switch to parking light
position, pull switch out and get front and/or rear fogs!
Harness overview

You may need to do some mechanical tweaking of the connectors, etc... to fit
everything nicely behind the fuse box cover, so a good look before starting and before
acquiring parts might help you pick better female blade connectors. Remember that
exposed hot wiring is a *BAD* idea, and remember that things in cars move ... so use
that electrical tape and/or tie wraps generously to make sure your fuse holder won't fly
around and that nothing can contact your connections!
Harness closeup

NOTE: Make really sure you've disconnected the LOAD side of position 36 from the FEED
side before connecting to your new power source. With a live fuse in position 36, the
LOAD side will go hot when the low beams are on. With a DEAD fuse in position 36, the
LOAD side will not go hot. Check this!
Feed closeup

Load closup
NOTE2: The high beams disable the fog lights via a relay which is buried somewhere in
the car. This modification does not change that relay and thus does not change that
behavior. Even after this mod, flashing or switching on your high beams will disable the
fog lights. I had no desire to change this behavior, so haven't looked for the relay. If
someone does wish to make the fogs live regardless of high beams, that will likely
require modifiying the wiring around the relay. Probably not difficult, but left as an
exercise for the student.
More tidy using fuse taps instead of the fuse
piggyback method.
Updated info:
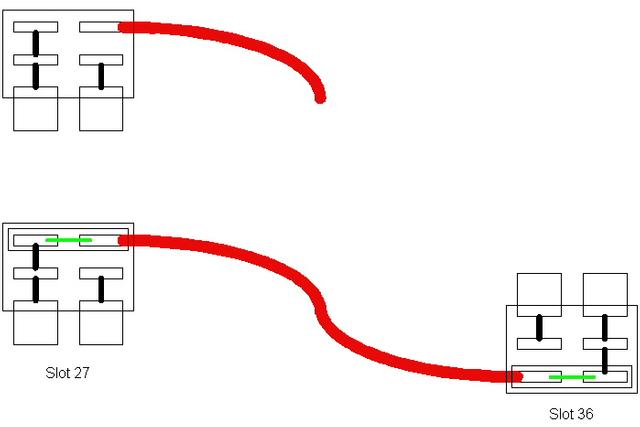
Ok, I'm not much of an artist, but here goes. The upper picture is a "schematic" view of the $10 fuse tap. Note how the blade on the left is wired to both left sockets, while the blade on the right is only wired to one of the right sockets. The other right socket has a big red wire attached to it.
The fuse tap manufacturer intends for you to put the fuse from the slot you're using into the (on my picture) "bottom" pair of sockets, and the fuse for your add-in device in the "top" pair. I use it a little differently, and flip one upside down to get it to behave the way I want.
The lower picture is a "schematic" view of the "cleaner" photograph. Since slot 27 is empty when we start, we don't need to populate the bottom fuse at all. (Those with something in slot 27, or using a different slot could of course place the existing fuse in that slot.) Place a live 10A(*) fuse in the lower slot, to get power to the red wire from our first fuse tap.
For slot 36 we want to plug something into the "load" side, and make sure there's no connection to the "feed" side. Wouldn't it be great if we had something like the fuse tap - just in reverse? Hmmmm :) Flip over a fuse tap, populate only the "top" slot (if it were right-side up) with another 10A(*) fuse and presto!
(*) Since we end up with two fuses in series, I dropped down a step on each one's rating from the factory's 15A to a 10A. Electrically it doesn't make any sense, but I felt better somehow. I believe my fuse taps were only rated for 10A anyway.
Insert copious disclaimer here:
From the diagrams I saw, this should work for model year 1999 and 2000 USA model
A6s. Obviously this change is not sanctioned by Audi, so don't blame me if you do it and
get your warranty voided. I have no control over the wiring of your car, your skill with
electrical matters, etc... so don't blame me if you try to do this and fry your electrical
system. I've seen numerous postings questioning the legality of running fogs without low
beams: again, don't blame me if you get arrested for improper light usage. Use a
voltmeter throughout any installation to make sure that the you keep the hot side hot
and the cold side cold. Double check everything again before applying power. Do not
touch electrical connections with your tongue. Really, it's NOT my fault. Don't screw up!