| Tech Article Title
|
Author
|
Date
|
| DC Accessory Outlet |
Steve
Hall |
2000
|

|

|
Below is information on a modification I made to my '01 A4 1.8T to add a DC accessory outlet to the rear ashtray in the space previously used for the diagnostic port.
While the way the cigarette lighter flips open is very cool, plugging something in there (e.g. cell phone power adaptor) makes the center armrest area look kind of cluttered. As some of you know, the computer diagnostic port is no longer in the rear ashtray of the '01 A4 1.8T but the space (and cutout) for it is still there unused; that space was pretty appealing to me as a place to put a DC accessory outlet. So, I installed one there and I think it came out pretty well. Here's an overview on how it was done (apply usual disclaimers here about not blaming me if anything does wrong, voiding warrantees, doing anything you're uncomfortable with, etc):
Basic tools & parts needed:
Screwdrivers, socket set, dremel tool (for removing plastic from rear ashtray...you might be able to do this with other tools, but the dremel works very well), 2 or 3 feet of
2-conductor wire to run under the armrest to the rear ashtray, Radio Shack Dash-Mount DC Accessory Outlet (part number 270-1539A...$5.99)
1. Remove the armrest as described by Dan Masi. I followed the first three paragraphs of this FAQ, but didn't actually remove the parking brake...I just got the armrest free so I could lift it up a few inches and see the electrical connections under the front portion.
2. On the underside of the armrest, about 4 inches back from the front, you'll see a white connector with 3 wires running into it. You're interested in the center conductor (+) and the left conductor (ground) -- these are as you're looking down on the connector from above. Press the tab under the connector and slide out the connector from its housing. There should be enough slack in the wires to pull the connector a few inches out on the driver's side.
3. Pull 2 or 3 feet of appropriate 2-conductor wire from the rear ashtray to the front of the armrest (I used some old 14g speaker wire)...I'll call this the "wire extension". By pulling up the brake level all the way, I was able to lift the entire armrest up enough to get my arm under the armrest about 3/4 of the way back toward the ashtray and pull the wire through.
4. Strip off about 1/4" of insulation on the 'front' and 'rear' ends of each conductor of the wire extension. To prevent any shorts while wiring things up, make sure you tape and keep separate each conductor on the 'rear' end of the wire extension until you're ready to connect them.
5. Strip off about 1/4" of insulation from the center (+) wire going into the white connector, about an inch back from the connector. In order to get enough slack in these wires, you may need to remove some of the black tape holding all three wires together. Using good soldering techniques, tin this section of wire and the positive conductor of the wire extension and solder them together. Wrap this connection with electrical tape, making sure that all exposed wire is well insulated. Repeat steps 4 & 5 for the ground connection. Plug the white connector back into its socket. If you have a volt meter (you do have one, don't you?), check to make sure the front cigarette lighter socket is still powered up and check the 'rear' end of the wires to make sure they're live.
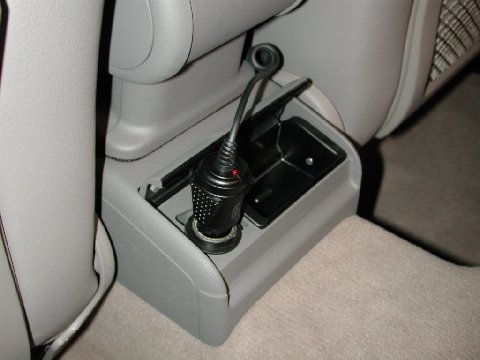
6. Now you need to mount the outlet and wire it up. It turns out the top of the outlet is just a little too high and prevents the cover of the ashtray from closing all the way. Fortunately, there is about 1/8" of plastic above the copper-colored ground inside the outlet. Using a saw, cut off this extra 1/8" of black plastic. I used the blade from a hacksaw, but you could probably do this with a coping saw or even file it off with a rough file or rasp. I then used some sandpaper to remove most of the saw blade marks from the rim of the socket and round off the top outside edges of the socket. When you're done, the copper-colored ground metal inside the socket should come right to the top of the socket (see pictures).
7. Now the fun -- removing enough plastic from the empty diagnostic area to fit the round DC outlet. As mentioned at the top, I used a dremel tool. The socket is exactly 1" in outside diameter; if you had a 1" hole saw, this would probably work perfectly. To reduce the amount of plastic shrapnel flying around, I draped a trash bag over the dremel tool, but you're going to need to vacuum when you're done no matter what you do! Using the socket cover that comes with the outlet, I traced lines where I needed to remove material; you actually need to remove very little material -- just enough to get the socket in there. It took a couple of passes to remove enough plastic from the right areas, but remember, the outlet has almost a 1/4" lip around it and will hide any minor slips when removing material. Also, due to the 'flaps' on the socket (you'll see what I mean when you open the package from Radio Shack), once you get it in the hole, it's probably not coming out. One more note on making the hole: Since the lip of the outlet does stick up, you want the outlet near the middle (front to back) of the space...too far toward the rear and the ashtray lid won't close.
8. Feed the wires from the socket down through the hole you just made and back up through the ashtray hole so you can get to them and insert the outlet socket into the hole you made. It should fit securely and not slip out when you pull gently on it.
9. Using good soldering techniques, solder the 'rear' of the wire extension to the outlet (making sure, of course, to wire positive to positive and ground to ground). Test it with your volt meter, tape everything up, tuck any excess wire back under the armrest, bold the armrest back together, and that's it.
It's nice to have the cell phone powered up without having anything protrude from the armrest area. When you're not using it, just close the ashtray lid and everything is hidden.
|