| Tech Article Title
|
Author
|
Date
|
| Audi
Concert II illuminated without CAN-BUS |
Jarkko
Heinonen
|
2004 |
I wanted an original Audi CD stereo unit in my 1998 Audi A4 but soon found out that
the only option Audi was offering is the external 6 CD Changer (to go along with the
Concert I). Tearing down half of the interior and boot to get all the stuff in place and getting a
Concert I with a cassette deck didn't sound too appealing so I thought I'd go for the
newer Concert II, which is a single CD unit.
The problem of course is that the Concert II was only introduced when the new generation A4 came along and it has CAN-BUS, which the 1998 Audis do not have.
This means a few functions will be disabled when running the unit in a non-CAN-BUS car,
such as illumination of the controls, the GALA speed sensitive volume control and as a "bonus" you'll get a power-down problem (Unit automatically turns itself off after 1 hour).
The most annoying defect IMO is that you can't see the controls in the dark. However this can be solved pretty easily. You'll have to open up the unit though,
which will void any possible warranty on the unit. All you need is basic soldering skills.
Here's what you need to do once you've removed the unit from the car:
1. Pry open the under side cover from the unit using a small screwdriver.
2. Locate the 18-pin connector area on the main PCB (See picture)

3. Counting from right, pin number 8 is the pin for illuminating the interface controls.
It's in the row closer to the edge of the PCB.
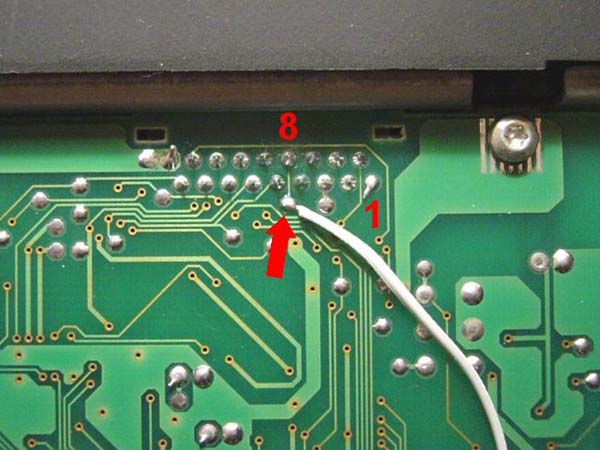
4. Solder a 2ft long wire directly to pin 8 or to the tab located directly below it and
connected to pin 8 (as in the picture). I found the tab to be the better option of the two because there's more room around it and less chance of short circuiting
anything. :-)
I also think it's a good idea to let the wire run to the right from the tab, again for the reasons mentioned above.
Also try to peel off as little insulation from the wire as possible before soldering.
5. Running the other end of the wire outside the unit I used the gap in the metal frame around the antenna contact plug.
Try to support the wire for instance with a piece of tape. I made a knot in the wire so any
pulling on the wire from the outside doesn't put strain on the solder joint.
6. Put the cover back on again and check that the wire doesn't get squeezed or tangled.
7. Connect the loose end of the wire to pin 6 (Head Lights On) of the black 8-pin audio connector in the car. The numbering scheme is printed on the black connector.
8. Turn the head lights on and check that the unit controls are illuminated.
The ideal solution would be to run the wire from the front panel's pin 8 directly to the
other end of the PCB to the audio connectors pin 6. That way there wouldn't be any
wires hanging outside of the unit. But the Concert II is missing pin 6 altogether in the audio connector on the back of the unit and removing the 40+ pin audio connector cluster would be too complicated IMO.
And turning the unit back to the original configuration (if need be) would also take longer.
If you're still looking for a Audi Concert II unit for an Audi A4 (B5) be sure to get the
A6/TT model since only this model has the same front panel dimensions as the B5.
*Important Note*: This modification will only work with European model of Concert II made by Grundig, it will not work with the Panasonic models in USA model cars.
And last but not least, I take no responsibility if you manage to destroy your stereo unit or other equipment attempting these modifications.