Tech Article Title Author Date
Installing an Air Filter Don Pavlik 2000

I've heard of a few tales of difficult filter installs so I thought a how-to might be in order.  Installing an air filter on the S4 is not difficult 
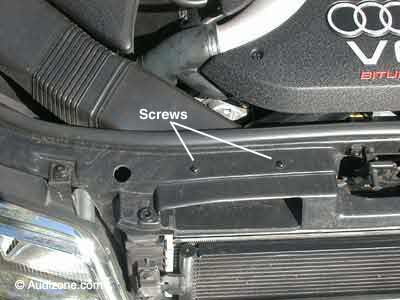
with one exception--one clip on the back edge of the airbox can be challenging. 
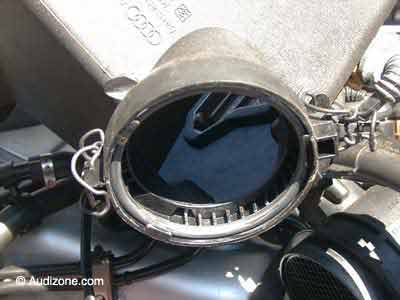
Also, to a novice, the web of hoses and wires on top of the airbox might make some think twice.  The good thing is none of hoses or wires need be removed to put in a new filter; that simplifies things a great deal.  Sorry this page takes such a long time to load with a slow connection. Yup, I went overboard with the pictures but I've heard a picture is worth a thousand words so...  

The filter did not change the sound of the turbo or intake noise.

  • The cosmetic cover next to the snorkel just pulls straight up. 
  • 3 clips keep it secure.


  • Remove the two screws that hold the air snorkel.


  • The snorkel just pulls straight up off the airbox.  It's attached to the airbox by a clip.  
  • Watch when taking this apart.  My clip came off and fell down into the deep recesses of the engine bay.  I'm just lucky that way.
  • A wire runs down the side of the airbox.  Unhook the wire from it's retainer on the front edge of the airbox so you have slack later on. 
  • Note the web of hoses and wires on top of the airbox.  None of this needs to be disconnected or removed.
  • Unclasp the two retainers (under the hoses in this picture) that secure the mass airflow sensor to the airbox. 
  • Grab the body of the sensor and carefully wiggle it out of the airbox.
  • Watch for the big rubber o-ring as you separate the two so it does not drop off into never never land.
  • With the airflow sensor separated, release the 4 clips that hold the airbox lid in place.  One clip at each corner.  I used a long screwdriver.
  • The clips are secured to the bottom half of the airbox so no worries about them migrating into the darkness. 
  • With the clips released the top half of the airbox will lift up.  With some wiggling you can lift it up and rotate it to give you enough room to get to the filter.
  • Be careful of all the wires and hoses on the top.
  • I was surprised to see how much debris was in the bottom of my airbox.  I would not have expected this much after only 6,000 miles.
  • The offending dirt was quickly removed by my shop-vac.  You didn't think I was gonna leave it in there did you?
  • I'd heard that the K&N filter did not fit correctly, something about it being 5mm to small. Mine fit just fine.
  • K&N part number: 33-2125


  • Before securing the top half of the airbox, make sure the big o-ring for the airflow sensor is properly seated.
  • With your spiffy new filter in place line up everything and put the airbox top back on.  Secure with the 4 clips.
  • Watch the wire at the front; it likes to get in the way.
  • I will warn you the back right-hand clip can be difficult.  I used big looong screwdriver to coax the clip into position.
  • After securing the 4 clips, wiggle the airflow sensor back into position and secure the two retainers.  Pay attention to the o-ring... it has a mind if it's own.
  • Secure the wire on the front edge of the airbox.
  • Reinstall the snorkel with the 2 screws at the front and push it down onto the clip on top of the airbox opening.
  • The cosmetic cover just slips back into position.  Note the 3 mount points.
  • I found it easiest to secure the cover at the fender first then line up the other two.  
  • Seemingly simple, surprisingly annoying.


Advertising | Contact Us | Cookie Policy | Privacy Statement | Terms of Service | Do Not Sell My Personal Information
© 2020 MH Sub I, LLC dba Internet Brands