K04-015 Turbo Installation
I originally planned to have detailed, step-by-step installation instructions for the
turbo. But, after doing the install myself I came to the conclusion that if somebody
needed detailed nut-by-nut, bolt-by-bolt, part-by-part instructions to do the install they
probably should not be doing it. There are way too many steps to lay them all out in
a straight line and document. Robert Bentley Inc. may do it... but I'm not Bentley.
IMO, if the thought crossed your mind or you have to ask, "Can I do the install
myself?" the answer is probably "No". I'm not
suggesting the install is hard -- it isn't. It's pretty straight forward and really
doesn't have any big "gotchas" along the way but it does require a certain
amount of mechanical ability and a reasonable complement of tools to do the job. I
would think nothing of yanking a transmission in my garage on a saturday morning to
replace an input shaft seal... would you?

The Tools
(Note the band-aids... flesh sacrifice to the wrench gods ensures success)
I took 4:15 to complete the job. 25 minutes of that time was spent looking for one
stupid bolt that I dropped (the gods snickered). I also spent time taking
pictures and comforting my 7 month old Golden Retriever who was none to happy with the
noise of my air ratchet and the air compressor suddenly springing to life... off into the
house with him after a romp in the back yard to chill him out. Oh yeah, I ate an
unfrosted blueberry pop-tart too.
So, what I decided to do is skim the surface, hit the high points if you will.
The nitty-gritty details are up to you and your ability. There are a few things
worth noting along the way and I'll cover that kind of information.
- You'll need to put the car up on stands or on ramps for access from below.
- You do not need to drop the exhaust.
- Plan on an oil change. The turbo oil drain line connects to the bottom of the oil
pan so the current slippery stuff is history unless you catch it and <gasp>
put it back in. You wouldn't do that... would you?!? I didn't think
so...
- If you're careful you'll only loose a couple ounces of engine coolant.
- Obviously, you need to remove the belly pan.
|

|

|
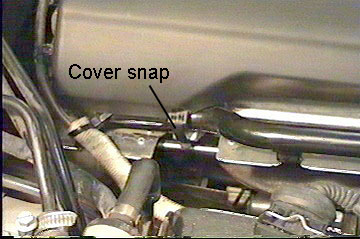
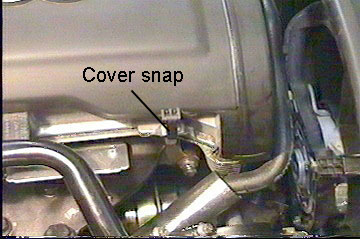
Removing the engine cover first requires
undoing the snaps at the front and rear. |
|

|

|
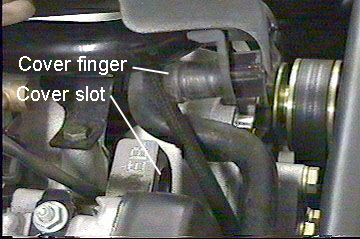
| Then, if you have a car with the 2-piece engine cover, pull
up on the rear section to free the small cover then slide it forward to get the cover
finger out of the cover slot. At this point lift the main cover from the snap side and it
will "hinge" off the mounting tabs. |

|

|
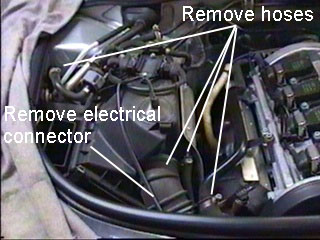
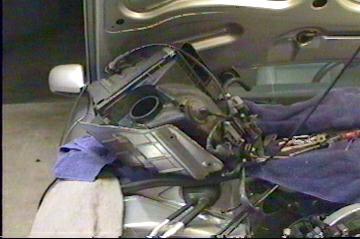
| You must remove the air box for access to the turbo.
Remove the airbox cover, the one bolt that secures the airbox, 3 hoses, the cold-air
intake snorkel (secured near the radiator), the turbo inlet hose on the airbox side and
the one electrical connector that leads toward the front to the boost control solenoid.
Push down on the spring wire on the connector to release it. Audi chooses to use
one-time crimp type clamps on the hoses so pick up some clamps. Note that the heat
shield remains attached to the airbox. The airbox will just flop up onto the cowl
once disconnected although still tethered to the car by hoses and wiring. |
|

|
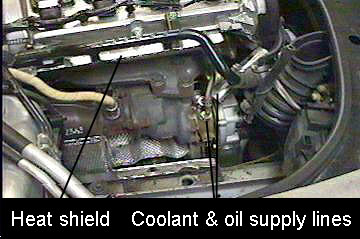
- Remove the heat shield (2 bolts, 3 screws)
- Later disconnect the coolant and oil supply lines. Pinch the hose of the coolant
line before removing. You'll want to do the lines later I just mention it here
cuz the picture is convenient.
|
|

|
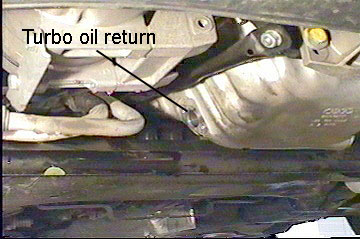
On the floor with ya. Drain the oil and loosen the oil drain
line. While you're down there loosen the clamp for the turbo inlet hose. If you are double
jointed pull the hose off... if not go back upstairs and disconnect the hose. |
Intro | Page 2