|
Note:
During our
trials and tribulations we found that some of SPR's instructions didn't
quite tell the whole story for us lame first-timers. We thus decided to
take a lot of pics and write up an Electric Fan Kit Installation For
Dummies. The first kit we did took us most of the day to install, as we
spent a lot of time and a few phone calls figuring things out that weren't
covered in the SPR instructions. The second kit we did the next day only
took us about 3 hours, and we weren't hurrying. So, some of the pics
and/or text below were lifted from SPR's instructions, but most are our
own.
I also
recommend reading all the way through these instructions before starting
the install. |
| |
|
Stuff needed:
Phillips and
Flat head screw drivers
Torx 15-30 drivers
Hex wrench set
Metric Socket Set with Extensions
Vice Grips
and 2 pennies
Jack and Jack Stands
1 bucket
1 Bottle of G12
Coolant
1 or 2 friends to help
zip ties (always good to have
around)
electrical tape |
| |
|
Instructions:
--Jack up the front of the car
and secure
it on jack stands, as you'll be crawling under it. Never use the factory
jack for support when working under a car unless you'd like to be
substantially thinner than you already are. |
|
--Remove the front wheels |
|
--Remove plastic underbody cover
There are 10
"half-turn" screws involved: 3 metal screws along the front of the cover,
3 metal screws along the back, and 2 big plastic screws on the inside of
each wheel well. They only take about a half turn each to remove them, but
feel free to turn them all you like. After removing the screws, the big
plastic cover will pretty much fall on your face. Slide it out and set it
aside. |
|
--Remove screws holding bumper in
You first need to
remove the two small fog light grills. They just snap out. In the space
next to each fog light, there is a big, long torx screw going straight up
into the car. (These torx screws actually hold the bumper cover onto the
bumper supports inside.) Remove the torx screws. Next, in each wheel well,
there are two 6mm hex screws to remove as seen in this picture: After
removing all 4 hex screws, and the two large torx screws that were up
front next to the fog lights, that's it for the screwing. The bumper can
now slide around a little. |
|
--Remove bumper
This one's a bit
tricky the first time you do it. It's a bit tricky the second time too,
but never mind that. To add to the trickiness, we failed to get any good
pics of the bumper removal, so you'll just have to visualize. But there
really isn't anything to take a picture of except for a couple of greasy
guys pulling on an expensive bumper. In fact, this part is so difficult to
explain that I'll just cheat and copy SPR's instructions:
From
SPR's instructions
From the front, push bumper inward while
pulling downward at the end of the bumper starting with the driver's side
first. Repeat on the passenger side.
Got that? To
help you visualize, we did take some pictures of the clips that hold the
bumper in: |
|
|
|
| The bumper slides around on rails inside those clips, so you have
to get the rails derailed. It actually involves quite a bit of force, so
we really had to man-handle the bumper to get it off those clips. After
you get the bumper off, you'll need to unplug the wiring harnesses from
the fog lights. Then you'll need to disconnect the washer fluid hose. To
do this, use the vice grips and 2 coins to clamp the hose closed. Then
disconnect the hose. Set the bumper aside. |
|
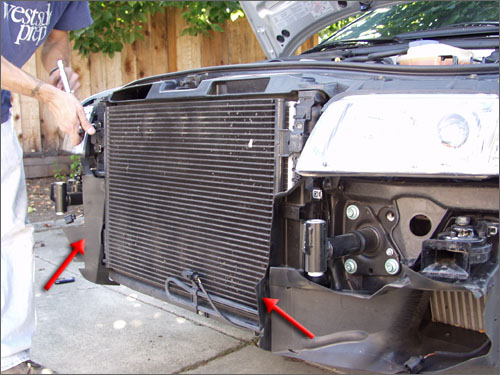
--Remove rubber air dam flaps, temp sensor brackets, A/C
condenser brackets |
|
|
| In the pic above, you can see that there are 3 rubber
air-dams/flaps. The largest one on the right directs air into the
intercooler. Ignore that one. Remove the other two. They just have one screw each. |
|
|
| Then, along the bottom of the A/C condenser there is a thin metal
tube with a little sensor suspended from it. Remove the screw from each of the two plastic brackets
that hold this tube on, and let the whole assembly hang down out of the
way. (Just ignore the fact that we didn't remove it... pretend we did.)
Then remove the two brackets (two screws each) that hold the A/C condenser
on. |
|
--Remove A/C condenser |
|
|
| There is a little electrical plug in the left side of
the condenser. Unplug it. You can then remove the condenser itself. It
just slides up and out. Carefully swing it around and set it aside, being
sure not to damage the two rubber hoses that are still connected to it. In
the above pic you can see the two hoses connected to the bottom. You do
not want to remove those. That would be a Bad Thing. |
|
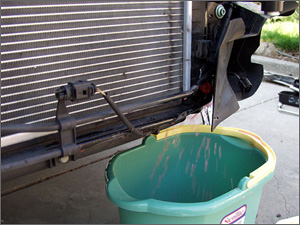
--Open coolant filler cap and drain
radiator |
|
|
|
| At this point you need to get a bucket and
drain the radiator. First, open up the coolant filler cap on top of the
coolant reservoir. Then, on the bottom right side of the radiator you'll
see a little red screw. This opens up the drain valve. Open it. Did I
mention you should put a bucket under it? |
|
--Remove upper and lower radiator hoses |
|
|
| After the radiator is drained, you can then remove
the radiator hoses. They are on the right side of the radiator, top and
bottom. Each hose is held on by a little metal clip which you barely see
in the above pic. Slide the clip
off the hose using your choice of tool. We went with a flat-head screw
driver. You can then slide the hoses off of the radiator. It can take
quite a bit of force and/or jiggling to get the hoses off. After removing
the hoses, you might need to unplug a little wiring harness right above
the lower hose. Josh's MY2001.5 didn't have this harness, but my MY2000
did. Then you'll need to remove the two plastic clips that hold the top of
the radiator in place. In the above pic the clips have already been
removed. |
|
--Remove radiator |
|
|
|
| As our illustrious model Josh demonstrates
above, slide the top of the radiator out, then up. It can be a little
tricky to get out due to the plastic hose mounts. After removing it you
may want to dump out the excess coolant that is still in the
radiator. |
|
--Remove fan/pulley assembly from engine |
|
|
| This part is a bit tricky. You'll need to use an 8mm
hex attachment on a ratchet to get this bolt out. SPR's instructions said
6mm, but we found it was 8mm on both of our cars. As you can see in the
pic above, it's a very tight fit to get the ratchet in there, so there's
not a lot of room to move. As you crank on the ratchet the whole pulley
will try to turn, foiling your plans to unscrew it. But screw it you
shall! You'll notice that Audi conveniently left a notch along the body of
the pulley housing in which you shall insert something long and strong...
like a hex wrench! In the pic above you can see our long and strong hex
wrench slid in between that notch and through the pulley via one of its
many holes. You can just see the other end of the hex wrench sticking out
the other side of the pulley. After removing the bolt from the back of the
pulley, you can slide the whole fan/pulley assembly off. It might be
easier if someone holds the belt tensioner loose when you do
this. |
|
--Disassemble mechanical fan
from pulley
and attach custom adapter to pulley. Unscrew the 3 bolts from the back of
the pulley that hold the fan onto it. Remove the fan and attach the custom
hexagonal metal adapter plate back onto the pulley using the same 3 bolts. |
|
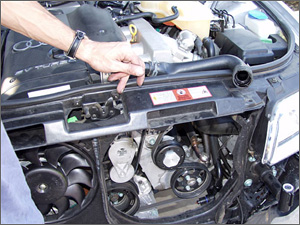
--Attach pulley assembly to engine |
|
|
|
| Now attach that pulley back onto the engine.
In the pic above you can see the spring loaded belt tensioner to the left
of the fan pulley. You'll need to hold this
tensioner loose with a wrench in order to get the pulley back
on. |
|
--Splice fan wires |
|
|
|
| Now you'll need to splice your new fan's
wires in with the existing auxiliary fan's wires. The pic above shows the
completed result. The location of the wires to splice into were in a
slightly different location between Josh's MY2001.5 and my MY2000. The pic
above show's Josh's car. When splicing the wires, be sure to get them
twisted together well, and crimped into the butt-connector very tightly.
There's not much slack in the wires, so you'll have to keep your work
tight. After splicing the wires together, be sure and wrap some electrical
tape around it all to help hold it together and insulate it. If you feel
motivated, you might even want to solder the wires together for a better
connection. Or maybe even use some removable connectors rather than the
butt-connectors. Your call. |
|
--Mark fan mounting points, drill, screw |
|
|
|
| Now you just need to mark your 3 mounting
points for the fan brackets, drill some small pilots holes, and screw them
in. The pics above show the completed results. You can see the 3 silver
mounting brackets and where we screwed them in. |
|
--Test the fan and reassemble everything
You should
probably test it before you get everything completely back together. We
re-assembled everything back to the point where we got the radiator put
back on and radiator hoses connected. We then briefly started the car up
and turned on the A/C to get the fans spinning right away. As soon as you
verify that the new fan does indeed come on along with the auxiliary fan,
turn the car off as you haven't yet refilled the coolant. You can then
re-fill the radiator using a 50/50 mix of distilled water and G12 coolant.
Then just re-assemble everything in the reverse that you took it off. |