If your A8 smells oily a few minutes after start up, or if
your garage smells like a Jiffy Lube, then it could be the valve cover gaskets leaking. If
the smoke is coming from under the car, you might also consider the transmission final
drive seal which can leak onto the left hand catalytic converter. To check if it is your
valve cover gaskets, open the hood of your car, start the engine when cold, and let it idle
for a few minutes. If a few whiffs of smoke start appearing around the sides or back of
the engine after things warm up, it's probably the valve cover gaskets.
How Long and Difficult?
Figure two hours if you work slowly and
fastidiously. If you're at all handy, this is an easy job;
just remember to keep everything clean and go slow
and gentle. Look through this procedure for the few
tools and materials that you will need.
What Else Should I Do at the Same Time?
Make sure you replace both valve cover gaskets at the same time. The part number is 077 198 563. They are
about $30 each. AutohausAZ.com (1-800-240-4620) is a good source for these and other OEM parts.
You might want to consider replacing the spark plugs at the same time. Use only factory Bosh plugs, they are good for 50,000 miles. If you don't know what
kind to install, buy them at the dealer and always ask for a discount.
Tools Required
- Screwdrivers
- Metric allen head wrenches
- Metric socket and wrench set
- (2) 17 mm open ended wrenches
- (1) 14 mm open ended wrenches
- Blue paper towels to keep things clean
- Brake cleaner
- "Brush in Can" gasket sealer such as Permatex Aviation or Loctite High Tack
- Auto silicone sealer such as Dow, Permatex or Loctite
Get All Tools Ready
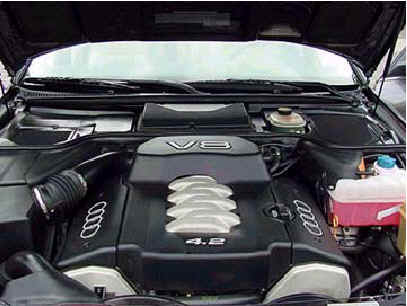
Make sure you have everything to do the job ready. The first step is to remove the engine plastic covers.

Pull the side pieces first, then the center piece. Loosen intake hose clamps; remove
hose and set aside. Stuff a paper towel into both the throttle body on engine and mass air sensor on air cleaner housing.

Right hand valve cover. Note each coil is bolted in place, fuel lines are above and on the left, engine throttle body is stuffed with rag, and valve cover breather hose is on the front end of the valve cover.
Remove the Spark Plug Coils
Each plug has a coil. Each coil is held in place with (2) 6mm cap screws (10mm hex head).
Remove all 16 cap screws. Gently remove each coil, pulling straight up, starting at the front of the
motor. Remove the coil wiring from the black plastic wire trough as you go.
Place the left hand bank coils and wires up on the
firewall at the rear of the engine. Gentle, don't drop or bang the coils. Place the right hand coils and wires
off to the right of the valve cover - they are held in a loose string by connections at the right hand front of
the motor. Remove spark plug plastic troughs (two 6 mm cap screws in each bank). If you choose to replace
the plugs, blow out any grit in the plug wells after
breaking each plug loose.
Remove Valve Covers
Remove the valve cover breather hose at front of motor. It simply connects the valve covers together. Just gently push
the hose off each valve cover fitting. You can reuse the
clamps by just leaving them in place.
Push other hoses, etc. out of the way. There will be a
couple of them lapping over the center edge of each valve cover. Just tuck them in with the injector rails toward the
intake manifold.
Remove the two EFI supply fuel lines. These are situated at the rear of the RH valve cover. Use two wrenches
on each fitting (17mm & 17mm; 17mm & 14mm). Doing this will "backup" the stationary fitting, while you
break loose and remove the rotating fitting. Place a paper towel under the fittings to catch any gas drips - though
there should be little if any.
IMPORTANT! Blow off any loose grit or dirt from around the valve covers. This stuff
tends to accumulate under the engine plastic, and you don't want it inside your engine when
the valve covers come off. Use a compressor, bicycle pump, aerosol brake cleaner, paint
brush - your choice, but clean around the covers carefully.
Remove the valve cover fasteners. Four 6mm hex head cap screws around the edges;
two 6mm allen screws down the middle. Pull off the valve covers. You may need to bump
them gently to initially dislodge, but no prying or banging please. Note right and left because
they're different.

Backside of Audi A8 valve cover and replacement gaskets. When replacing the
gasket, ensure the valve cover and cylinder head are completely cleaned before
installation of new gaskets.

Left hand valve train. Note valve cover breather hose removed on top of timing belt cover. When removing this hose, gently push the
hose off the fitting and reuse the clamps by leaving them in place.
Clean and Regasket
The A8 valve covers are beautiful aluminum die castings. The gaskets themselves are molded neoprene in two
pieces for each bank: one to seal the spark plug holes, the other to seal the valve cover gasket edges.
Pull off the old gaskets and discard. Clean the valve cover gasket surfaces with
turpentine, solvent, or aerosol brake cleaner. Wipe clean and dry with a paper towel. Clean the mating cylinder
head surfaces. Aerosol brake cleaner and a toothbrush work well for this. Be sure
to remove the dried silicone sealer located at the front and back of each head. Wipe dry.
Using a "brush in can" gasket sealer such as Permatex Aviation or Loctite
High Tack, sparingly brush sealer all around the (rough) edge of each valve cover. After allowing 5 minutes or so of
set up, fit the new gaskets to each valve cover. They only go on one way; both center and edge gaskets.
With the valve covers ready to go back on, first smear a dab of automotive silicone sealer
at the front and rear sharp edge sealing valleys of each valve cover. This will fill in any gaps.
Just a very little bit is needed; four places on each valve cover.

After examining the old leaking gaskets with an eye loupe, it appears that they were leaking on the valve cover side, perhaps due to the unmachined (rough)
edge. This is why the "brush in a can" is suggested as a sealer on this surface. The automotive silicone sealer used at the 90 degree cam carrier to
cylinder head junction was also used at the factory during initial assembly. The "brush in a can" is an addition to the original factory set up.
Reassemble
Put the covers back on making sure all the hoses and what have you are out of the way,
ensure the cylinder head sealing surfaces are perfectly clean and dry. Check that the valve
cover screw holes are not full of oil or solvent.
IMPORTANT! Run up the six valve cover screws just finger tight, then gradually work a circle around the six screws 1/2 turn at a time. This will evenly draw down
the cover, uniformly compressing the gaskets. Tighten to about 18 lb-ft of torque.
Reinstall front engine hose, fuel hoses, and coil wire troughs. Blow out the spark plug wells before fitting the coils. Tighten coil fasteners to about 12 lb-ft of
torque.
Replace engine plastic, then remove paper towels and install breather hose, lining up index marks and clamping securely.
Drive your A8 for a couple of days to burn off the oil and cleaner that got slopped around during the procedure. It should then be oil tight and odor free.

When it's April in Willmington, NC the Azalea Belles come out for their inaugural
spring cotillion. When this happens, you can't have any oil on your driveway, you
wouldn't want them to get their petticoat dirty, or would you?

We always say "A valve cover that doesn't leak oil makes us smile!".