| Tech Article Title
|
Author
|
Date
|
|
2.7T Timing Belt Replacement |
RMcQ
|
2005 |
Introduction
For the benefit of anyone
who may attempt to replace his/her own timing belt I am providing the
following technical procedure as a reference point to be used along with
the Bentley manual and proper knowledge and experience. I don't feel the
need to provide any further disclaimer as anyone considering doing this
understands what it means to wrench on a car, but since it seems like
tradition here it is: I am not responsible for your work on your car. If
you screw up you can do astoundingly expensive damage, hurt or kill
yourself, or both.
The timing belt on the 2.7T should be replaced,
depending on who you ask, between 60K miles and 105K miles. The range is
absurd, but that debate can be handled elsewhere. I did mine at about 80K
miles.
The procedure requires removing the front bumper and at
least partially removing the radiator support (AKA "Lock
Carrier" in the shop manual.) I will refer to it as Audi does for
the remainder of this write-up.
There are two reasons why it is
important to replace much more than just the timing belt. As with many
repair procedures there is significant labor involved to get to the part
in question. Other parts that could fail based on age should be replaced
"while you are in there" to save on future labor. Also - and more
importantly - things like the water pump and pulleys should be replaced
because if they lock up they will kill a new timing belt and potentially
kill your engine. This is not the time to cut corners. Replace all the
parts listed below.
The procedure below is how I did the job on my
2001 allroad quattro. There are obviously variations and improvements
possible and bumper/body differences between my allroad and the S4 or A6.
I am not going to attempt to explain the factory way, alternate ways, or
differences between different models. I am simply going to document how I
did it.
Parts to Replace
As noted above, there are many
"while you are in there" parts to replace as part of this procedure. It is
widely known that ECS Tuning sells
a
kit
that includes most of the major pieces the need to be replaced
including:
- The timing belt
- Water pump with gasket
-
Serpentine belt
- Idler roller
- Tensioner roller
- Thermostat
with O-ring
In addition to the kit you will also need:
- G12
Coolant (1 gallon should do)
- Feedback on my write-up has
consistently suggested that it may be a good idea to also replace the
timing belt hydraulic tensioner though that isn't included in the
procedure below
Tools and Supplies Required
I didn't
record and exhaustive list of every tool required but here is a decent
list to be sure you are prepared:
- A full set of basic metric hand
tools including sockets, wrenches, extensions, etc.
- Torx drivers
(T-20, T-25, T-30, T-45)
- Cam Lock Bar (a special Audi tool that I
borrowed as seen in pictures below)
- Crank lock pin (I made do
without)
- Fan removal "chopsticks" (I made do without)
- Distilled
water is best (I used soft tap water)
- RTV gasket goop
- Some
solvent of some kind
- Toothbrush or similar
- Rags, paper towels,
etc.
- Bentley Manual
Procedure
Again please
note that this was my procedure, not the only possible
way.
Preparation
Jack front of car and
support on jack stands. Remove front wheels. Remove belly pan (detail
here.) Open hood. Remove center "V6" logo plastic engine
cover.

A
- Remove Bumper
A1. Partially remove fender liner in each wheel
well by removing several T-25 torx fasteners and pulling the front part of
the liner back so you can work behind it.
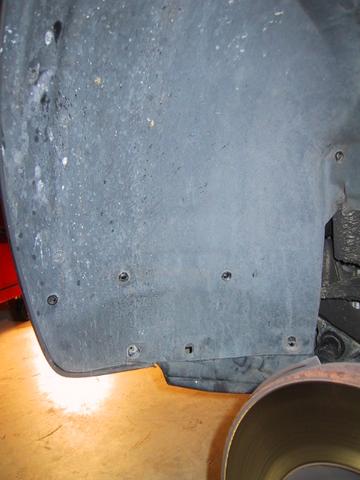
I
temporarily zip tied it out of my way so I could work behind it in peace.
Don't leave it like this too long or it may crease.

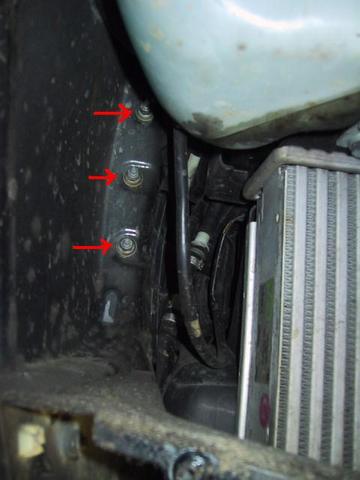
A2.
Now look behind the liner toward the front bumper. What you are after are
the three 10mm nuts on each side aligned in a vertical column. Remove them
with an extension on your ratchet.
A3.
Remove the intercooler grilles (they surround the fog lights). Just pull
straight out with your hands on the strong part of the grille. It will pop
right out.
A4. Remove 2x 8mm allen head bolts oriented vertically
inside fog light enclosure.
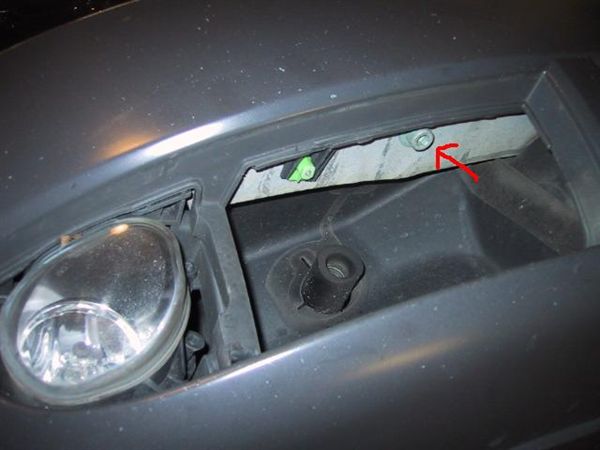

A5.
Remove 2x per side T-20 torx attaching bumper to the 'bumper guide' where
you peeled back the fender liner.
A6. Unplug fog lights
[1] [2] [3] [4]
|