|
|
Jump to: 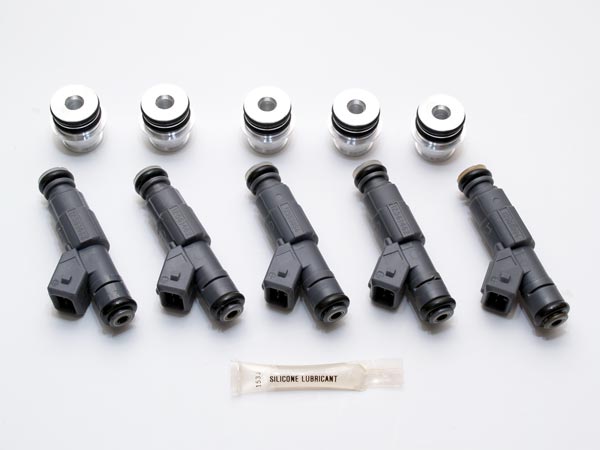 The 034 Motorsports Audi 7A EFI Injector Adaptor Kit (original version); five Bosch fuel injectors, five aluminum adapters, silicone lubricant.
Product Review For owners of older Audis, like my own 1991 Coupe Quattro, keeping your Audi properly maintained can be a chore, especially if you're on a budget. Unlike Domestic or the Asian brands, you can't go down to your local NAPA or AutoZone and pluck an aftermarket part off the shelf for a fraction of the cost of the OEM equivalent. The Internet has made things easier, with plenty of places offering parts from OEM suppliers for less than your local dealer. But there is a lack of every-day aftermarket parts for your older Audi, especially if you own one of the "rare" ones. The fuel injector is a common, readily available part for most vehicles. But the CQ has the famed 20v 5-cylinder engine, which utilizes unique Hitachi fuel injectors. They were state-of-the-art when first developed, but were also overly complicated and never widely used in other engines. There has never been a direct-replacement aftermarket part for these injectors, so the only solution has been to purchase the OEM injector. Of course, since these Hitachi injectors are unique, the OEM replacements are expensive. In October 2003, my Coupe started to misfire and the diagnosis was a failing fuel injector. After 160,000 miles this was no big surprise. In a perfect world I would replace all five injectors at the same time. Yes, the others may be working properly at the moment, but if one has failed due to old age, then other others are probably not too far behind.  Stock Hitachi fuel injector with broken tip.
When this first injector failed, the going rate for an OEM replacement was about $160 from a non-dealer source. $800 for a full set of injectors was out of the question at that time; so one injector was purchased and installed. Nine months later, a 2nd injector failed and to my surprise the price had gone up to $180. A year later after that, a third went and by then the price had shot up to $210. A month after replacing the third injector, the symptoms started again and I knew a fourth was on its way out. It was time to bite the bullet and replace the final two injectors. I had followed long running discussions on possible replacement injectors for the 20v engine. There was no direct-replacement for the injectors, other than OEM, but many wondered if another injector could be adapted to work. Patrick Carlier from Belgium, took it upon himself to find a solution. Starting with an inexpensive and reliable Bosch fuel injector, he created a number of prototype aluminum adapters, which would allow the Bosch injector to fit into the Audi fuel rail. Once a suitable adapter was created, a member of the 20v community tested the adapter kit. Unfortunately, the first set of Bosch injectors tested were not a good match for the Audi engine, causing it to run extremely rich. But on the positive side, the aluminum fuel injector adapters proved to work perfectly. It was soon discovered that the Bosch injectors used in the GM LS1 engine have the same technical specs as the Hitachi injector. However, they are high impedance injectors, whereas the Hitachi's are a low impedance injector. This would require bypassing the Audi's injector resistor pack, which was accomplished by simple rewiring. With new injectors and adapters in place, a number of people tested the system and reported positive results. The word began to spread over various Internet groups and Patrick began selling the kit directly to those that requested. Soon, 034 Motorsports (www.034motorsports.com) approached Patrick about distributing the adapter kit and in September 2005 they added the kit to their online catalog for a price of $305.  Stock Hitachi fuel injector (top); Bosch fuel injector with aluminum adapter (bottom).
While I had heard about this solution before replacing the third injector in my car, I really had some doubts about the reliability of such a kit and the logistics of dealing with an individual in Europe. By the time the fourth injector started to fail, I had learned that 034 Motorsports was now selling the kit and I decided to give it a try, even if it did mean replacing the three newer injectors I had purchase over the past two years. The thought of having to bypass the resistor pack did cause some concern, and the fact that I was due for and emissions test within a month was also on my mind, but eventually my pocketbook overruled both of those thoughts. Ordering from 034 Motorsports was quick-and-easy, and the product was delivered a few days later. On delivery, I found only four injectors were in the package, rather than five, and there were no written instructions on how to bypass the resistor pack. A quick call to Chris Miller at 034 Motorsports set things right and the fifth injector and instructions were sent via overnight delivery. Even with rewiring the resistor pack, the installation is an easy do-it-yourself job, taking about an hour. The fuel injectors are easily accessible at the top of the engine, requiring the removal of three bolts to remove and replace them. The resistor pack wiring is also easily accessible at the base of the windshield; the rewiring consists of splicing six wires together. To make things even easier, 034 Motorsports now offers a $31 wiring adapter, which makes bypassing the resistor pack an easy plug-and-play modification. This adapter was not available when I ordered, so I had to manually bypass the resistor. Complete how-to instructions on the install can be found below. 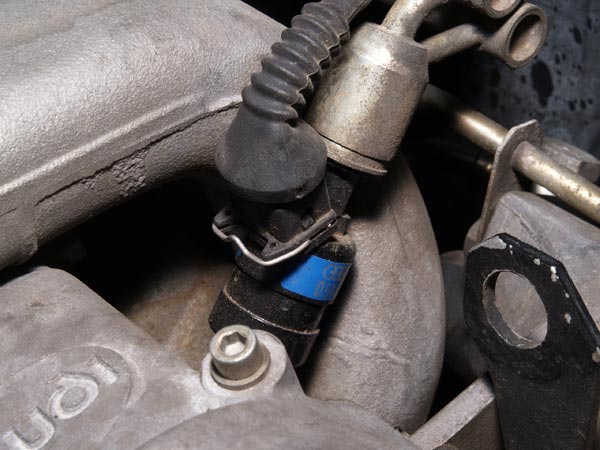 Stock Hitachi fuel injector installed in the fuel rail.
Once the adapter kit was installed, I found my 1991 Coupe Quattro running better than it has in over two years. I'll admit that I was hoping for a minor boost in performance, but it feels about the same had it always had when running smoothly. However, gas mileage has greatly improved, which isn't too surprising considering how poorly it had been running. Overall gas mileage is up about 3-4 mpg. I am also happy to report that my car passed the Colorado emissions test with no problems at all. Since purchasing my conversion kit, 034 Motorsports has updated the product with different injectors, which are advertised to add a minor performance increase. If you're an owner of an older Audi with the 20v engine and you find yourself needing to purchase a new fuel injector, the 034 Motorsports 7a Injector Conversion kit is highly recommended. Not only is it an incredible value when compared to five OEM injectors, it now also promises to increase the performance of your Audi. Installation Included in the 7A Injector Conversion Kit
 Fuel injector resistor pack is located below the windshield, to the left of the fuse box.
1. Start by disconnecting the negative battery cable. Next, locate the stock resistor pack, which can be found under the hood, near the bottom of the windshield to the left of the fuse box. It is easily recognized by the wiring harness passing through the firewall and ending at two light-colored wiring connectors mounted on top of the resistor pack. Removing the rain gutter out of the way greatly increases access to the resistor pack; a word of caution, the clips holding the rain gutter on could be brittle with age and may easily break.  Unplug the wiring harness, the two connectors with the multi-colored wires will need to be cut off.
2. Disconnect both connectors from the resistor pack; a small flat head screwdriver is useful in prying up the clips holding the two ends together. With the connectors separated, you will only need to worry about the ends that pass through the firewall into the engine bay. If you purchased the available wiring adapter, you can plug it into each of the connectors coming out of the firewall. Once the wiring adapter is connected, you are done with this part of the installation. If you don't have the adapter, you will have cut and splice the two ends together.  The cut and stripped wires are spliced together.
3. Cutting and splicing the two ends is simple, although the included instructions make it sound more complicated than it really is. To start, cut the connectors off both ends of the wiring harness coming out of the firewall (the one with the different colored wires). I left about 2 inches of wire on each connector in the off chance I want to go back to the stock configuration. Slicing the black wiring harness sleeve a few inches will give you easier access to the group of wires. With the connectors removed, strip about one inch off of each wire. When all six wires have been stripped, twist the bare ends of all together and secure with screw-on wire connector and electrical tape. After wired together, I inserted the bundle of wires back into the black sleeve and used a fair amount of electrical tape to keep it waterproof and secure.  The fuel injectors and fuel rail are easily located on the right side of the intake manifold, on top of the engine. Three 10mm bolts secure the fuel rail to the intake manifold (bolts have already been removed in this photo).
4. With the wiring done, it's time to replace the fuel injectors. Start by removing the electrical connectors from the fuel injectors. There is a spring clip holding the connector to the injector, use your screwdriver to depress the clip then lift off the connector. Next, remove the three 10mm bolts that secure the fuel rail to the intake manifold. You can then lift up the fuel rail enough to remove the injectors - the far injector may be a little tight to get too, but it's easier than going through the trouble of disconnecting fuel lines and removing the entire fuel rail. 5. With the fuel rail removed, remove each injector. The injectors are very snug inside the fuel rail and take a little bit of effort to remove. The best way is to twist them back and forth and gently work them out. If your injectors are old there is a good chance that the tip inside the fuel rail will break off when removing. Don't be alarmed if this happens, it is fairly common with the Hitachi fuel injectors. Just make sure that the tip isn't still in the fuel rail or falls down into an undesirable area of the engine bay. With all injectors removed, clean the inside of the fuel rail cups to ensure a good seal when installing the new injectors.  Bosch injector and aluminum adapter.
6. Next, prep the new injectors for installation into the fuel rail. You will first need to put the aluminum adapters on each of the new injectors. With the supplied silicon lubricant, lube the o-rings on the top of each injector. There isn't much of the supplied lubricant, so you may want to be a little frugal with its application. With the injector lubricated, slide the aluminum adapter on, making sure that it is well seated. 7. With the adapter installed, lubricate the o-rings on the adapters. When complete, install each injector/adapter into the fuel rail cup. The fitment is going to be very snug. If you cannot get the injector in all the way by hand, use a large set of pliers to gently squeeze the injector in the rest of the way.  New Bosch injector and aluminum adapter installed in the fuel rail.
8. Once the injectors/adaptor are properly installed in the fuel rail, reinstall the fuel rail. Make sure that all the injectors are properly lined up with their respective holes (the flashlight helps) and reinstall the three 10mm bolts. Aligning the injectors can be tricky, especially since the new injectors do not have a long tip that extends into the engine block like the OEM Hitachi's. 9. With the injectors installed, reconnect the injector connectors and the negative battery cable. When you first start the car it may take a crank or two since there is no fuel pressure and the fuel injectors are dry. After the engine is running, check each fuel injector for leaks. 10. Enjoy your smooth running engine at a fraction of the cost of replacing the OEM injectors. |
|
Advertising |
Contact Us |
Cookie Policy |
Privacy Statement |
Terms of Service |
Do Not Sell My Personal Information
© 2020 MH Sub I, LLC dba Internet Brands |