|
|
A6 Clear Corner Mod for Dummies I always hated the amber corners of the Audi's. I saw the posts on AudiWorld for the A4 clear corner mods. I was so excited, I didn't quite realize that it was for the A4 (and not the A6). It was the "see what you want to see" thing. So after I go out and get the T30 driver bit, I unscrewed the three bits and wrestled for a loooong time on getting the light units out. Until it hit me.... Something's not right. So, I went back to Audi world and included the "A6" in my search. I saw that everyone else was having them done and paying an arm and a leg for it. Well, if anyone can do it, anyone else can learn to do it. Most importantly, once ya learn, you have to share what you learned to help others. So here we go... The A6 Clear Corner Mod for Dummies. If I missed anything or you learn any distinctions that can help others, please let me know and I'll include it. Disclaimer! Please check your state and local laws, warranty, and health insurance ;) before attempting this modification to your A6. Time: About 30 minutes 1. Drive your car onto ramps or wood blocks. I used multiple layers of wood so I could turn the wheels (helpful when removing the front parts of the wheel liners).
2. You have three lower grills on the front of your A6. The outer two also house the fog lamps. Use a small screw driver or nail-set to gently pop the clip towards the outer edge of the car (towards the fog lamp). You will see it move. Gently pull on the grill and it will come out. Do this on both sides.
3. If you lie on your back and look on the underside of the bumper, you will see a hole with a socket head bolt. It takes a Hex wrench to remove the M8 x 132 bolt. It's a loooong one, so it will take some time. Do the same on the other side as well. Now for the fun part. Besides these two long bolts, there are 6 nuts that need to be removed just ahead of the wheel well and on the back edge of the bumper cover.
4. There is a noise insulation panel that covers the front under-side of the car. It goes from the bumper back to the transmission and out to the wheel wells. It is held in place by quick release screws/fasteners (A) on the underside of the car. It is also has plastic fasteners (B) in the front of the wheel wells. These only require a 1/4 to � turn. Remove the cover and set aside.
5. On the front of each wheel well, along the outer edge, there are three screws (some may be screws or bolts depending if you have a nose mask or not). Undo these and set them aside. You may want to turn the wheels to give you easier access. This is where you want to make sure you have the latex gloves on. If you have small hands, the next part will be even easier. There are 3 nuts that hold the back edge of the bumper cover to the front edge of the front fender. See the next step for an exploded view of them.
6. To get to these nuts, now pull the front edge of the wheel liner out and, lying on your back, you can see up into the front fender and see these nuts with a flashlight. I'd recommend starting on the left side of the car since there's more room. You will feel the 3 studs. You will only be able to make small rotations with the wrench or socket. Once you do the left side, you'll know what to expect on the right side. On the right side, you have some A/C plumbing so you will want to weave your hand up to these nuts. If your hands are bigger, ask you kids, wife/Girl friend (yeah, right), to help you. If none of these folks are available, just use a TON of patience. DO NOT PULL THE BUMPER YET.
7. Now there are some snaps along the top edge of the bumper cover in front of each wheel. Gulp hard, and just pull. The will snap out. If it snaps so large that your stomach goes into knots, you did it perfectly. See the pic here to see what it looks like when you realize that you're now ready to pull the bumper.
8. Gently pull the front bumper towards to about 4 inches. If you want to pull it further, you'll need to start disconnecting the headlight washer hoses. SO STOP J In this pic, I got a little overzealous and yanked the housings out before I took the pic. But now it's easy. On top of the headlight housing, there are two visible T30 screws. Unscrew them. To the outer edge of the housing, there's a hole in the frame. If you look deep down, there's a third screw. Use an extension bit to unscrew it. It hold the bottom of the housing in place.
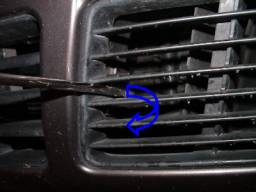
10. Now I'd recommend cleaning lenses. Also, the next steps should be done on a table with good lighting and a soft towel on the surface of the table. The amber lens is held in place by a few plastic clips. If you look at the top and bottom edges, you will see that it has a clip at the bottom that fits/grabs between the front edge of the silver reflector and back edge of the glass. I saw the A4 mod required a few holes to be drilled. I was really worried about moisture leaks - so the fewer holes the better. If you break out the one lower clip the right way, you only need one, that's right, 1 tiny hole. 11. With the housing upside down, drill one small hole right above where the yellow clip/tab is holding the reflector in place. See the pic here.
12. Use a small piece of metal ( I used a small hex wrench) to push on the edge of the tab to the point where it breaks. This will now free the reflector and allow it to move within the assembly. Remove the turn signal bulb by twisting and then pulling it out. This will serve as the hole to remove the reflector.
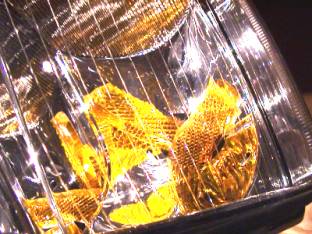
13. With a pair of wire snips or cutters, poke through the opening for the turn signal bulb and grab the edge of the reflector. Basically, if you start to break the reflector, it'll shatter into pieces (shards). The more you do it, the smaller the pieces become so that the fall out the hole. BE CAREFUL not to move the assembly around too much as you risk scratching the silver reflector coating of the housing unit itself. You can use compressed air to clean little pieces of amber reflector out of the housing.
14. Using some auto silicone sealant, fill in the hole you just drilled. Don't put too much in. Put just enough in so that it spreads a tad beyond the hole. Then put a little on the outside of the hole. This will hold it anchor it to both sides of the hole. Now, put a piece of tape over the outside to hold the silicone in place and quickly turn the housing right-side up to prevent the silicone from continuing to go into the housing. Put the turn signal bulbs back in.
15. Repeat the process on the other lens housing and you're done. Repeat the steps above in the reverse order to put everything back together again.
Hope that helps and I welcome anything that I missed so I can include it to help others in the future. This will save you a few hundred bucks and give you the satisfaction of knowing that you did what most people thought couldn't be done. Take the money you save, and get the eBahn Bentley Publisher's CD Shop Manual. It make it all much easier. |
|
Advertising |
Contact Us |
Cookie Policy |
Privacy Statement |
Terms of Service |
Do Not Sell My Personal Information
© 2020 MH Sub I, LLC dba Internet Brands |