|
|
Purpose The Tiptronic steering wheel has two rocker switches that allow, when in Tip mode (ie. gearbox lever on the right), to change gears. This modification costs around $1000 to $1200 , took about 6 hours, including taking pictures and writing down notes and. .... oh by the way, please excuse my English, I know it sucks! I will try my best. Disclaimer (please read) - You assume all responsibility for any damage or unsatisfactory result
obtained by following this modification. Car A European 1999 A6 2.8 with Tiptronic gearbox. Needless to say, this mod only applies to car WITH the automatic tranny ! Tools needed
Parts needed
(the above part numbers and prices are given as is, and may vary depending on country, car color code, etc. Please CHECK with your dealer.) Installation
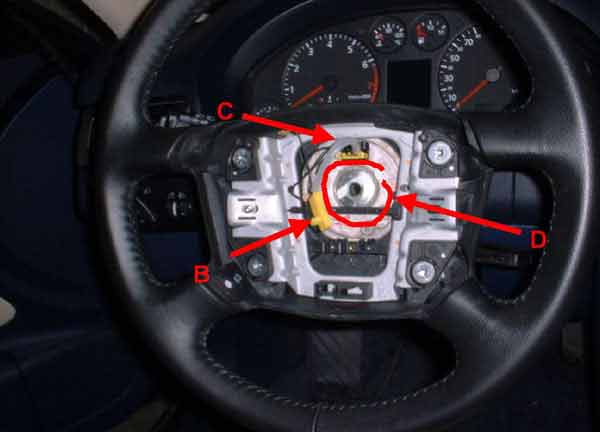
1. Remove original steering wheel Line up car wheels. Although not necessary, it will make the fitting of the new steering wheel easier. Then, before disconnecting the battery, write down all parameters that could be lost, such as radio codes, etc. As airbags are triggered by a high voltage, I suspect they could be subject to static discharge, like those which can occur when disconnecting a plug. I chose to disconnect both ends of the battery (with 10mm wrench). In order to deter the least motivated of the readers, I may add "wear protective glasses, earplugs and sun screen!". Still reading ? Unscrew the two bolts that are "behind" the wheel (Tool: T30 Torx) to release the airbag (see "A" on picture below).
Disconnect its yellow plug ("B" on picture) and store it somewhere safe. Unclip the short cable "C" that you just disconnected from the airbag. With the M12 Torx head, unscrew the central bolt "D" to release the steering wheel.
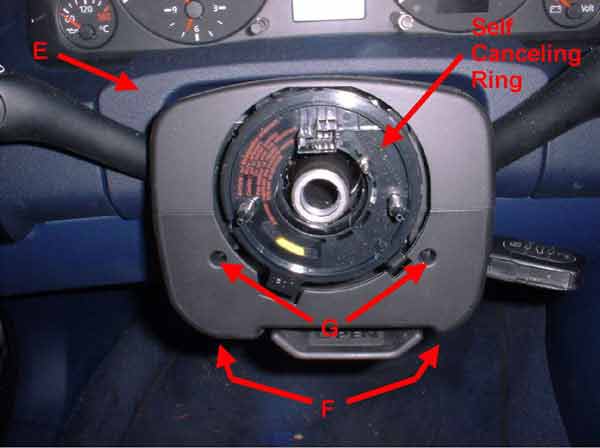
2. Remove trims around steering wheel Unclip the small instrument cluster trim "E" by pulling it towards you. With the Phillips screwdriver, remove both screws from the lower trim "F". The upper trim of the steering wheel area is now free. Still with the Phillips screwdriver, remove both screws "G" from the lower trim. From underneath it, remove one screw (Tool:T25 Torx) and remove the handle that allows adjustment of the steering wheel (two Torx T25 screws). You can now nicely pry the lower trim out, paying attention to the rubber sealing around the ignition key slot. Note that your car is now harder to steal :
3. Remove self-canceling ring and driver's storage compartment Just unclip it from its four catches and disconnect the yellow plug that comes from the car's harness. With the 8mm socket, remove the five bolts that hold the driver's foot-well trim (one is located on the fuse box compartment, on the left side of the dashboard). Unclip this trim from its two catches above the pedals, unplug the ODBC connector (the purple plug) and the light. You can now free the trim, it will be easier to run wires without it. 4. Run wire from steering wheel to instrument cluster With the Phillips screwdriver, remove the two screws "H" located at the bottom of the instrument cluster. Then gently slide it towards you.
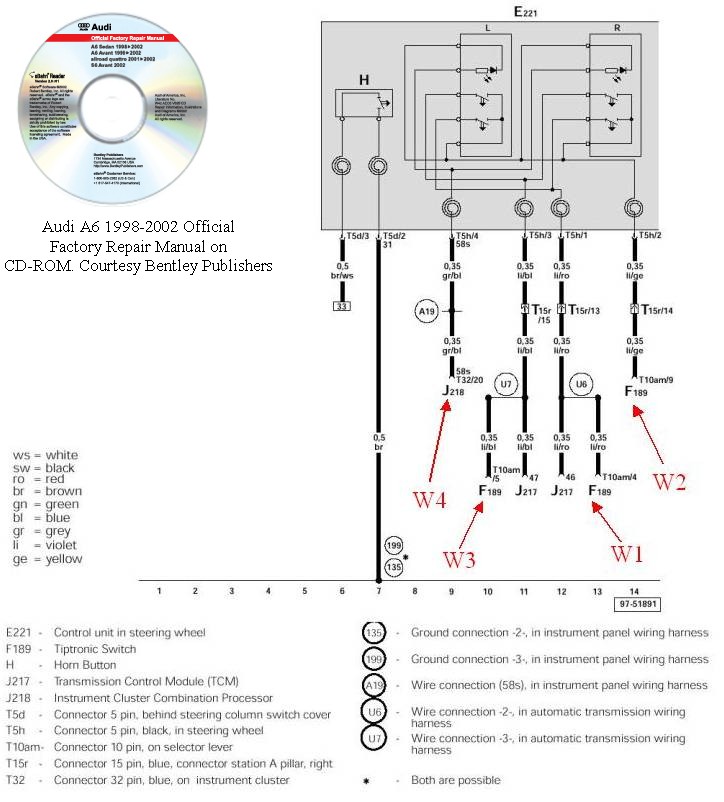
When the cluster pokes out of the dashboard, disconnect the left blue plug by pulling up its pink lock lever (see picture below). No need to disconnect anything else. On the harness of this plug, identify the gray/blue wire. Then, solder a 2 feet wire on it, check with the voltmeter that it is linked to pin number 20 on the plug (the pins are numbered). Please check the wiring diagram of YOUR car. This wire turns on the light under the "+" and "-" symbols of the rocker switches. Put instrument cluster back, with the new wire running behind and coming out in the steering wheel area.
5. Run wires from steering wheel to Tiptronic selector First remove the wooden trim around the Tiptronic lever: with the flat screwdriver, lift the back upwards ("I" in picture). Be careful not to scratch it, apply moderate strength. When unclipped, lift it up slightly and pull towards you. Be careful not to lose the two metal tabs on which the trim clips, they have a tendency to run free. On the Tiptronic shift, slide down the chrome ring "J" located under the knob. Select gear "3" for convenience. Then pull out the knob's button "K" to the left, (to release its lock) and pull the whole knob up at the same time.
The chrome cover of the Tiptronic mechanism has four retaining clips on its sides. Pry them open and lift the cover up slightly, while you help by pulling up the harness at the same time (it is on the left side of the cover). Be careful with the circuit board and the Hall sensors fitted underneath the cover. Unplug the connector. Then run three wires from there to the steering wheel area. It is better to tag them at both ends, we could conveniently name them W1, W2 and W3. We will connect them to the Tiptronic harness later. Inside the Tiptronic mechanism, make the wires follow the same path as the harness (see "L" below). This will prevent them from being pinched when we put the chrome cover back.
6. Connect the wires Locate three wires on the harness and solder our three wires on them, as follows: Purple/red wire (pin #4 of Tiptronic plug) with W1 Purple/yellow wire (pin #9 of Tiptronic plug) with W2 Purple/blue wire (pin #5 of Tiptronic plug) with W3 Connect the other end of the wires to the five-pole plug you bought. Its pins are clearly numbered 1 to 5. The pinout is as follows. Check continuity of four contacts.
7. Fit new self-canceling ring and steering wheel First put all trims and plastic housings back. Clip the four catches of the new self-canceling ring onto the brackets, then clip both connectors on its back : the yellow plug (airbag and horn) goes into "M", whereas our custom-made plug goes into "N". Note that the 6-pole plug above "N" is for ESP, which is not fitted in my car. Locate on the front side a security tab that prevents the self-canceling ring from turning freely during transport (otherwise this could damage the internal connections if exceeds the allowed number of revolutions). Pull to break it.
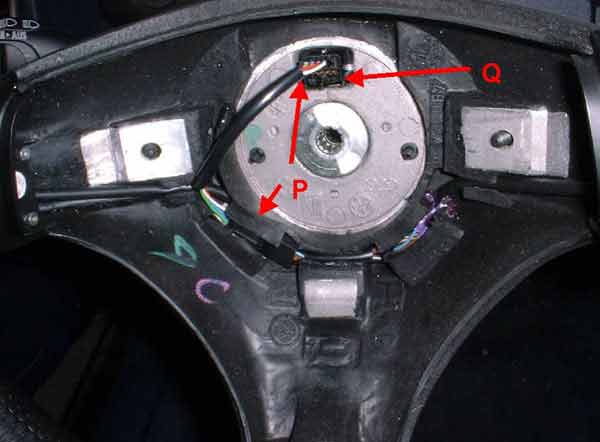
Adjust the new steering wheel into the shaft, tighten its Torx bolt to 70 Nm (52 ft lb). Plug the short cable "P" (for Tiptronic rocker switches) into the self canceling-ring and the steering wheel. Clip it into the rubber tabs, this will prevent noise. Then plug the yellow connector from airbag/horn into "Q". Put the airbag in position and tighten its two Torx bolts to 7 Nm (62 in.lb).
8. Connect the battery Connect the battery when nobody is inside the vehicle (still the airbag paranoia), turn ignition on but do NOT start the engine before another three minutes. This gives time to the ECU to adapt to the throttle position sensor. This gives you time to put the AudiSport logo. (I know, it is missing on the picture ;-)
|
|
Advertising |
Contact Us |
Cookie Policy |
Privacy Statement |
Terms of Service |
Do Not Sell My Personal Information
© 2020 MH Sub I, LLC dba Internet Brands |