| Tech Article Title
|
Author
|
Date
|
| Do-it-Yourself Sway Bar Installation
|
Steve Sherwood
|
1999
|
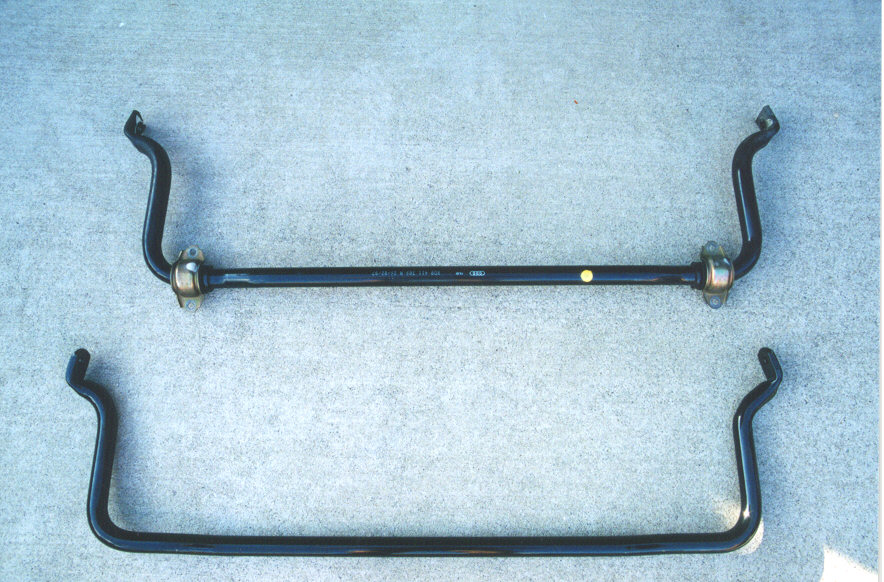
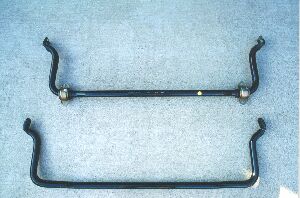
Anti-Sway Bars, more commonly referred to as Sway Bars, are used to reduce body roll during fast transition turning. The Audi A4 comes with anti-sway bars in all trim levels. The 97 1.8T and the 96 and 97 2.8 A4 have the same anti-sway bars. Starting with the 98 model year the A4 came with a sports package which included a hollow front bar 27mm, and a solid rear bar at 16mm. The difference between stock and aftermarket sway bars can be seen in the pictures below.
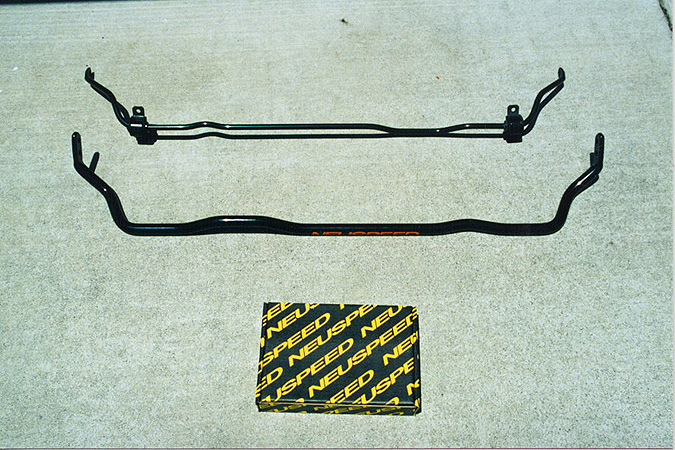
There are several companies that offer aftermarket anti-sway bars; Neuspeed, LLtek, and Total Audi Performance (TAP) to name a few. Neuspeed developed their own anti-sway bars at 27mm solid in front, and 22mm solid rear bar (with two adjustment holes for a soft and harsh setting). The LLtek and TAP rear anti-sway bars are manufactured by ADDCO and are 19mm in diameter.
Tools Necessary
- Floor Jack (the one that came with the car or a hydraulic aftermarket
jack -- highly recommended)
- Screwdriver - Standard
- 13mm open or closed end wrench (2 preferred)
- 17mm open or closed end wrench
- Silicone grease for sway bar bushing (usually comes with sway bar)
- Jack Stands (2)
Installation
The time required to remove and re-install both aftermarket sway bars
ranges from 1.5 to 3.0 hours depending upon your level of expertise, your tools, and the type of jack employed.
Click for larger image
Special Note: The OEM jacks that come with your A4 are unstable and not designed to do anything but lift the car just enough to allow wheel/tire removal. Any side loading, such as leaning into the wheel well to remove the engine shroud or swaybar mounts, can topple the car off the jack. At that point, with no jack stands you can have your head crushed instantly, and even with a jack stand, if it is not properly placed, the stand can literally punch a hole in the body, doing costly damage and possibly still allowing the car to crush your head or other (human) body parts caught in the suspension. In addition, it wouldn't hurt to use proper blocking of wheels to increase stability. You should put a wood block in front of both front tires while working on the rear, for example. Again this statement is not intended to get you worried or anything, just to shock you into being safe whenever you jack up a car and do any modifications.
- Slightly loosen the lug nuts on your front wheels
- Jack up the car at the most forward jack point (see manual if you
don't know where it is). In addition to the jack, place a jack stand just adjacent to the jack itself (this is a safety measure)
- Jack the car up so the front wheel is about 2-3 inches off the ground
- Remove wheel, set aside
- Remove plastic shroud under the engine by using a standard screwdriver...there are about 6-8 attachment points that hold it to the car...including two in the wheel well. After it is removed set aside shroud and plastic nuts.
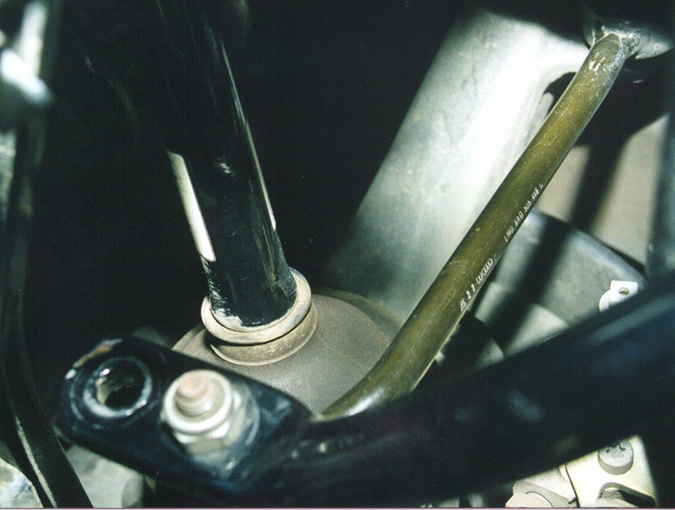
- Gradually remove all nuts...should be two sets of two bolts near the center...and the 17mm bolts at the bar ends.
- Gradually lower bar and remove.
To Install Front Bar:
- Repeat process in reverse order. Make sure to use the new bushings
that come with the anti-sway bars, and remember to grease them. They are either polyethylene or rubber.
- Tighten all bolts securely. Tighten a little bit tighter that you
would think. The reason why I suggest this is that my bolts came slightly undone after some use.
- Test drive the car without the shroud on, to make sure everything is
tight.
- Reinstall plastic shroud when totally done.
Note: Make sure you don't install the anti-sway bars upside down...don't
laugh...it is possible to do. If it doesn't look right...it probably isn't.

Click for larger image
To Remove Rear Bars:
- Loosen lug nuts on rear wheels
- Jack up car as described above...use jack stands as a safety precaution.
- Remove wheel, set aside
- Go under car and remove the two sets of 13mm bolts near the center of
the car and the 17mm bolts at the end of the anti-sway bar. The best way to remove the 17mm bar-end nuts is to use a 5-6mm allen wrench at the end, while turning the 17mm nut with a open ended wrench. Remove stock anti-sway bar.

Click for larger image
To Install Aftermarket Bars:
- First lubricate the replacement bushing (if you get one) or just
lubricate the existing one with grease.
- Reinstall bushing over anti-sway bar
- Place sway bar in proper location....you might have a little bit of
difficulty getting over exhaust (I did).
- Tighten each bolt moderately...when fully in place, tighten the bolts
completely.
- Replace wheel on car....
- Test drive car...then do a double check on the lug bolts to make sure
they are tight.
After a week or so, go back and check the bolt tightness on all
bolts...last thing you need is one of these babies falling off the car in a high speed freeway onramp. Every year you should re-lubricate all of your anti-sway bar bushings with grease.

Click for larger image
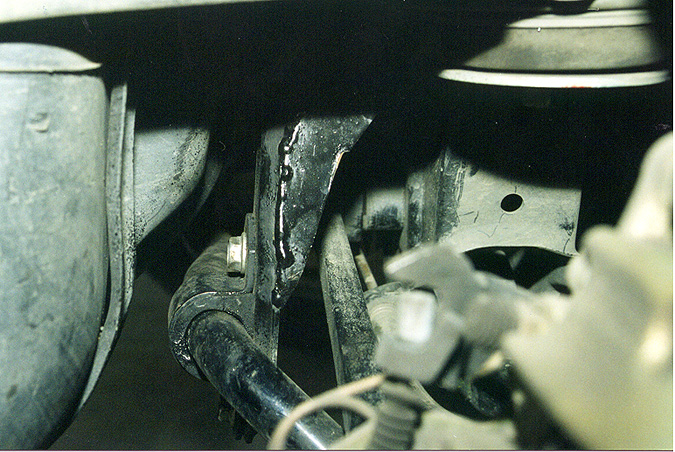
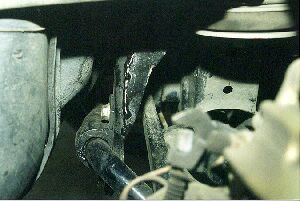
WARNING: Some A4 owners have reported cracked rear subframes and broken or damaged uplink arms when using the larger solid rear sway bars (22mm in diameter) in the stiff setting. The older A4s (96 thru early 98) had metal uplink bar arms, while the 98.5 and newer cars seem to all have these larger plastic rectangular uplink arms. Unfortunately, one poor soul had to replace his whole subframe due to the extent of damage to his car. If you want to avoid this occurrence I would highly recommend that you set the rear anti-sway bar at the softest setting (if it has multiple mounting holes) to prevent additional stress on the suspension of the car. The softest setting uses the holes nearest the ends of the anti-sway bar.....the stiffest setting usually uses mounting holes down the bar a few inches. To my knowledge the 19mm ADDCO rear bars and the OEM sport rear bars (16mm) have not produced any subframe damage. However, I was emailed by someone that had the plastic uplink arms break on his A4 with the ADDCO rear bars. The main point is that some kind of damage can be had with ANY aftermarket anti-sway bar manufacturer and that you need to really make sure you are installing the part correctly. If you intend on participating in autocross events and high performance driving schools, I would highly recommend that you definitely check for possible damage in the subframe and uplink arm areas.
To reinforce the subframe that the rear anti-sway bar attaches to, a support piece or gusset may be required. I worked with a shop to fabricate a gusset that supports the subframe right near the anti-sway bar mount. This will allow for a small amount of additional stress and hopefully prevent any subframe cracks. See picture below.
Click for larger image
Disclaimer: This FAQ is being written as a guide to those who wish to
install anti-sway bars themselves. It is just a guide by someone who has done the install on several occasions. I am not a mechanic by trade. Please take that into consideration when doing the install. The author of this FAQ and the website owner assume no responsibility for any damage to you or your A4 if you choose to follow these instructions. Use of these instructions is at your own risk. Good luck.
|