|
|
Shifter Removal and Installation Procedure: Tools Required:  *If you are installing a TG shifter with the supplied e-ring, circlip pliers are not necessary but a pair of ordinary pliers will be required to install the e-ring. You can destroy the old circlip. New step has added 10/14/03 It is recommended you purchase some ordinary white lithium grease, which comes in a tube or little can and is available at any auto part store. I haven't tried out the Mobil One synthetic grease yet, but that may be a better choice for longevity. I've heard many stories of people dropping screws/nuts down into the tub below the shifter, therefore you may want to have a magnetic pickup tool available. -------------------------------------------------------------------------------- Removal: 1) Unscrew and remove shift knob. 2) Remove boot and trim piece by pulling up as shown in the picture. It will unsnap. Pivot it up, pull the boot off the shift lever, and slide it back to remove. 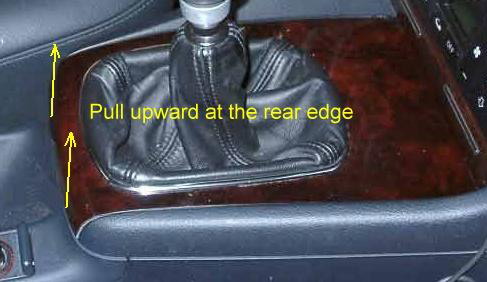 3) Remove sound insulator by removing 2 10mm nuts and pull straight up. 4) Remove the rubber collar, circlip, sleeve, and spring. If you have a replacement e-ring like I supply, it’s OK to destroy the circlip....Just rip it off with pliers and discard. 5) Remove the 2 6mm hex socket bolts. One on top in the center, and one down deep connecting the shifter fork to the tube. Note that on the bottom, the bolt passes through a cylindrical clamping plate. Don’t worry about retrieving the plate. You can get it later. 6) At the top at each corner is a 10mm nut. Use the 10mm open wrench for the 2 toward the front of the car and remove them. Use the 10mm socket for the rear 2 and remove them. Take care not to drop the nuts. 7) Now that the frame is loose, you can remove the 4 T20 Torx screws from the front and back ends of the shifter guide rails. Again, take care not to drop these screws. 8) Now you can remove the entire shifter and carriage with rails from the car. The shifter rod will just drop out of the bottom of the assembly. If you have the older style shifter, take care and slowly slide out the shifter rod, with your finger covering the white plunger carrier's hole (the "white thing"), to keep the plunger and spring from flying out and getting lost. Take the lithium grease and lubricate the plastic pivot ball located in the carriage assembly. Get it nicely coated by swiveling it around. 9) Retrieve the cylindrical plate, (optionally apply some ordinary glue stick to its bottom side), and replace on top of the tube with its hole lined up with the slot in the tube. -------------------------------------------------------------------------------- Installation: 1) Slide the new shifter into its receptacle in pivot ball in the carriage. If you have the old style shifter, first insert the spring and plunger into its white cylindrical housing and hold in its retracted position with a socket extension as you slide the rod into place. Do not yet attach the spring, collar, and e-ring The shifter is keyed so that it must be in the correct orientation to fit fully into its receptacle. 2) Lower shifter and carriage into the cavity, manipulate into place, and loosely attach the top center hex socket bolt. 3) Plug the lower hex socket bolt onto its socket tool and ratchet extension, and apply some tape to keep it securely in place. 4) Insert shifter fork into the shift tube, aligning its threaded hole with the cylindrical clamping plate's hole. Now you should see the threaded bore into which you will want to insert the 6mm hex socket bolt. Hold the shift lever with one hand to keep the holes lined up. 5) Insert the lower socket bolt into the lined up holes by manipulating the ratchet extension, get it to thread in, and loosely tighten. 6) Replace the 4 Torx screws, loosely tightening each one. Once all are installed, go ahead and tighten all 4. These are popular items for people to drop, so be careful. You can tape them to the tip of the torx driver for the initial insertion and thread engagement. Then remove the tape and continue. 7) Now pull up on the carriage so that it returns to its proper position, exposing the threads for the 4 10 mm nuts. While continuing to pull up with one hand, spin on 2 of the 10mm nuts with your fingers. Do front-left and rear-right first. Then you can discontinue pulling up and install the remaining 2 10mm nuts easily. Be careful not to drop these. Now tighten all 4 10mm nuts. 8) Replace spring and collar. Snap in supplied e-ring with some pliers while pulling up on the shifter and pushing down on the collar to get the groove exposed. Regular slip joint pliers work well for seating the e-ring. If you can’t get the groove exposed, the shifter is not seated fully into its receptacle. While pulling up on the shifter, rotate the spherical joint until the shifter pops in. 9) Adjust upper and lower 6mm hex socket bolts for the correct operation. Generally, you can first tighten the upper 6mm bolt midway in its slot and do all of the adjustment using the lower bolt. The lower bolt should now be loosely tightened and then backed off so that you can manipulate the lever without affecting the shift rod. With the shifter mechanism in neutral, the lever should be tilted back about 7 degrees and should be tilted to the right about 3 degrees. Refer to the photos below. Tighten the lower bolt taking care not to disrupt the angles. That should do it, as there is some leeway in the system. If you have some doubt about your ability to judge angles, you can construct a little "plumb bob". Take some fine string and tape it to the surface of a quarter-dollar so it will hang down vertically. Then you can hang it next to the shifter and use the 1/2" and 1/4" measurements shown in the photos as a guideline. The car should be level, of course. The diameter of the shaft is 0.472 inches, so roughly speaking, you would tilt the shifter back by one shaft diameter and to the right by 1/2 shaft diameter, measured from the e-ring.  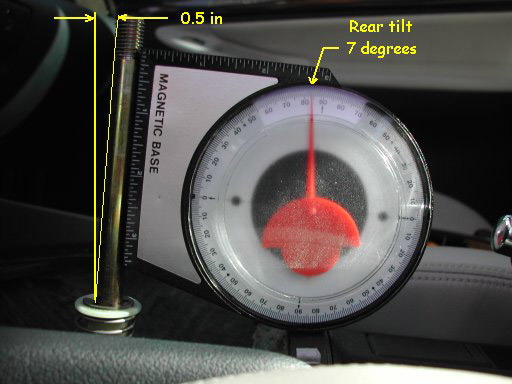 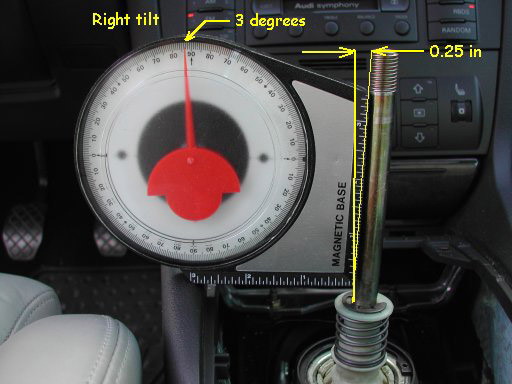 When properly adjusted, the main test is that left-right "play" should be the same in 1st and 2nd gear as it is in 5th and 6th gear. If 1st to 2nd gear feels tight, the shifter needs to be adjusted slightly more leaning to the right. This is the most common misadjustment...needs more right tilt. Of course check reverse gear engagement. Not enough rearward lean will cause difficult reverse gear engagement. If there is some asymmetry between front throw and rear throw relative to neutral gear, you can adjust via the upper bolt: If it takes more travel to go from 2-4-6 to neutral than 1-2-3 to neutral, then adjust the upper bolt for a more tilted back shifter (upper bolt more rearward in the slot) Now tighten up the 2 6mm hex socket bolts, redo and retest as necessary. You might want to put on the knob and go for a drive before reinstalling the sound panel and shifter boot. 10) When all is good, replace sound panel with its 2 10mm nuts. 11) Replace rubber collar, trim/boot and knob. If you have a shifter with reduced knob height, be certain to trim the plastic collar within the boot by the corresponding amount of reduction. You can, alternatively, completely remove the collar inside the boot by unscrewing it. |
|
Advertising |
Contact Us |
Cookie Policy |
Privacy Statement |
Terms of Service |
Do Not Sell My Personal Information
© 2020 MH Sub I, LLC dba Internet Brands |