| Tech Article Title
|
Author
|
Date
|
| Brake
pad removal and installation for Brembo |
jyoteen
|
2002 |
Other kits such as the Porsche Big Reds, Mov'it, Stoptech, and 2Bennett may also benefit from this guide.
This FAQ is provided as a guide and you may proceed at your own
risk. The usual disclaimers apply.
My 2001 S4 Avant has the
Brembo 355mm (14" Rotor) and the Brembo caliper installed in the front.
After about 450 track miles and 1500 street miles, it was time to replace
the brake pads as I was hearing metal to metal contact noise when the
brakes were applied.
I have never undertaken pad replacement on the
Audi, but the Brembo based kits are supposed to be easy for pad swap and
installation. The following is for newbies or people who may be on the
fence about undertaking such a project. There may be slight differences
with your brake kit, so do research before proceeding.
Time
Required: Approx 2 - 2 1/2 hours (with medium progress)
Difficulty
level (scale 1-10): 4
Tools you need to remove wheels:
Wheel
chocks (2)
Floor Jack
Breaker Bar
17mm 6pt deep socket
Torque
wrench
Wheel lock key
Tools you need to remove old pads
and install new ones:
Needle nose pliers
C - Clamp or
Sears Brake Piston retractor
Other things you may
need:
Brake Fluid (Dot 4 for Audi)
Rags or Shop Towels
Rubber
or wooden mallet
Hole punch or awe
Step 1: Jacking up the car
and removing the wheel
Making sure your car is on a flat
surface, place wheel chocks behind and front of either one tire, or two
different tires to stop movement of the car. Make sure car's emergency
brake is pulled.
Loosen lug nuts, only to a point where they are
freed.
Jack up the car at the car's designated jack point. You can
locate the appropriate jack point as outlined in the automobile's manual.
Don't raise the car too high. When the tire is off the ground and has
about 2" of clearance, that should be plenty. Take the wheel off and set
aside.
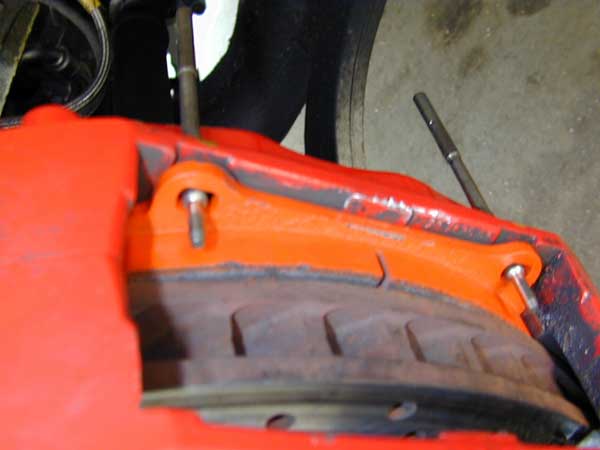
Step 2: The brake caliper
Look at the
caliper and examine the pieces. You will need to remember how it is put
together when you reassemble. Quick photos or a sketch could be helpful.
In the picture below, you can see the two pins that bridge the caliper on
the two ends, and a metal piece. The end of the metal piece (spring) will
span the opening. This spring provides tension that holds the pin(s) in
place, and the metal pin holds the spring and pad in place.

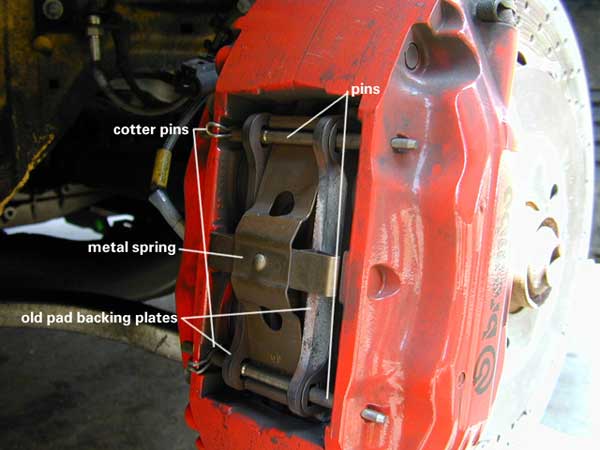
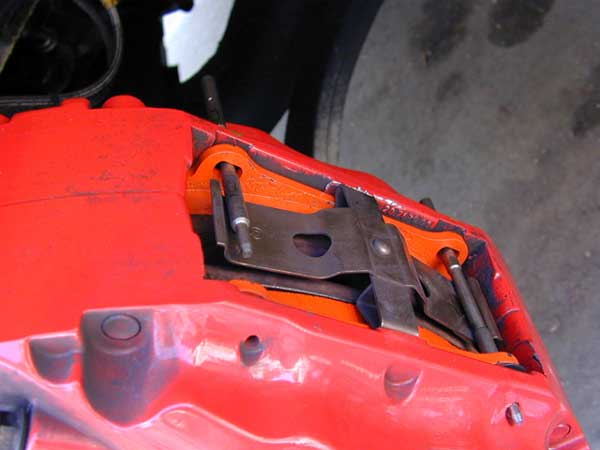
On the Brembo 355mm kit with
the F50 caliper, there are two tiny cotter pins located between the pad
backing plate, and the wall of the caliper. Locate these cotter
pins.
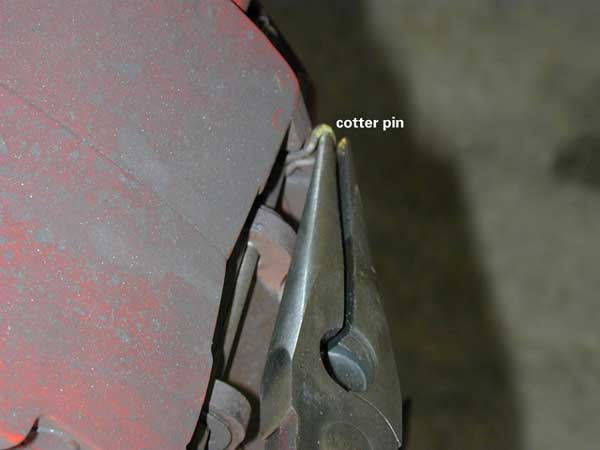
Using needle nose pliers, carefully remove the cotter pins
and set aside in a safe place.
Step 3: Removing parts
in the brake caliper to gain access to pads
Using the
rubber/wooden mallet, tap at the head of one pin. It should slide towards
the interior of the car. It should not require any force, but you may use
a hole punch or awe if required to un-jam the pin. Slide out the
pin.
Notice the tiny hole that the cotter pin that you removed in
Step 2 goes into. Set pin aside in a safe place. The metal spring should
be free to be removed. Remove the other pin and set aside.


Note: On some
Brembo/Porsche calipers, there is a larger pin that spans the middle of
the opening, along with the two outer pins.
Step 4:
Protecting paint from brake fluid
Open Hood and locate the
brake fluid reservoir. On A4's and S4's it is located next to the battery
cover, between the inside and outside firewall. Unscrew cap. The cap has a
circular symbol on it, and the cap should be yellow. Using several rags or
shop towels, surround the cap to prevent any brake fluid spill to drip
below. See picture below.

Step 5: Spreading the
brake caliper pistons
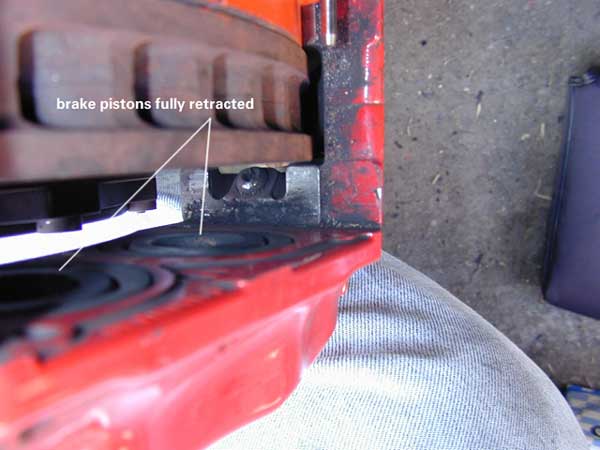
Before we take the pads out, we need to
have the pistons retract into the caliper body. The purpose behind this is
so the used pads can be removed easily, and the new pads, which are
thicker, will be able to be inserted into the caliper.
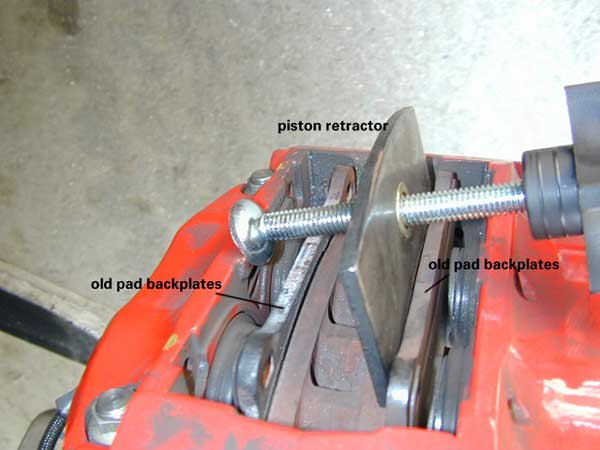
We will use
the standard brake piston clamp, that can be obtained from Sears, or any
auto part store. When we spread the pistons, and they retract into the
caliper body, brake fluid winds up into the reservoir. The fluid in the
reservoir will rise, so make sure if the reservoir is too full, take some
fluid out.
Using the used pads as leverage areas, and to protect
clamps and other material from the piston rubber boots, wind the brake pad
clamp so the pads spread apart. You will need to work back and forth,
between each side of the rotor to retract the pistons. This step is the
most time consuming because the pistons must be almost completely
retracted into the caliper. See the picture below on how to use the clamp.
There may be other ways to do this as well.

Step 6: Pad
Installation
Remove old pads. Separate the shim from the old
pad's backing plate.

Take out the new pads from
the box. You will reuse (in this case) the metal shims.

Insert the new pads on each
side. The Brembo kit comes with a thin metal plate that sits between the
back of the pad and the pistons. Align the holes that the pins will go
through eventually of the thin metal plate and the pad. I also fed the two
metal pins that we took out just to hold the pad in place while I
retracted the pistons on the opposite side.
Double check the fluid
level and make sure that no brake fluid has spilled.
Don't force
any thing. The pads should slide in fairly easily.
Step 7:
Reassembly
Remember that tiny hole on the metal pin? Make sure
that it is lined up so that the cotter pin can go through it (it should be
facing the opening). Feed the metal pin through the back of the caliper
(side closest to the interior of the car), through the thin metal plate,
through the pad backing plate hole, all the way to the other side,
repeating the feed through process for the pad on the opposite
side.
Then
put the end of the metal spring under the pin and make sure it's seated
properly.
Take the other pin and repeat the process. This pin goes
over the metal spring as well, just like the pin you did before, so you
may have to push down on the spring's end while you feed the pin through
all the holes.

Step 8:
Reinstallation of the wheel
Make sure the wheel sits on the hub
properly and hand tighten the lug bolts. With the lug bolt wrench or your
breaker bar with the 17mm socket, tighten some more and lower the car so
that the tire just makes contact with the road.
Don't lower the car
all the way and tighten them in a criss-cross fashion, all the bolts some
more. Then lower the car completely and properly torque the bolts with a
torque wrench to the proper torque settings.
Make sure the brake
reservoir has plenty of fluid and pump the brake pedal some to get the
pressure back. It will take quite a few pumps to build pressure and move
the pistons back into position.
Test drive carefully on a deserted
road at a slow speed.
|