| Tech Article Title
|
Author
|
Date
|
| Coilover
Suspension Installation |
Frank_Sheperson
|
2003 |
1. Jack up the front end and remove both wheels. If you don't
have jackstands, get some. You need to have both sides lifted so you're
not working against torsion in the sway bar. (Sorry, no pic...if this is
beyond your capabilites, stop right now and get thee to a shop)
2.
You'll need to remove the plastic piece at the rear of the engine
compartment. Grab one end of the rubber sealing strip and pull towards the
front of the car. Once it's off, do the same thing with the
plastic.

3. [Editors note: This method is not advised on cars with any sorf of mileage on them. This Pinch Bolt tends to weld itself in, and can be VERY difficult to remove. Only remove this bolt if you also plan on changing the upper control arms at the same time. Check THIS article for an alternate method
] Pick a side,
and get started by removing the bolt holding the upper control links to
the suspension upright (or bearing carrier, or whatever you want to call
it--the big part that the wheel attaches to). 16mm.
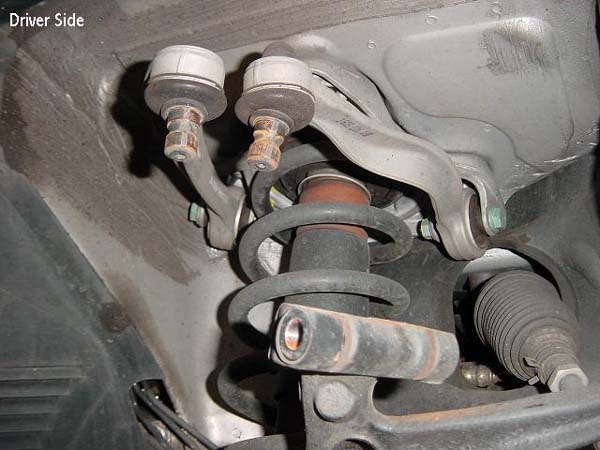
4. Pop both of the link ends out of the
upright. You will probably have to use a hammer and punch to get them out.
They're under tension from the bushings at the other end, so they will
spring up a bit when they come out. The upright/hub/brake is loose from
here on out, so try to keep it from knocking around too much.

5. Take off the lower shock bolt. 18mm.
You may have some trouble getting the bolt out; it tends to be blocked by
the rear lower control arm. Carefully move the upright around until you
can get a straight shot.
There's a decision to make here. There are
two ways to dismount the top of the shock from the body. The way I've seen
in most write-ups is to remove the three 17mm bolts and take out the whole
upper shock mounting plate, together with the attached upper links. The
other way is to remove the two 13mm nuts holding the shock to the mounting
plate, leaving the mounting plate and the upper links attached to the car.
Each way has it's own PITA bit--the first method requires removing an
annoying locking ring from the locator pin, the second involves
prying/gouging out two plastic plugs that are glued into the car body. I
chose the second method, for a few reasons: I thought it might be
easier/less awkward moving the shock around without the links attached,
fewer parts sticking out to possibly scratch things (i.e. paint on the
fender lip), it might possibly avoid some microscopic changes to the
suspension geometry, and two small nuts should be less work than three big
bolts (yeah, I'm a lazy SOB). This is also the method that the Bentley
manual uses, so what the hell. No comment on which method is easier. I
guess I could have done the left side one way and the right side the
other, but I didn't think of that until I was finished. Anyway, if you
choose to go with the three bolt method, fine. You're on your own for a
few steps, but I'm sure you can handle it.
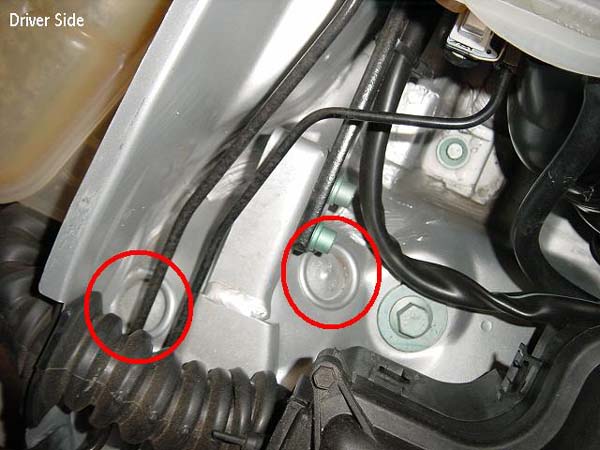
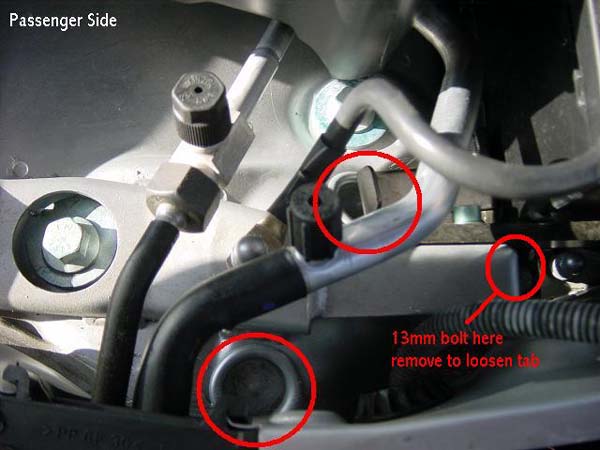
6. Find the two plugs (mine were
painted to match the body) covering the upper mounting nuts. One of the
plugs on the passenger side is blocked by a tab attached to the battery
box (wtf this is for, I have no idea), but if you remove the 13mm bolt
just in front of the battery, this loosens up enough so you can get in
there.


7. Pry/pull the plugs out. I tried to
preserve them, but with the amount of glue they use and the tight work
space, it's kind of hit or miss.

8. Loosen (but don't remove) the two
upper mounting nuts. 13mm. You want enough slack so the shock can move
around, but you don't want it dropping down just yet.

9. Push down on the lower control arm a
bit, until you can pull the U-shaped bracket on the end of the shock clear
and move it towards the front of the car.
Note: In step 9 for the front suspension, S4 and A6 owners may have an issue lifting the shock over the lower control arm to remove it. If this is the case, remove the belly pan, and remove the (2) 13mm nuts on each front sway bar bracket (not shown in the pictures). Also unclip the leveling sensor on the driver's side lower control arm (not shown in pictures). This leveling sensor is only on cars equipped with xenon headlights. Finally, remove the inboard bolt that attaches the lower control arm to the subframe (not shown in pictures). The lower control arm can then drop enough that you'll be able to lift the shock over the control arm and out of the car. When you put everything back together, make sure you torque the inboard bolt on the lower control arm while the vehicle is at ride height (place a jack under the wheel bearing housing, and lift the axle to approx. ride height. Consult Bentley for a torque spec on the lower control arm bolt. In the absense of that, 60 ft-lbs should be sufficient.
10. While supporting the
shock (either with your free hand or by resting it on the lower control
arm), remove the two upper nuts.
11. Carefully remove shock
assembly from car. Watch the fender.

12. Now the fun starts. Take the shock
to your work bench and get out your spring compressor(s).


[1] [2] [3] [4]
[5]