Tech Article Title Author Date
Brake Disk Shield Installation Jason W. Haines 2004

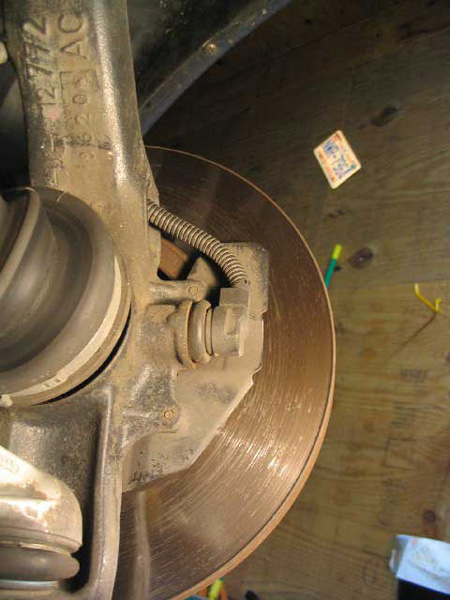
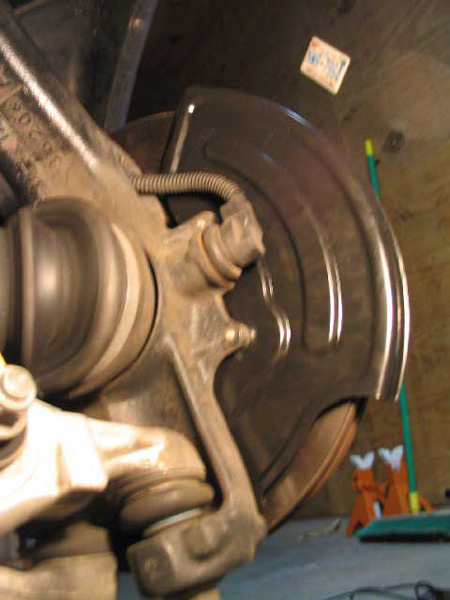
Introduction:

My car suffers badly from the wet braking problem that plagues the B5 platform A4 cars. After reading many postings concerning this topic on the AudiWorld A4 forum, I discovered that Audi has acknowledged this engineering flaw and has released two repair kits with the intent of resolving this issue. One repair kit (8D0 698 998) consists of replacement brake disk shields that attach to the wheel bearing housings and the second kit (8D0 698 998 A) consists of new plastic extensions that attach to the wheel well and engine belly pan. This article discusses the installation of the replacement brake disk shields.

The 8D0 698 998 repair kit contains the following:

one 8D0 615 311E (Left brake disk shield)
one 8D0 615 312E (Right brake disk shield)
six N 905 293 01 (6x10 retaining bolt for shields)

Digging into the Audi electronic parts catalog software ETKA, I discovered that these new shields are the same part number as the existing dinky little ABS sensor shields that they are replacing. This is common practice among manufactures to  continually improve parts and supersede the older designs.

ETKA indicated that these shields fit the following models:

1998 - 2002 FWD and Quattro A4 or A4 Avant
1998 - 2001 FWD and Quattro A6 or A6 Avant

If your car is still under warranty, Audi of America should cover the parts and labor to install this repair kit.

Disclaimer: I assume no liability or responsibility for any damages that may arise either directly or indirectly as a result of the application of the information provided herein. Please read instructions fully before attempting this modification.

Tools:

· Floor jack and stands
· Torque wrench that will go up to 100 ft lbs
· 17mm socket
· 10mm socket or wrench
· 7mm allen hex socket
· Medium tip flat blade screw driver
· PB Blaster rust penetrate
· BFH (Big Fugly Hammer)
· Small block of wood
· Small wire wheel on drill (Hand brush might work)
· High temp brake grease
· Aerosol brake cleaner
 

Parts:

One 8D0 698 998 repair kit from Audi dealer ($18.34 at my local dealer)

Procedure:

  1. Loosen front wheel lug nuts while car is still on ground
     
  2. Raise each front side of car to get the wheel off of the ground and support with jack stand.
    You will want to raise and support both sides otherwise you will cause undue stress on the sway bar linkages and bushings if only one side is raised.
     
  3. Remove wheel.
     
  4. Pry retaining spring clip out of holes using screwdriver.

  1. Remove the two caps covering the caliper guide pins on the back side of the caliper. Using the 7mm allen hex bit and ratchet, removed the two guide pins securing the caliper to the brake carrier.
    The bozos who worked on this car prior to me owning it forgot to install the protective caps. These caps are critical because they keep crud from building up on the guide pins that allow the caliper to float. If the caliper is not allowed to float, this will cause decreased braking performance and rapid pad wear. Sorry no pictures of this step.
     
  2. Pop the ABS and brake pad sensor wire grommet out of the bracket and disconnect the brake pad wear sensor connector.


  3. Remove caliper and suspend using any available wire tied to the upper suspension/steering components. Make sure that the brake hose ends are not bent dramatically causing them to crack. Sorry no pictures of this step.
     
  4. Using the 17mm socket, remove the two bolts securing the brake carrier to the wheel bearing housing and remove the carrier.


  5. Remove the brake disk from the wheel hub.
    If the brake disk is not loose, spray the joint between the disk and wheel hub with PB Blaster and let it do its job for a few minutes.
    Get your small block of wood and hold it against the edge of the disk and pound on the wood with a hammer. If the disk does not break free from the hub, keep pounding away at a different edge until it does separate.
    Make sure the disk does not fall from the hub onto the ground.
     
  6. With a 10mm wrench or socket, remove the three bolts securing the mini brake disk/ABS sensor shield and remove the shield.


  7. Install the new shield with the new bolts that were supplied.
    Torque bolts to 7 ft lbs (Good-n-tight if you doubt your torque wrench accurately goes this low).


  8. Place brake disk back on hub and temporarily secure with one lug bolt and some type of spacer between the disk and bolt.
    Select correct size spacer to make sure lug bolt does not go into the wheel bearing housing. I used a 17mm box end wrench.
     
  9. With the wire wheel or hand brush, clean the crud on the machined surfaces of the brake carrier where the brake pads slide.
    Be careful of the dust as it may contain asbestos!
    Lightly dab a little high temp brake grease on the the cleaned surfaces.
     
  10. With the wire wheel or hand brush, clean the metal out of the grooves in the 17mm bolts that secure the brake carrier to the wheel bearing housing. These grooves act as a lock washer so it is critical that they are clean. Close-up picture is kind of fuzzy but you can see the metal stuck in the grooves.


  11.  Reinstall the brake carrier and torque the two 17mm bolts to 92 ft lbs.
     
  12. Clean the two surfaces of the brake disk with brake cleaner.
     
  13. If the caliper guide pins have crud built up on them due to missing protective caps, clean the pins with brake cleaner and lubricate them with high temp grease.
     
  14. Reinstall the caliper and torque guide pins to 18 ft lbs.
     
  15. Install the protective caps over the guide pins. Get some ordered if you are missing them.
     
  16. Reinstall the retaining spring clip.
     
  17. Reinstall the wiring grommet back into the bracket and reconnect the brake pad sensor connector.
     
  18. Remove the lug bolt used to temporarily secure the brake disk to the wheel hub.
     
  19. Reinstall wheel and torque lug bolts to 89 ft lbs.
     
  20. Take a break,  have a cold one and repeat steps above on the other side.
    As you can see below, the shield wraps around the disk tightly (0.60 inches between edge of disk and shield) so my future A8 rotor upgrade will require modifications to these new shields.


  21. Here are some before and after shots from the left side showing how the disk is now protected from the elements

    Before:


    After:


Road Test:

Just by shear coincidence, there was a torrential down pour that dumped about three inches of rain while I was doing this install. Was the wet braking problem eliminated?
No, but it was greatly reduced by at least 80%.
I highly recommend this install for anyone that is suffering from poor wet breaking performance.

eMail me if you have any questions about this install.


Advertising | Contact Us | Cookie Policy | Privacy Statement | Terms of Service | Do Not Sell My Personal Information
© 2020 MH Sub I, LLC dba Internet Brands