|
|
Here is a quick and dirty write-up of the suspension conversion. I am not doing a full blown step by step tech article as the procedure was experimental and I did not make notes of every individual step. I also probably did not do things in perfect order or the quickest way since I was swapping crap around and test fitting etc. I chose a KW Varient I setup made for an A6. The KW part number was 1021-0026.  Just to put it up front for reference you will also need several A6 parts if you are going to attempt this conversion: 2x A6 front spring caps 8D0 412 065F 4x M8x1.25 nuts and lock washers 2x A6 rear suspension mounts 8E0 512 149H 2x A6 rear spring caps 8D0 412 065F 2x A6 rear bumpstops 4B0 512 131L FRONT Remove front suspension. Remove the whole assembly by removing the 3 bolts on top of the uni-body tower under the hood and the lower strut bolt. There is a guide pin on the body that pokes through the bracket. It will have a press fit temporary fastener on it. This is used during original assembly of the car. You can pry it off and forget it. Disconnect air line at air bag (10mm open end wrench.) Remove the upper control arm pinch bolt (good luck!) and pop the control arms out of the upright. Now you have to worm this big assembly out of the car in one piece including the air bag/strut, upper bracket, and upper control arms. I don't have a picture of it as it came out of the car, but this should give you the idea of the 'assembly' I am talking about.  Now work on the workbench. Remove the uppper bracket from the air bag/strut assembly by removing the 6 triple square (spline) bolts on the top. They are already out in the pic above. The strut bushing fits tightly into a recess on the upper bracket. You may have to fight it off since it has been stuck on there a while. Now disassemble the strut with allen tool inside a socket. You will need to remove and re-use the strut top bushing and the washer, but maybe not the nut depening on what comes with your new kit. Now since the allroad does not have a coil springs you need to by two A6 spring caps 8D0 412 065F. You will also need 4x M8x1.25 nuts and lock washers to attach it to your upper bracket. Unfortunately the allroad upper bracket does not accept the A6 spring cap.  Now this is do or die at this point since you can see in the pic that we are going to drill holes right where the rubber o-ring seats on the upper braket. I carefully marked the bracket for drilling in between the existing holes and drilled it out to fit the A6 spring cap.  Test fit the spring cap to the upper bracket. When you have that sorted out you can fully assemble the new suspension on the workbench. Depending on your kit things could vary slightly but the spring goes on, then bump stop, then the washer on the piston rod, then the spring cap, then the upper strut bushing, then the nut. Hold the strut rod with allen tool inside a socket and tighten the nut. You should end up with something like this:  Now fit your upper bracket onto the top of the spring/strut assembly. Put the M8x1.25 nuts and lock washers I mentioned on the spring cap studs: 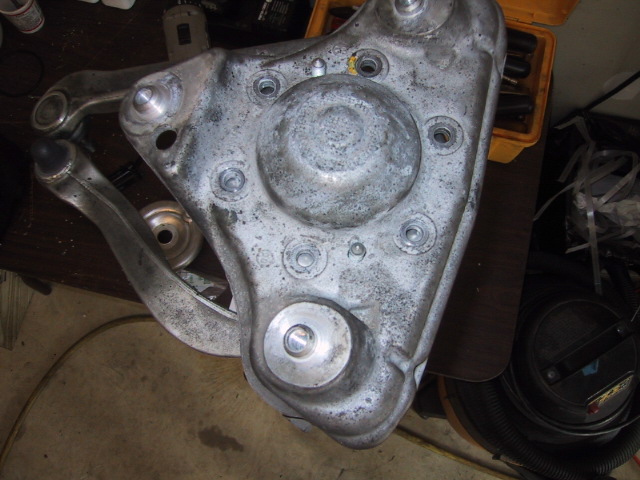 You should end up with something like this, ready to be mounted back into the car. 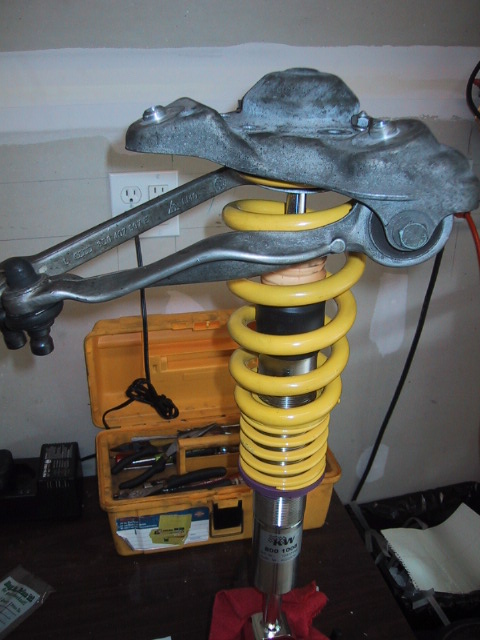 NOTE: I set my coilover's height at a half way point on the range of adjustment as specified in the manual that came with them. It was waaaaay too low. I had to raise it over an inch from that setting after I had it in the car which is much harder that setting it before you assemble it. Consider choosing a height more toward the top of the range especially if you chose KW like I did. Reinstall in car just like you took it out and the front is done. (don't forget to drench the pinch bolt with anti-seize)  REAR Remove 2 vertical bolts that go up into the body. Remove 'dragon scales' protective cover from lower control arms. Remove lower shock bolt. Remove lower control arm eccentric bolt (yes, of course you are going to need an alignment anyway.) Disconnect air line from air bag. Disconnect ABS sensor and pull out. Disconnect rear sway bar. Now pry the lower control arm down and pull bottom of shock out of control arm, forward, and down out of car. Sit the whole assembly aside as you will need nothing else from it. You can't separate the Mount from the air spring so you need to buy two A6 mounts, part number 8E0 512 149H:  And two A6 rear spring caps, part number 8D0 412 065F:  If you want to add a bumpstop you could buy A6 part number 4B0 512 131L. On the workbench assemble your rear coilovers with the A6 parts. Order should be spring, then bumpstop, then A6 spring cap, then A6 suspension mount, then the nut/washer that came with the coilover kit. The whole assembly can now go into the car. It fits perfectly, but it is a bear to get in there. You may have to shorten the assembly with the coilover adjustment and then re-raise it after installation. The A6 mount fits fine in the allroad. Re-use the vertical bolts to attach it to the car.  Like the front, I found that a mid-range setting on the rear was WAY too low. If you use KW like I did you will need to crank it up quite a bit. So that's it. Put it on the ground and drive it around the block and then try to set your height. You can expect it to continue to settle, but you want to get it close to what you want ASAP as you need to go get an alignment. Don't be surprised if you can't get the negative camber low enough to meet Audi specs if you are really low. Extra negative camber can be good for handling, but bad for the inside shoulder of your tires. |
|
Advertising |
Contact Us |
Cookie Policy |
Privacy Statement |
Terms of Service |
Do Not Sell My Personal Information
© 2020 MH Sub I, LLC dba Internet Brands |