|
|
Well after you have pulled a bit of magic out of your hat to pass the reservoir through the tiny space where your steering tie rod ends pass you will need to tackle the final stages of the installation. Again some manoeuvring will be required. Check it out... First I decide to attack the driver's side. This side turned out to be the easier of the two sides simply because no major components of the car get in your way. The stainless steel lines are already covered by a thick durable plastic cover but I decided to go one step beyond this in areas I thought might be problematic. Any area where there might be some rubbing on a steel part of the car was protected by an additional plastic/rubber tube to prevent chaffing. Additionally the new layer of plastic tubing was itself wrapped in aluminium tape. The tape primary function was to hold the new tubing in place but will have a secondary purpose too. It should help reduce the heat factor somewhat in the hot places the line goes through by reflecting the heat. In the first picture, the line comes up from the driver's side wheel well and out into the engine bay. As you can see I added the extra plastic tubing to protect it from the rather sharp edge of the car's chassis. The line is going to be curved upwards.  Here we can see that the line and its additional tubing have been covered by the aluminium tape. Lucky break for me, Audi decide to have a hole in the right spot. So I used it in conjunction with two tyraps to secure the line as it goes upwards. Now for those wondering what that big black thing is at the bottom of the picture it is my dual ICs water spray pump. It can move 3.5 USG a minute!  As the line goes up, I pass it through a plastic retainer not used by Audi and secure it with another tyrap. BTW, you can see the first set of tyraps way at the bottom where the line initially turns upwards. The big black harness you see crossing horizontally is the main ECU harness. I unclipped it from its secured position by cutting its tyrap. I passed the reservoir and line behind it.  Then the messy part starts; the cutting of the firewall to allow the line to pass through to the other side, behind the firewall and into the battery/ECU/other components compartment. In this picture it was just the start of the cutting. In the end the cut had to be enlarged to allow the line not to twist as much. The cuts we all smoothed out with a file and the bare steel was repainted red. Additionally I glued some of the same tubing that I used on the lines as an extra shield on the cut areas of the firewall to prevent chaffing. The black cut tyrap is the original OEM ECU harness tyrap. The drilled hole to the right of the picture was used to further secure the line to the chassis prior to its turn before going through the firewall with a metallic/rubber tie down that used a metal screw to fasten it in place. 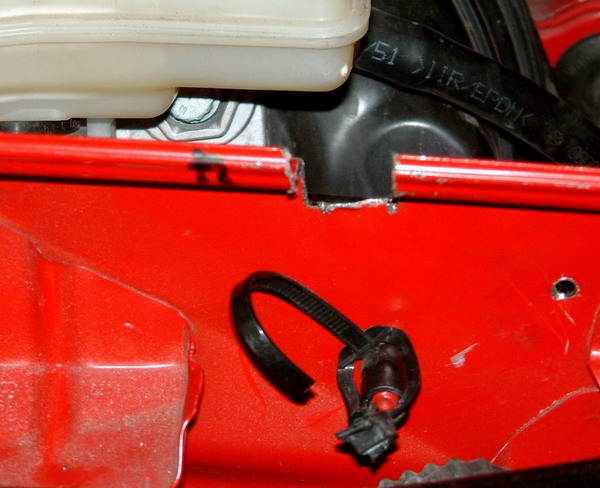 Oh boy, now onto the passenger's side. This involved a lot more work because of the location of certain components. First off, the line goes right by MTM's 70mm downpipe. I had to hide it behind the heat shields and then try to secure the shields back into there original positions with a line behind them. Then there was the gas line that had to be removed from its secured mounts so I could pass the canister and its line underneath it. Same thing for an electrical wire that goes to the battery. Then there was another line like the gas line that had to be moved. Finally I had to force the big water hose from the heater to move just enough to squeeze the canister by. No wonder the canister is all scratched up now. So be it. All of this could not be done without removing the complete air box system and disconnecting everything plugged to it like the MAF and my custom made T.I.P. You can see in this picture the gas line with one of three securing points that had to be removed. You can see one of the heat shields some of the electrical harnesses. Finally the line comes up from behind all these obstacles. Try adding the extra plastic hose and then taping the line with the aluminium tape in these close quarters!  If you lock carefully in this picture, you can see the downpipe (brownish color), an electrical harness, the electrical line to the battery, the gas line (with the Audi logo) and finally the big heater hose. I temporally secured the line with a tyrap to the A/C Freon line. The other components at the bottom of the picture are all hoses that are part of the air box which as been removed.  Here we have the cutting of the firewall right by the Freon line and the heater hose. Like on the other side, the cut was cleaned up with a file and repainted red.  I used one of these rubber grommets to safely pass the line at the firewall junction (see next picture for actual installation).  You can see the rubber grommet in place on the firewall opening with the line going through it. You can see that I secure the line with a tyrap onto the big hose and to the Freon line on the other side. You can really see the line make a 180 degree loop.  Here you can see that I decided to completely wrap the line in aluminium tape. You can also notice that the line is now additionally secured with a tie down with screw (just below the battery cable's exit point). This was done to keep the line secure as close to the firewall as possible.  Now both canisters have to be secured to the firewall. Here we see the two holes needed to secure the canister's mounting bracket.  Here's the canister secured within its mounting bracket which is itself secured tightly to the firewall. You can see the canister's line coming in underneath it. You can see how easy the adjustment knob is easy to get to. The black line that runs underneath the canister out the back end and up to the battery is the same line that came from the other side. IIRC it comes from the alternator. You can also see the Odyssey PC680T LWB and its custom made and beautiful battery rack! I wonder who makes these great racks? LOL.Oh and then there are all the scratches from the passing the reservoir through tight spots. C'est la vie!  Here's a shot from further back giving you a side view of the installation. Pretty neat if I may say so myself.  Now back to the driver's side for a moment. Front view of this installation. The Prestone tank is back in its place, so is the ECU's main harness where you can see the aluminium covered line go through the firewall and out the other side to the canister.  Finally a front shot of both canisters secured in place. I'm quite happy with the results. Lots of work and hours were put into this job but very satisfying. Not bad at all for an amateur. [page1] |
|
Advertising |
Contact Us |
Cookie Policy |
Privacy Statement |
Terms of Service |
Do Not Sell My Personal Information
© 2020 MH Sub I, LLC dba Internet Brands |