| Tech Article Title |
Author |
Date
|
| H-sport Sway Bar Install |
Robert Gedeon* |
2006 |
*with input from GBW, Flint'sA6, MCH 2.7T and SouthboroAudiGuy.
To begin, I verified the contents of the H-sport sway bar box. Included in my package were the front and rear sway bars, 4 bushings, 4 brackets, a pair of 16mm bolts (each threaded through two washers (a small one and a larger one) and into a 16mm nylon locking nut), 2 front bushing mounting plates, and 2 packets of greasy white lube. Everything that was supposed to be there was there, plus the bolts, which were NOT mentioned in the instructions or among the package contents (Drew at H-sport said he needs to update the directions to include mention of them).
Since I did this installation (in March of 2005), H-sport has apparently changed the size of the bolts they include with their kit to 17mm. Because of this, you'll likely need both 16mm AND 17mm wrenches for the job - the 16mm to remove the stock end link bolts, and the 17mm to install the bolts included with the kit. But enough - more about that later...

After verifying / identifying the package's contents, I got my tools together. The instructions called for the following:
- 4-wheel lift, ramps, or jack stands
- 13mm socket
- 13mm wrench
- two 16mm wrenches
- 3/8" drive extension (long)
- blue threadlocker
When all was said and done, I myself ended up using the following tools:
- 2 wheel ramps
- WD-40
- Blue Loctite
- Sharp utility knife
- Flathead screwdriver
- 10mm shallow socket (3/8" drive)
- 13mm deep socket (3/8" drive)
- 16mm shallow socket (3/8" drive)
- 3/8" drive ratchet
- 16mm box end wrench
- 16mm ratcheting flex-head wrench
- 13mm ratcheting flex-head wrench
- A couple of paint cans
- Every bit of abdominal muscle I never knew I had in my flabby stomach
- Between 2 and 3 hours of free time
Again, since I did this install, H-sport changed the contents of their kit to include 17mm bolts, and therefore you'll need a 17mm wrench to install the new bolts, in addition to the 16mm wrenches required to remove the stockers (thanks for the update, GBW and Flint'sA6!).
Of these tools, I found the 16mm ratcheting wrenches to be quite handy when loosening / tightening the rear sway bar's end links, but of course, normal non-ratcheting wrenches would be just fine. Many have since said that using standard wrenches is a real PITA, and that flex head ratcheting wrenches are really the only way to go. Your choice. As an aside, I did this install myself, with no physical help (look mommie, I did it myself!!). Just mentioning this in case you've read elsewhere that having a friend is helpful. Yes, it would have been helpful (especially when dropping the exhaust, in my case), but you can certainly do this on your own.

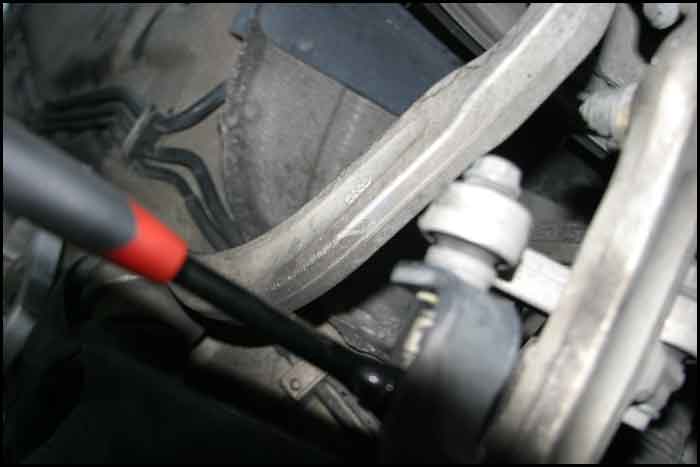
After getting all my crap together, I backed my car up onto my wheel ramps, deciding to do the rear bars first. Once the rear end was up on the ramps, I shimmied underneath the vehicle to the area circled in the picture below, and located the central exhaust hangers. On my exhaust, simple "7" shaped hangers are welded to each of my exhaust pipes, and hook into a rubber grommet-type thing that's itself hooked into additional hangers bolted to the underbody of the car. Most will have two options here - A) to use a 13mm socket on a 10" extension to remove the entire hanger from the underbody of the car, OR, B) remove the exhaust hangers from the rubber grommet.
I chose the latter route, squirted a bit of WD-40 on the exhaust pipe hanger, and twisted and wiggled off the rubber grommet. While I'd still say this was "easy" to do, it did take a bit of "come on you little ____" to come off. The party as officially ON!


After I freed the central exhaust hangers, I moved on to the rears. I placed some stacked paint cans (I used BEHR Premium Plus Interior Semi-Gloss with a nice cherry stain, but I think you can use any kind, actually) underneath the rear cross-arm connecting the two exhaust pipes to support the exhaust after the rear hangers were removed. Removing the rear hangers was much like removing the central exhaust hangers, but for me, a bit easier. I simply located the hangers on the interior side of each muffler, squirted a bit of WD-40 on the ends, and wiggled them out of the rubber hangers to which they were attached.


I had to support one muffler with my foot while freeing the second muffler's hanger. After I freed the second hanger, I lowered the exhaust down onto the stacked paint cans and took a nice drink of beer.

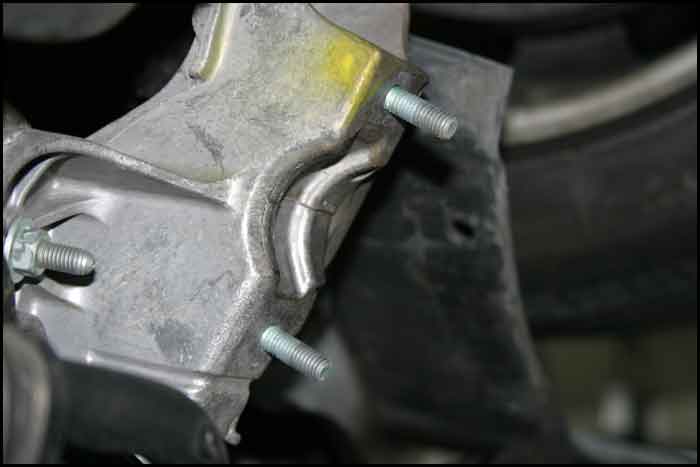
Next, I observed the rear bar and the way in which it was mounted. It was easy to identify, as it looks pretty much just like the thing you're replacing it with. I then went to work removing the bushing brackets. For this, I used my deep 13mm socket and my 13mm ratcheting wrench. First I removed the bottom nut.
After getting the bottom nut off, I removed the top nut. The top bolt on the forward side was a bit trickier to deal with than the bottom bolt. The subframe to which it's mounted seemed to have a little curved lip that would have made it a little difficult to access with a flat wrench. I was glad at this point that I had flex-head wrenches, but a box end wrench would also have done the trick here. You of course can by all means get by with a flat wrench, but for me, it might have been a little harder.

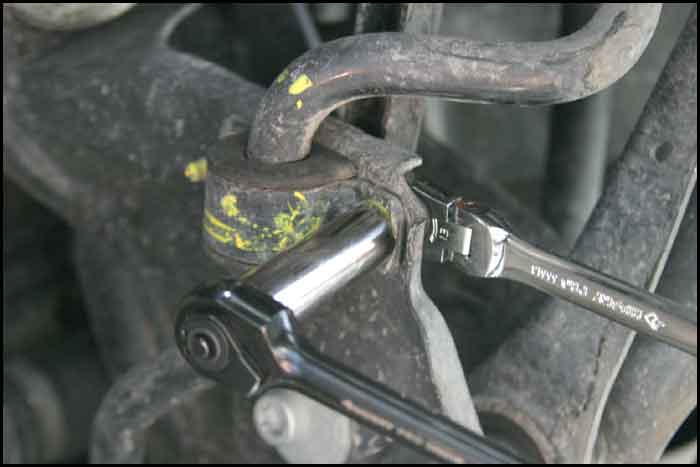
I removed both bushing brackets, and set the nuts and bolts aside, as they'd be reused when installing the H-sport. I next moved on to removing the bar from the end links. (**Note in the top picture that the bar is installed OVER the cable in the foreground (not sure if it's a brake line or electrical or what). When you put in the new bar, it can fit with arms below OR above this cable, so if you get to that point and wonder whether it should be above or below, well, you can always reference this pic.)

To remove the end link bolts, I used a 16mm box end wrench to secure the inside bolt, and a ratcheting 16mm flex wrench to loosen the outward nylon lock nut. Again, the angles here were a bit tricky, and I was glad to have a ratcheting wrench. I can imagine this being the most difficult part of the install, together with reinstalling the end links bolts when putting in the new bar. If you're just on ramps, there's not much room down there, and you're going to be craning your neck a lot (as well as using your abs - I'm a flabby bastard, and after this install my "ab" (more like a gallon than a 6-pack) was PUMPED).

After removing the nut, I worked on the other end link. After removing both end link nuts, I backed each bolt out of each end link and the bar. I could not pull them directly out, but rather had to walk them out a bit before they came loose. The instructions that came with the bars say to put the nuts and bolts aside and save them for re-installation of the new bar. HOWEVER, you will NOT use these nuts and bolts. Drew at H-sport said to instead use the 16mm bolts / washers / nuts that were included (but undocumented) in the package. Again, he said the instructions here needed to be updated. I just put the bolts and washers aside, since I'd be including them if I sold the PSK bars after the install.
Note - these are the nuts that have since been replaced with the 17mm's.

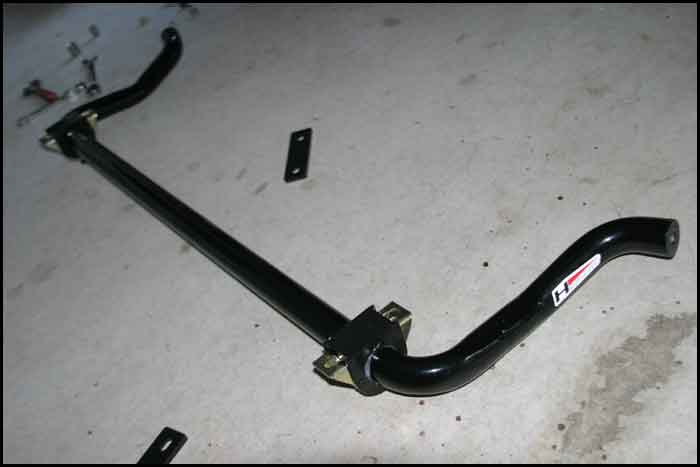
After removing all the nuts and bolts, remove the original sway bar. I thought this would be tricky, but it was surprisingly easy - just think it through before pulling on it (like moving a dining room table into a doorway - first turn on side then legs, then turn, then table, then legs, etc). You may have to lower the exhaust a little to get it to come out, but not by much if at all. Here's a pic of the PSK bars (lower bar) compared to the H-sport bar (upper bar).

Next, I put the new bar in place for installation. Note that the H-sport stickers on the ends of the bar should be right side up (not upside down), and the bar should go above the aforementioned brake lines (or whatever cable they are - someone please chime in here).

Once the bar is more or less in place, I went to get the undocumented bolts that came with the package. As of this writing, there's no mention of these bolts and washers in the instructions at all. However, Drew at H-sport (he's the dude in the pictures included with their instructions) said that they should be used in place of the stock nuts / bolts when reattaching the rear bar to the end links. According to Drew, the bolt should proceed from the center of the car to the outside of the car. It should first go through the small washer, then the sway bar, then the end link, then the big washer, and finally into the nylon lock nut. In the picture of the bolt in my hand below, the position of the washers is transposed. Again, in reality, the order should be bolt --> small washer --> sway bar --> end link --> large washer --> nylon lock nut. Drew said that the nut sometimes got pulled through the end link, hence the addition of the large washer on the outside of the end link.

After getting the bolts, I loosely attached the bar to the end links as instructed. There's both a "hard" and "soft" option for the rear bar. For the "softer" setting, the bolt should be placed through the hole at the bar's end. For the "hard" setting, the bolt should be placed through the second hole from the end. I chose to go with the "hard" setting for this install.

After loosely attaching the end links, I started to work on the bushings and brackets. My package came with 2 packets of grease, so I used half of the first packet for each of the rear bushings (the rear bushings have the smaller diameter hole, the front bushings the larger hole for the thicker front bar), squeezing a good amount into each and smearing it around with my finger.

Notice that the bushings all have a split in them. After greasing the interior of the bushings well, you can pry the bushing open and "snap" it onto the rear bar at the same location the stock bushings were located.

I next installed the rear bushing brackets (they are not as beefy as the front bushing brackets) over the rear bushings on the rear bar, and bolted them on using the original 16mm bolts and nuts. Make sure that the grease-gun connection nipple on each bracket is pointing downward.

After I secured the bushing brackets, I remounted the exhaust hangers. The instructions say to do this later, but I wanted the exhaust out of the way so I'd have the additional room to work with when tightening the end link bolts. I think this was a good idea. If you have someone helping you, this is where they might be useful. It was a task lifting and re-inserting the exhaust hangers into place. Took a lot of leverage work, but ultimately worked out fine.

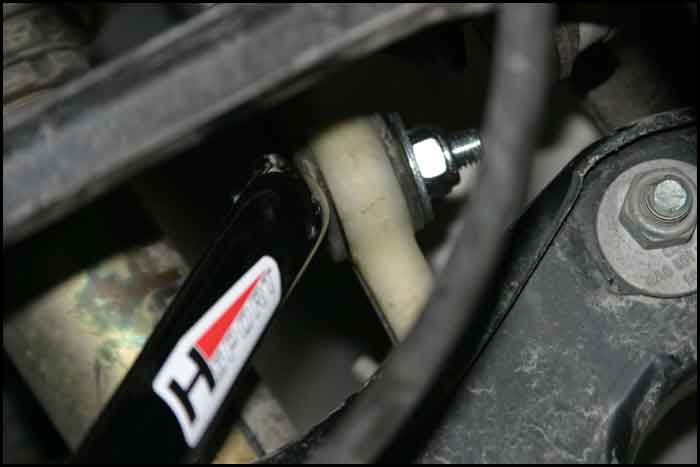
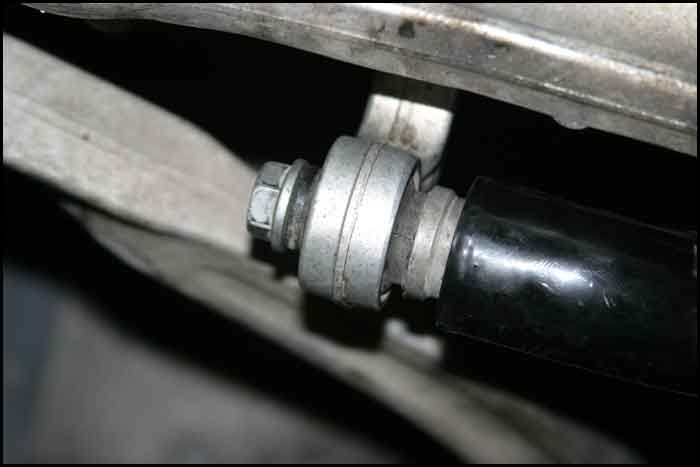
With the exhaust out of the way, I went to work tightening up my end links. Once again, I used a 16mm box end wrench here to hold the bolt while I tightened the nut with a ratcheting 16mm wrench (would have just used a socket, but not enough space in there). I was a little disturbed because the large washer on the outside of the end link was not flush with the end link itself, and I had tightened it down like a muther. I called Drew again, and he said not to worry, and that the washer was bottoming out on the cylinder that rides through the center of the end link, and that I shouldn't see the washer and bar "squeeze" the end link like a perfect sandwich. After inspecting the end link more closely, I saw what he was talking about (you can see a bit of white between the end link and the outside washers - that's the cylinder, and the washer is indeed bottomed out on it (this is more apparent in the top pic than the bottom pic). Anyhow, I just tightened until I couldn't tighten no more.
Again, these bolts have been replaced with 17mm's. Also, it's important to note that the suspension must be loaded when tightening the end link bolts! While I did my install on ramps (ensuring that the suspension remained loaded throughout the project) MCH 2.7T has pointed out on numerous occasions that the suspension doesn't have to be loaded to remove the old bar or to install the new one, but that it MUST be loaded when the end link bolts are TIGHTENED. This means that you have the option of lifting the car, removing the wheels, getting things set up and then loading the suspension to tighten everything. I've never tried this but am sure it's possible. Both options work - just be sure the suspension is loaded when tightening things down.

That was it for the back, and I next moved on to the front. I got the car off the ramps, turned it around, and pulled forward onto the rams again, lifting the front end up so I could get under it.

I next located and removed the flat head and 10mm hex screws holding the belly pan in place. None of them require much force - the flat head screws (some are silver, and some are black plastic) require only a quarter turn and then they unlock, and the hex screws can be removed by hand with the socket (i.e. you don't need to use an actual ratchet). For me, the screws were located on the leading and trailing edges of the belly pan, as well as in each wheel well, where the belly pan attaches to the fender liner.


After the screws were removed, I pulled the belly pan back (had to wiggle it a bit to free it from the fender liners) and set it aside.

Once you remove the belly pan, the front sway bar stands out clearly. I again observed the way the front bar was mounted. I then removed the end link nuts with a 16mm socket on my 3/8" drive ratchet. After breaking loose the nut (toward the center of the car behind the bend in the stock sway bar), I secured the bolt (toward the outside of the bar) with a 16mm wrench to keep it from spinning as I removed the nut completely. I then kept the bolt aside as it would be used to install the new bar.

After removing the bolts from both end links, I removed the nuts from the bushing brackets (you can't miss them - below's a pic of what one of the the bushing bracket looks like after I removed it) with my deep 13mm socket.

After unbolting both brackets, remove the front sway bar - be careful, it's a little heavy and is easy to drop on your face while you're under the car! Here's what it looks like compared to the H-sport bar.

After getting the stock bar off, I prepared the H-sport front bar's bushings with grease. As I did with the rear bar's bushings, I used half of the remaining tube of grease for each of the two front bushings, squirting it in, and smearing it around with my finger.

After greasing them up, I snapped the bushings in place on the front bar, each against the outward edge of the two ridges on the bar. Once in place on the bar, I covered each of the bushings with the two bushing brackets to ready the bar for installation on the car. The bar should be mounted so that the H-sport stickers on each side are right side up when mounted to the underside of the vehicle.

After the bushings and brackets were in place, I mounted the actual bar to the car. I first grabbed the two mounting plates that came with the bar.

Next, I located the mounting points for the bar.
Then I placed the mounting plates between the mount points and the bushing brackets on the bar, and used the original nuts to secure the bar in place. I used my 13mm deep socket for these nuts. The H-sport bushing bracket is shaped differently than the stock bracket, and the fit of the socket is a little tighter. I found it helpful to alternately tighten each bolt on each bracket a little at a time to ensure that my socket fit them until they were tightened all the way down.


With the bushing brackets tightened down, I moved to the front bar's end links. I first hand-threaded the OEM end link bolt taken from the stock bar into the bars end to make sure it threaded properly. I then removed the bolt and applied a bit of blue loctite to it, and inserted it through the end link and into the end of the H-sport bar. With the suspension under full and even load, this should not be a problem, and the angles should line up well as in the pictures. For me, the load on the right and left suspension was uneven due to a slight right / left slope in my driveway, so I had to push up on the bar with a lot of force to get it in line with the bolt and end link. Be sure to do the installation on level ground - it is the only safe way to do it, and will make it much easier. Once I had the bolt in the bar, I threaded it in by hand a few turns, then tightened it down with my 16mm socket and ratchet. Again, the H-sport stickers should appear right-side-up when the bar is mounted to the vehicle.
Again, as mentioned above, the suspension really NEEDS to be under load only when TIGHTENING the end link bolts. If you find it easier to jack up the car, remove wheels, etc., that should work. Just be sure to load the suspension fully before tightening things down. I obviously did it on ramps (seems simpler to me), but whichever you prefer.


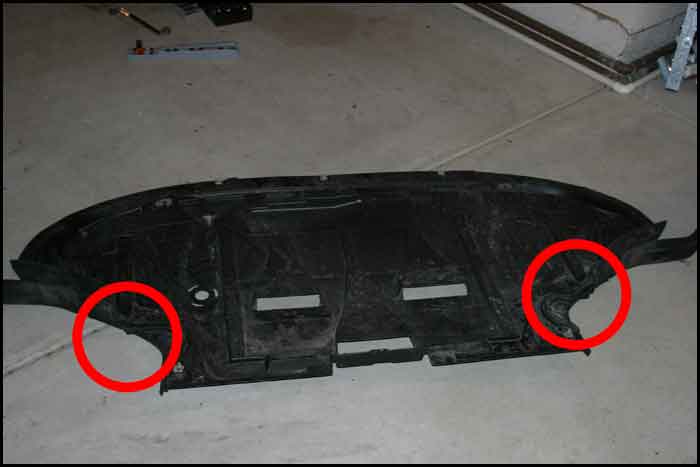
The final step after installing the front bar was reinstalling the belly pan. I knew that I might need to cut the pan a bit, but I was unsure of where the cut would be. I did a test fit and located the areas that needed to be notched out. On my belly pan, there were two very small plastic corners that were in the way - one on each side of the pan, where it transitioned to the fender liner. I used a sharp utility knife and simply cut these corners out. The plastic is very soft, and you can cut through it very easily.

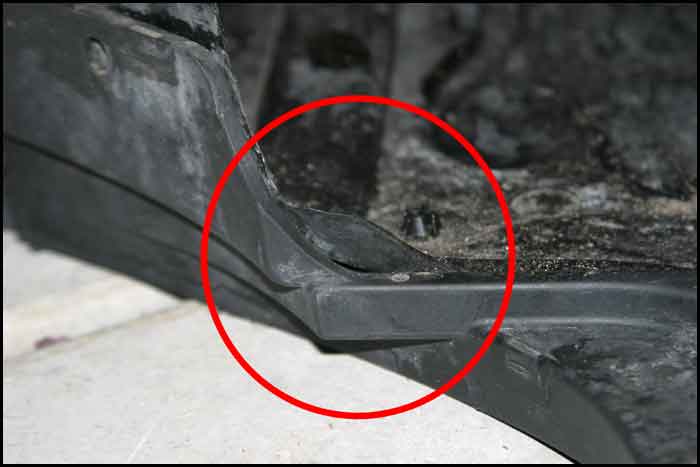


After I notched out these parts of the belly pan, I test fitted it once more and it fit perfectly. I then reinstalled the screws, and the installation was done! Time to go for a ride and hit some twisties!!
INSTALLATION NOTES - by SouthboroAudiGuy
- Yes, you can do it without ramps. It is, however, a bear. When you get to that last step of having to tighten down the end links (which must be done with the suspension under load for both front and rear) you will really miss the ramps. I actually ended up doing a quick post to check on the possiblity of holding up the rear end while under load by using jackstands under the control arm. This ended up working, but it was not an ideal solution and would have been elminated if I had ramps. For the front, I ended up dropping the car onto some wood so I had the front end up just enough to get under there to tighten up those end links. I suppose if you've got a ton of scrap lumber around, you can jack the car up, do the work, and then drop it on to some lumber for the final tightening of the end links. Ramps on the cheap.
- The ratcheting wrenches really are a must. You can get by with just the 17mm, but having the 16mm (I didn't) will make removing the rear end link easier, and the 13mm does make getting the bushings on and off quite a bit easier.
- The kit from Hotchkiss now comes with a little tube of locktite so you don't need to worry about buying that if you don't have any.
- If you can, use a good shop jack to lift the exhaust back into place. I was using a buddy's good jack and it made that step a piece of cake.
DRIVING IMPRESSIONS (note: I used the firm setting for the rear bar)
After finishing the install and taking a badly needed shower, I went for a LONG drive to get some gas and give things a try. I think the best way of describing the change is that the H-Sports calm the car down. There's just no more drama when getting on it in a turn. Whether you're on a big entrance ramp or making a quick turn at speed, the car just makes the turn. No dramatic attitude shift, no heeling over. It's comparable to upgrading your wheels by going lower profile and wider -- turn-in is improved and it really does inspire confidence. I can actually see getting the tires to break away now because I feel I can push it much more -- previously, I wouldn't push it as much because of all the drama.
What's fun is that you start to sense your speed in a turn using different parts of your perceptual system. Instead of the car's attitude being the primary indicator, you start to tune into how much the side bolsters (I have sport seats) are pressing against you. There is a bit of increased road feel that seems just about right -- certainly not harsh, but more communicative about what's happening with the road.
It was well worth the effort and I'm happy to be part of the H-sport club.