| Tech Article Title |
Author |
Date
|
| A6 Suspension Swap |
Kris Hansen |
2006 |
I recently installed new shocks and springs on my 2000 A6 (C5) Avant quattro. It's a fairly involved process, not all that different from other cars, but there are some tricks which will prove helpful to others who are taking on this task on their own.

First and foremost, as with any job requiring you to lift and work on the car, use proper jack stands, and other personal protection. You do not want the car falling on your head.
Front Suspension:
After safely raising the car, remove the wheels, spray all visible nuts (and even the ones hiding in the subframe for the lower control arms) with your favorite penetrant oil. You will be loosening all of them later on. However, the #1 thing to NOT do on the front suspension is worry about the long pinch bolt which holds the outer ends of the upper control arms to the upright. You absolutely do not need to remove this bolt to only change the shock/spring assembly. Instead, you'll remove a total of 4 rubber body plugs, and remove 4 nuts on the top side, and a few bolts on the bottom.
The body plugs are held in by paint, and rubberized undercoating, so they do take some work to remove. I use a long flathead screwdriver, and gently tap it under and though the body plugs, then pry it out, sometimes assisting the screwdriver with a long pair of needle nose pliers. Once you have removed the body plugs, you can jack the car, and get it on your stands.
The nuts are 13mm, I use my 1/4 drive ratchet with a very long extension. you do not want to fully remove them yet.
(mouseover the image for a different view)

(mouseover the image for a different view)

Next step is to remove the bolt from the sway bar/sway bar link junction. It's very helpful if you can remove the bolts on both side of the car at the same time (jack both front wheels off the ground). Next step is to remove the inner pivot bolt on the lower front control arm. This is to allow the lower shock mounting ears to clear the arm and the CV joint with no risk of injury to the CV joint boot. On some cars with smaller CV joints, it's possible to do this without removing the inner pivot bolt.

The lower shock bolt can be tricky to remove, as it runs into the rear lower control arm. Most often, if you wait to pull it out after you let the front arm/shock assembly droop down, you can slide it out under the lower curved arm. It's ok to put this bolt in from the front upon reassembly.
Once you get the shock assembly out of the car, it needs to be disassembled, so you can reuse the bumpstops, and the top spring perch and the top bushing.
It's impreative to use extreme care when dealing with the springs when under tension. There is enough stored energy to send the shock body flying if released. Use good quality spring compressors, and never aim the assembly at people. Compress the springs enough to safely remove the top nut from the shock (it's an 18mm nut. I usually just zip them off with an impact gun. If you don't have one, you can either hold the shaft with an allen wrench, and use a socket held with vice grips, or hold the old shock by it's shaft with vice grips and use a socket wrench. I really can't imagine doing this job without air tools though.)

With the Koni shocks, you are provided with a new lower spring perch, and a new rubber seat. It's only possible to install this one way, as pictured. Line up the cut in the bottom perch with the angle of the mouning ears. This will provide clearance for the upright once installed in the car. Make sure that nothing rubs on this spring perch.
Maneuver the new assembly into the car in the same way as it came out. Loosen all of the inner pivot bolts for the control arms, and prepare to put the car's weight onto the suspension.
I do this by placing a bottle jack under the suspension,and jacking it UP, as opposed to lowering the car down onto something, like a jack stand or ramp. Once you have safely jacked the suspension up (you'll know when, as the car will lift slightly off of your jack stand on that corner) you can torque the inner pivot bolts down to the proper torque settings.
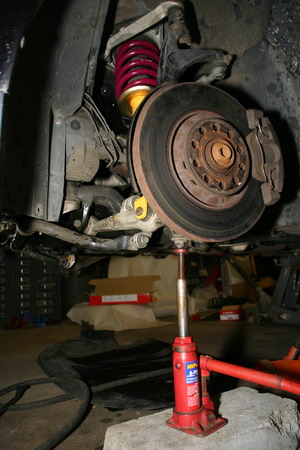
You will want to be VERY careful when you have the car in this arrangement. I have never had a jack slip out, but if it did, you would not want your head to be in the way!! I have visions of the suspension extending somewhat rapidly.
Torque Specs |
Location |
Torque |
| Lower Shock Nut |
66 lb/ft |
| C link to Sway Bar |
44 lb/ft |
| Lower Control Arm Nuts |
52 lb/ft +180 turn |
| Upper Control Arm Nuts |
37 lb/ft +180 turn |
| Upper shock mounting nuts |
15 lb/ft |
| Shock Top nut |
44 lb/ft |
Repeat for both sides, and you are done. Now it's time to move on to the rear!
Page [1] [2]