Introduction:
Intake air charge temperature is one of many variables, which plays a critical role in the performance of your turbocharged engine. Anything you can do to decrease the temperature of the air charge is likely to increase the performance of your engine. I'm sure we've all experienced the rather surprising increases in performance that can brought about by cold weather. These increases can almost solely be attributed to the lower intake charge temperatures produced by colder weather. In an attempt to keep the intake charge temps down Audi has fitted the 1.8T cars with an intercooler, but in it's current configuration I doubt it's being fully exploited.
As many of you know the air path through the intercooler is anything but low impedance...air must first travel thorough the drivers side lower grille insert...then discharge into the engine compartment. In the Audi S4 this issue has been addressed by adding vents to the wheel well liner. I assume this must be a worth while mod otherwise Audi would not have wasted their money making a new tool for a part that does nothing to increase performance or add value to the part. Fortunately for us these two cars are very similar in construction...so the S4 wheel well liner will fit with some modification. In the following article I'll outline the approach I took to implementing the needed changes.
Disclaimer: I assume no liability or responsibility for any damages that may arise either directly or indirectly as a result of the application of the information provided herein. Please read instructions fully before attempting this modification.
Parts and Tools:
· S4 Wheel Well Liner Part # (8D0 821 171 G) $32.00 USD
· Torx T-25 Screwdriver
· Standard Screwdriver
· 17mm Tire Iron
· Jack / Jack Stand
· Soldering Iron (See Text)
· 30 Min Epoxy (See Text)
· Utility Knife
· Pencil or Tape
Procedure:
1. Begin by loosening the lug nuts on the driver side wheel with the provided 17mm wrench.
2. Jack up the drivers side using the jacking points indicated in the owners manual and the provided jack, or jack of your choice.
3. This one's optional but highly recommended, place car on jack stand.
4. Finish removing wheel bolts and pull the wheel and tire free of the hub.
5. Using the supplied standard screwdriver remove the two plastic screws that are immediately to your left near the bottom of the wheel well liner.
6. Using the Torx T-25 screwdriver proceed to remove all 11 of screws, which hold the wheel well liner in place.
7. Once you've removed all the screws you should be able to pull the wheel well liner from the car. First push it away from you then pull it down...you'll see when you get in there it's quite easy.
8. Now that you've got the liner free you have two options simply install your new S4 style wheel well liner (reverse steps 1-7) or proceed on to modify the liner to create a, "Hybrid" liner which is more aesthetically pleasing.
Modifying the Liner:
As I mentioned in the introduction you will have to modify the liner if you want it to look perfectly stock. Why is this...well the answer is quite simple, the S4 has a body kit which includes rocker panels which are different than the stock A4. Because of this difference the lower edge of the wheel well liners are different. If you install the S4 liner w/o modification it will look somewhat hacked compared to the modified variety which will be indiscernible from a stock one...other than the fact it has vents. I'll show you in the following pictures exactly what I'm referring to.
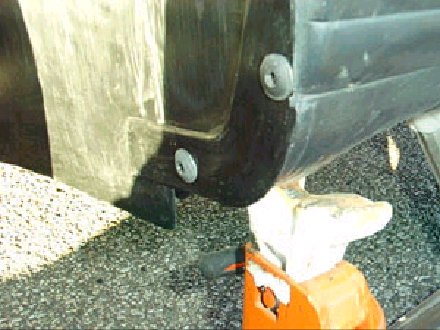
This image is the stock wheel well liner edge, notice how it wraps around the rocker panel of the car creating a smooth transition into the side of the car.
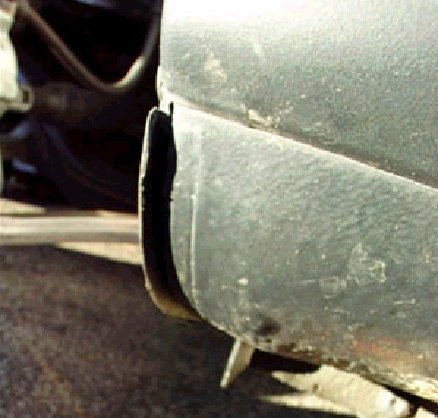
This image depicts how this modification will look if you elect not to perform the modification of the S4 wheel well liner. Notice how the edge looks ratty and does not smoothly integrate with the look of the car. You can clearly see a dirt line showing where the part used to wrap around the edge. If you don't mind this then you've got your work cut out for you, if you don't like the way this looks then follow me!
|


|
Modification Procedure:
1. Take both the stock liner and the S4 liner into your house / workshop, clean them up and get ready to do some cutting.
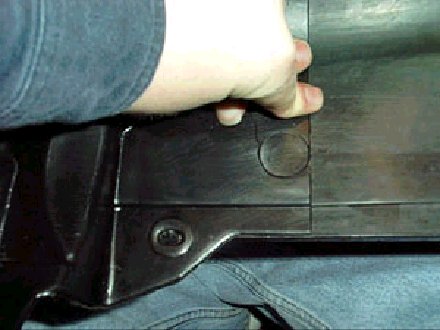
2. Let's begin by working with the S4 wheel well liner. Position the vented end to your left as I've done in this picture. Then select a location as a reference point. In this case I used the circular mark in the plastic as a guide point. I then laid down that yellow tape as a cutting guide. Make sure your line is straight otherwise it will make joining the two halves difficult. Once you're comfortable with the line you've made cut cleanly through the plastic. Toss the non-vented side, as you won't be needing it anymore.
3. Now it's time to grab your old stock wheel well liner and put it to good use. Orient your old liner in the same position the S4 one was in when you cut it. With the old liner in front of you place the vented section on top of your old liner. Move the vented section such that the screw holes in the lower left corner line up when viewed from above, if you fail to do it this way I can't guarantee your liner will go back in properly. Do not simply set them on top of each other...it's imperative that you align the screw holes from above (don't use the tooling marks for this step as they're different on the A4 liner, I almost found out the hard way). Once you've aligned them use the edge to strike a line on the stock A4 liner with your pencil, or score it with the razor blade.
4. Once you've scored your line carefully cut through the plastic you should now have a vented section from an S4 liner and the trim section from an A4 liner that when combined will create a, "Hybrid" ventilated A4 wheel well liner.
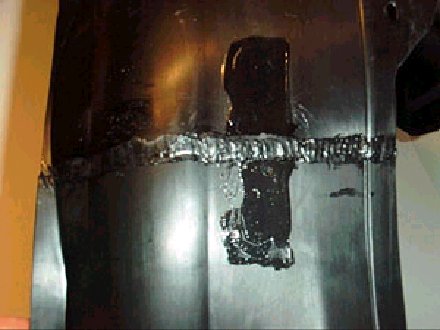
 5. Here's the trickiest part...now you must combine the two sections to create one single piece. You can see my fist attempt was with epoxy coated strips of plastic, which I peeled off before it cured. While this method may seem good I elected to do something different. Using a soldering iron and strips of plastic harvested from the other leftover bits of the wheel well liner I, "welded" the two sections back together, using the plastic strips as, "solder". It really isn't too difficult; you just need to carefully work the iron in a circular motion while adding some more plastic until you've created a seam. Then you simply repeat the process on the other side. When you're done you'll have a fairly strong entirely waterproof wheel well liner. Be careful not to poke the iron through the plastic...work it with the edge of the tip. I used a 40-Watt Weller with a pretty big 800-degree chisel tip. Also please do this in a well-ventilated area, that is unless you're into that sort of thing, you've been warned.
6. As a possible alternative for those who don't have a soldering iron...you could epoxy it as I attempted to do. Or if you're not picky you could find some very aggressive tape and put it together that way. I picked that cutting point (circle area) specifically because each half of the liner to either side is very well supported with screws and such, so if you decide to use tape it will still be very solid...my concern was more of a water proofing one. With that in mind you would simply install the two halves then run a bead of silicone sealant in the tiny groove (assuming you cut accurately) left by the cutting operation.
7. Assembly is the reverse of disassembly you should have 11 Torx screws and 2 plastic nuts. Note that the little black washer that's integrated in the liner edge of the liner goes on the outside...to protect the paint from cracking under the pressure of the screw I presume.

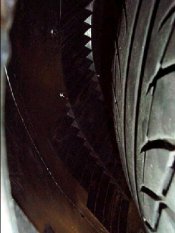
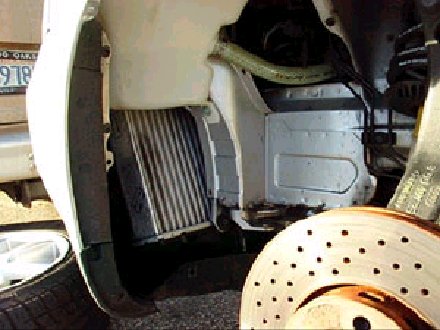
This picture has been included to show you the general location of the intercooler with respect to the vents, which are present on the S4 wheel well liner.
|

Here we have a picture of the liner in place.
|
Here we have another picture of the liner in place with the tire. Notice that the tire is fairly close...I'd imagine this would create some fierce vacuum possibly drawing the air through the intercooler with some force.
|
Observations & Final Notes:
First a friendly warning...don't drive w/o the liner installed. There is an outside chance a rock or pebble could get stuck in the tread of your tire at which point it could be thrown at the inside of your front quarter panel at a terrific velocity causing a volcano like ding and paint damage. This didn't happen to me cause I caught myself in the nick of time, again you've been warned.
Lastly, my personal observations about the mod, well as of yet I really don't have any as I just finished it a few hours ago. I did drive briefly and it did seem that in gear acceleration was MAYBE a hair better...but it's hard to say, couldn't be any worse. Besides it's a tiny investment...I've seen people spend their hard-earned dollars on far more dubious performance mods than this one. So with that I bid you ado' happy motoring.
BTW - I'd like to thank Christian J. Long, as his post was the one that got me going on this whole trip.

