Rear Parking Speaker / Buzzer Location
 04-15-2012, 07:24 AM
#1
AudiWorld Newcomer
Thread Starter

Join Date: Apr 2012
Posts: 3
Likes: 0
Received 0 Likes
on
0 Posts
Hi
I'm a newbie from the UK so bear with me ... I've tried searching for this but haven't quite got the answer I'm looking for .... anyone know exactly where the reversing speaker is located on an A6 Avant? I've got the part just need to find where it lives (and any advice on accessing it)!!
Thanks ... Andy

 04-15-2012, 12:05 PM
#3
AudiWorld Senior Member
Hi
I'm a newbie from the UK so bear with me ... I've tried searching for this but haven't quite got the answer I'm looking for .... anyone know exactly where the reversing speaker is located on an A6 Avant? I've got the part just need to find where it lives (and any advice on accessing it)!!
Thanks ... Andy
I'm a newbie from the UK so bear with me ... I've tried searching for this but haven't quite got the answer I'm looking for .... anyone know exactly where the reversing speaker is located on an A6 Avant? I've got the part just need to find where it lives (and any advice on accessing it)!!
Thanks ... Andy
<TABLE cellSpacing=0 cellPadding=0 width="100%"><TBODY><TR><TD class=spalte-text><TABLE class="cc abstand-kap einzug-standard"><TBODY><TR><TD class=titel-kap>Removing and installing rear parking aid warning buzzer -H15- on belt guide (right-side) - saloon from model year 2007 onwards</TD></TR></TBODY></TABLE></TD><TD class=spalte-pfeil></TD><TD class=spalte-marg></TD></TR></TBODY></TABLE><TABLE cellSpacing=0 cellPadding=0 width="100%"><TBODY><TR><TD class=spalte-text><TABLE class="cc einzug-standard abstand-standard absatz-hervor"><TBODY><TR><TD>Removing</TD></TR></TBODY></TABLE><TABLE class="cc einzug-standard abstand-standard "><TBODY><TR><TD class=einzug-liste>� </TD><TD>Switch off ignition and take out ignition key.</TD></TR></TBODY></TABLE><TABLE class="cc einzug-standard abstand-standard "><TBODY><TR><TD class=einzug-liste>� </TD><TD>Remove C-pillar trim.</TD></TR></TBODY></TABLE><TABLE class="cc einzug-standard abstand-standard "><TBODY><TR><TD class=einzug-liste>� </TD><TD>Pull out rear parking aid warning buzzer -H15--item 2- at belt guide (right-side) -3- in direction of -arrow-.</TD></TR></TBODY></TABLE><TABLE class="cc einzug-standard abstand-standard "><TBODY><TR><TD class=einzug-liste>� </TD><TD>Unplug electrical connector -1-.</TD></TR></TBODY></TABLE><TABLE class="cc einzug-standard abstand-standard absatz-hervor"><TBODY><TR><TD>Installing</TD></TR></TBODY></TABLE><TABLE class="cc einzug-standard abstand-standard "><TBODY><TR><TD>Installation is carried out in the reverse order; note the following:</TD></TR></TBODY></TABLE><TABLE class="cc einzug-standard abstand-standard "><TBODY><TR><TD class=einzug-liste>� </TD><TD>Install C-pillar trim.</TD></TR></TBODY></TABLE></TD></TR></TBODY></TABLE>
<TABLE cellSpacing=0 cellPadding=0 width="100%"><TBODY><TR><TD class=spalte-text><TABLE class="cc abstand-kap einzug-standard"><TBODY><TR><TD class=titel-kap>Removing and installing rear parking aid warning buzzer -H15- on belt guide (right-side) - Avant from model year 2006 onwards</TD></TR></TBODY></TABLE></TD><TD class=spalte-pfeil></TD><TD class=spalte-marg></TD></TR></TBODY></TABLE><TABLE cellSpacing=0 cellPadding=0 width="100%"><TBODY><TR><TD class=spalte-text><TABLE class="cc einzug-standard abstand-standard absatz-hervor"><TBODY><TR><TD>Removing</TD></TR></TBODY></TABLE><TABLE class="cc einzug-standard abstand-standard "><TBODY><TR><TD class=einzug-liste>� </TD><TD>Switch off ignition and take out ignition key.</TD></TR></TBODY></TABLE><TABLE class="cc einzug-standard abstand-standard "><TBODY><TR><TD class=einzug-liste>� </TD><TD>Remove luggage compartment side trim.</TD></TR></TBODY></TABLE><TABLE class="cc einzug-standard abstand-standard "><TBODY><TR><TD class=einzug-liste>� </TD><TD>Take out insulation in area of rear parking aid warning buzzer -H15- (if fitted).</TD></TR></TBODY></TABLE><TABLE class="cc einzug-standard abstand-standard "><TBODY><TR><TD class=einzug-liste>� </TD><TD>Pull out rear parking aid warning buzzer -H15--item 2- at belt guide (right-side) -3- in direction of -arrow-.</TD></TR></TBODY></TABLE><TABLE class="cc einzug-standard abstand-standard "><TBODY><TR><TD class=einzug-liste>� </TD><TD>Unplug electrical connector -1-.</TD></TR></TBODY></TABLE><TABLE class="cc einzug-standard abstand-standard absatz-hervor"><TBODY><TR><TD>Installing</TD></TR></TBODY></TABLE><TABLE class="cc einzug-standard abstand-standard "><TBODY><TR><TD>Installation is carried out in the reverse order; note the following:</TD></TR></TBODY></TABLE><TABLE class="cc einzug-standard abstand-standard "><TBODY><TR><TD class=einzug-liste>� </TD><TD>Install luggage compartment side trim.</TD></TR></TBODY></TABLE>
buzzer-H15-onbeltguideleft-side-Avantuptomodelyear2005.png?t=1334521155
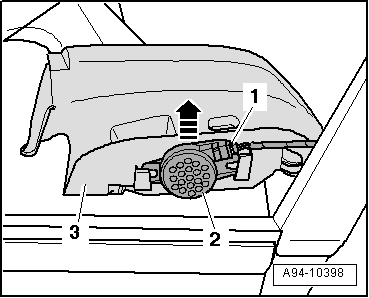
<TABLE cellSpacing=0 cellPadding=0 width="100%"><TBODY><TR><TD class=spalte-text><TABLE class="cc abstand-kap einzug-standard"><TBODY><TR><TD class=titel-kap>Removing and installing rear parking aid warning buzzer -H15- on belt guide (left-side) - Avant up to model year 2005</TD></TR></TBODY></TABLE></TD><TD class=spalte-pfeil></TD><TD class=spalte-marg></TD></TR></TBODY></TABLE><TABLE cellSpacing=0 cellPadding=0 width="100%"><TBODY><TR><TD class=spalte-text><TABLE class="cc einzug-standard abstand-standard absatz-hervor"><TBODY><TR><TD>Removing</TD></TR></TBODY></TABLE><TABLE class="cc einzug-standard abstand-standard "><TBODY><TR><TD class=einzug-liste>� </TD><TD>Switch off ignition and take out ignition key.</TD></TR></TBODY></TABLE><TABLE class="cc einzug-standard abstand-standard "><TBODY><TR><TD class=einzug-liste>� </TD><TD>Remove luggage compartment side trim.</TD></TR></TBODY></TABLE><TABLE class="cc einzug-standard abstand-standard "><TBODY><TR><TD class=einzug-liste>� </TD><TD>Take out insulation in area of rear parking aid warning buzzer -H15- (if fitted).</TD></TR></TBODY></TABLE><TABLE class="cc einzug-standard abstand-standard "><TBODY><TR><TD class=einzug-liste>� </TD><TD>Pull rear parking aid warning buzzer -H15--item 3- out of belt guide (left-side) -1- in direction of -arrow-.</TD></TR></TBODY></TABLE><TABLE class="cc einzug-standard abstand-standard "><TBODY><TR><TD class=einzug-liste>� </TD><TD>Unplug electrical connector -2-.</TD></TR></TBODY></TABLE><TABLE class="cc einzug-standard abstand-standard absatz-hervor"><TBODY><TR><TD>Installing</TD></TR></TBODY></TABLE><TABLE class="cc einzug-standard abstand-standard "><TBODY><TR><TD>Installation is carried out in the reverse order; note the following:</TD></TR></TBODY></TABLE><TABLE class="cc einzug-standard abstand-standard "><TBODY><TR><TD class=einzug-liste>� </TD><TD>Install luggage compartment side trim..</TD></TR></TBODY></TABLE>
<TABLE cellSpacing=0 cellPadding=0 width="100%"><TBODY><TR><TD class=spalte-text><TABLE class="cc abstand-kap einzug-standard"><TBODY><TR><TD class=titel-kap>Removing and installing rear parking aid warning buzzer -H15- on belt guide (left-side) - saloon up to model year 2006</TD></TR></TBODY></TABLE></TD><TD class=spalte-pfeil> </TD><TD class=spalte-marg> </TD></TR></TBODY></TABLE><TABLE cellSpacing=0 cellPadding=0 width="100%"><TBODY><TR><TD class=spalte-text><TABLE class="cc einzug-standard abstand-standard absatz-hervor"><TBODY><TR><TD>Removing</TD></TR></TBODY></TABLE><TABLE class="cc einzug-standard abstand-standard "><TBODY><TR><TD class=einzug-liste>� </TD><TD>Switch off ignition and take out ignition key.</TD></TR></TBODY></TABLE><TABLE class="cc einzug-standard abstand-standard "><TBODY><TR><TD class=einzug-liste>� </TD><TD>Remove C-pillar trim.</TD></TR></TBODY></TABLE><TABLE class="cc einzug-standard abstand-standard "><TBODY><TR><TD class=einzug-liste>� </TD><TD>Pull rear parking aid warning buzzer -H15--item 3- out of belt guide (left-side) -1- in direction of -arrow-.</TD></TR></TBODY></TABLE><TABLE class="cc einzug-standard abstand-standard "><TBODY><TR><TD class=einzug-liste>� </TD><TD>Unplug electrical connector -2-.</TD></TR></TBODY></TABLE><TABLE class="cc einzug-standard abstand-standard absatz-hervor"><TBODY><TR><TD>Installing</TD></TR></TBODY></TABLE><TABLE class="cc einzug-standard abstand-standard "><TBODY><TR><TD>Installation is carried out in the reverse order; note the following:</TD></TR></TBODY></TABLE><TABLE class="cc einzug-standard abstand-standard "><TBODY><TR><TD class=einzug-liste>� </TD><TD>Install C-pillar trim.</TD></TR></TBODY></TABLE></TD></TR></TBODY></TABLE>
</TD></TR></TBODY></TABLE>
</TD></TR></TBODY></TABLE>
Last edited by royclark; 04-15-2012 at 12:25 PM.
04-16-2012, 11:45 AM
#4
AudiWorld Junior Member

Join Date: Jul 2008
Posts: 40
Likes: 0
Received 0 Likes
on
0 Posts
this instruction is incorrect for Sedan, in a Sedan, the buzzer is not on the left seat belt guide.(not on the right seat belt guide either). this is from first hand DIY experience.
08-09-2013, 12:26 AM
#7
AudiWorld Newcomer

Join Date: Aug 2013
Posts: 2
Likes: 0
Received 0 Likes
on
0 Posts
Dear Forumers!
I tied to find my buzzers location, because I had the same issue: not working.
I didn't find any answer, so I started to looking for it and finally I succeed! So that's why I try to help.
My car is an Audi A6 Sedan (first of the 2004 serie).
After 2 hours I found it: on the driving side, back seat, under the belt holder. The main problem was, that is not actually under, but on the side of it. So there is (behind the C-pillar ) the small window (little triangle). The buzzer is simlpy dropped there (between the cars metal wall, under the triangle glass), sticked to the outer side of the belt cover.
I deeply sorry, but I foget to make picture the exact location, but hope you understand that. I made 2 pictures (when you able to reach the buzzer, I simply pulled out it's place, so tried not to rid all of my cars parts). However you need to remove the fallows:
- cap holder
- the screw what holds the movable seatback (remove the side)
- C-pillar - has 2 screws, one under the seat side, one under the uper end of the pillar, able to open it with little force (its a patent fastener) (whit this, the belt cover starts to move)
I forced my hand under the C pillar and grabbed it.

Finally, sorry for my english, that is not so good, but hope I helped...
I tied to find my buzzers location, because I had the same issue: not working.
I didn't find any answer, so I started to looking for it and finally I succeed! So that's why I try to help.
My car is an Audi A6 Sedan (first of the 2004 serie).
After 2 hours I found it: on the driving side, back seat, under the belt holder. The main problem was, that is not actually under, but on the side of it. So there is (behind the C-pillar ) the small window (little triangle). The buzzer is simlpy dropped there (between the cars metal wall, under the triangle glass), sticked to the outer side of the belt cover.
I deeply sorry, but I foget to make picture the exact location, but hope you understand that. I made 2 pictures (when you able to reach the buzzer, I simply pulled out it's place, so tried not to rid all of my cars parts). However you need to remove the fallows:
- cap holder
- the screw what holds the movable seatback (remove the side)
- C-pillar - has 2 screws, one under the seat side, one under the uper end of the pillar, able to open it with little force (its a patent fastener) (whit this, the belt cover starts to move)
I forced my hand under the C pillar and grabbed it.
Finally, sorry for my english, that is not so good, but hope I helped...
Trending Topics
 08-17-2013, 02:24 AM
#9

I've just did the replacement. It was a long process looking for the horn. But I finally found it and here are the step by step photos. I think the horn is always located behind the left rear passenger seat belt winder, just inside the C pillar window. You also need Torx screwdriver no. 10.
1. Remove the rear central trim to access the screw to the C pillar's upper trim, by carefully pulling the clips. There are four of them.
2. Remove the C pillar's upper trim as shown below. There are one screw and two clips.
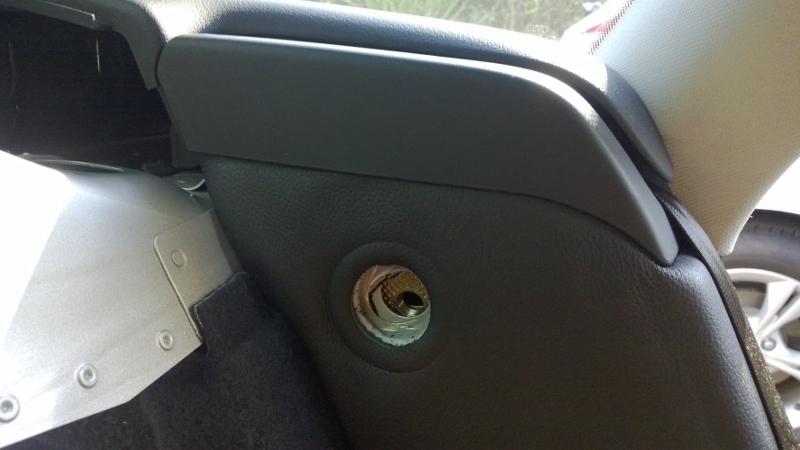
3. Remove the bolt for the left rear seat fold down latch, as shown below. This will allow you to move the cushion.
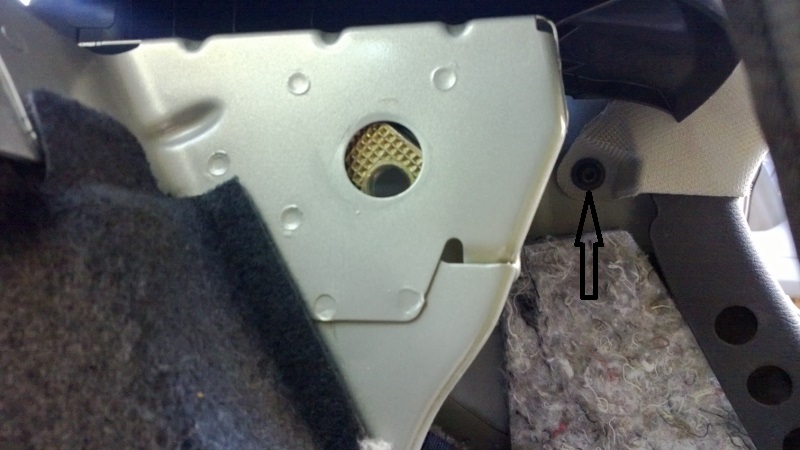
4. Loosen all the screws for the triangle shape trim for the C pillar. There are three screws in total. Two at the upper trim and one at the bottom, hidden behind the cushion (refer to no. 3 above). See the location of the hidden screw in the following photo.
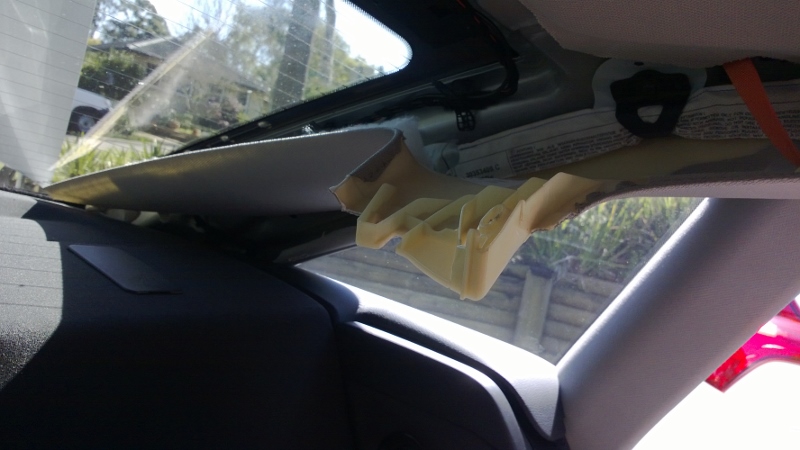
5. Now you can remove the triangle shape trim, which also covers the seat belt winder.
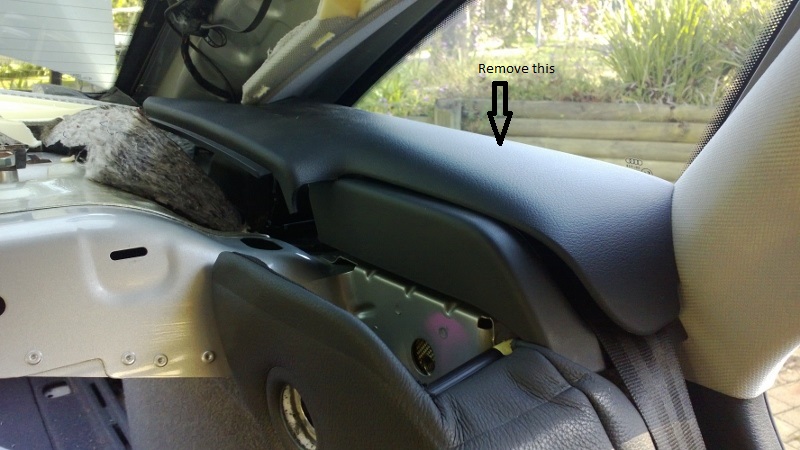
6. Once seat belt cover is removed, you can access the horn as shown below.
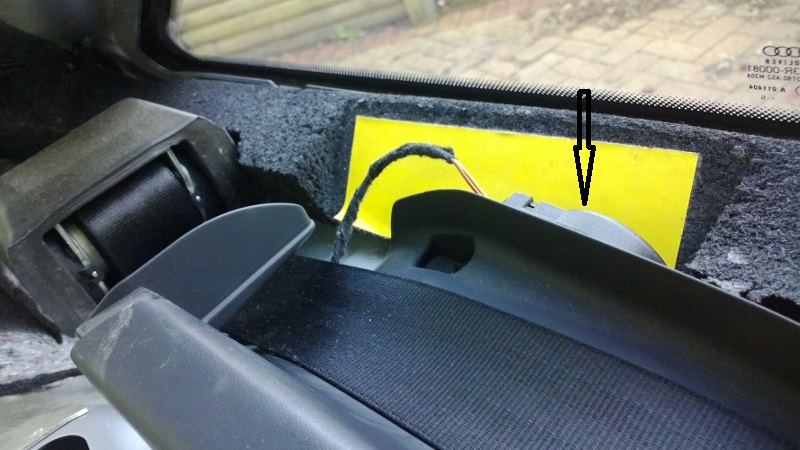
7. Then it is just a matter to put everything back together. Remember to test it first before putting everything back together.
Good luck.
1. Remove the rear central trim to access the screw to the C pillar's upper trim, by carefully pulling the clips. There are four of them.
2. Remove the C pillar's upper trim as shown below. There are one screw and two clips.
3. Remove the bolt for the left rear seat fold down latch, as shown below. This will allow you to move the cushion.
4. Loosen all the screws for the triangle shape trim for the C pillar. There are three screws in total. Two at the upper trim and one at the bottom, hidden behind the cushion (refer to no. 3 above). See the location of the hidden screw in the following photo.
5. Now you can remove the triangle shape trim, which also covers the seat belt winder.
6. Once seat belt cover is removed, you can access the horn as shown below.
7. Then it is just a matter to put everything back together. Remember to test it first before putting everything back together.
Good luck.
08-19-2013, 11:49 AM
#10
AudiWorld Newcomer
Thread Starter
Join Date: Apr 2012
Posts: 3
Likes: 0
Received 0 Likes
on
0 Posts
 Cheers, I've already done this job but a great step by step guide for the next person!
I've just did the replacement. It was a long process looking for the horn. But I finally found it and here are the step by step photos. I think the horn is always located behind the left rear passenger seat belt winder, just inside the C pillar window. You also need Torx screwdriver no. 10.
1. Remove the rear central trim to access the screw to the C pillar's upper trim, by carefully pulling the clips. There are four of them.
2. Remove the C pillar's upper trim as shown below. There are one screw and two clips.
Attachment 33580
3. Remove the bolt for the left rear seat fold down latch, as shown below. This will allow you to move the cushion.
Attachment 33578
4. Loosen all the screws for the triangle shape trim for the C pillar. There are three screws in total. Two at the upper trim and one at the bottom, hidden behind the cushion (refer to no. 3 above). See the location of the hidden screw in the following photo.
Attachment 33577
5. Now you can remove the triangle shape trim, which also covers the seat belt winder.
Attachment 33579
6. Once seat belt cover is removed, you can access the horn as shown below.
Attachment 33576
7. Then it is just a matter to put everything back together. Remember to test it first before putting everything back together.
Good luck.