DIY Rear Brake Pads
 06-26-2010, 03:20 PM
#1
AudiWorld Senior Member
Thread Starter

Rear Pads & Rotors: 1 hour. Need jack, stand, rubber gloves, 16/17mm ratchet (for lug bolts), flat head or puller tool (for lug bolt caps), 15mm wrench, 13mm wrench or socket, turkey baster or something similar, VAG COM, large c-clamp or piston tool, mineral spirits or brake cleaner, rag, battery charger, pads, rotors, replacement caliper self-locking bolts and anti-rattle clips.
1) Hook up a battery charger.

2) Turn on car accessory and cycle parking brake on first then off.
3) With car now off hook up VAG cable to car and computer. Turn ignition/accessories on (car not running) and open VCDS software.
4) Go to "Select" module, then "53-Parking Brake," then "Basic Settings-04" type in "007" in the "Group" section and press "go." You will hear the e-brake retracting for about 5-10 seconds. Exit to the main screen but keep the software open. You will get a beep and some blinking on the dash saying parking brake malfunction. Don't worry. The pic below shows the screen in VCDS but I have value "006" in as I took the pic after I was done. Value 006 is to close the e-brake not open so make sure you put in "007" in this step and "006" in step 14.

5) Loosen lug bolts while car is still on the ground.
6) Jack up the car and take off wheel on one side, place stand underneath and also place wheel underneath exhaust as you can use this to set the caliper on.
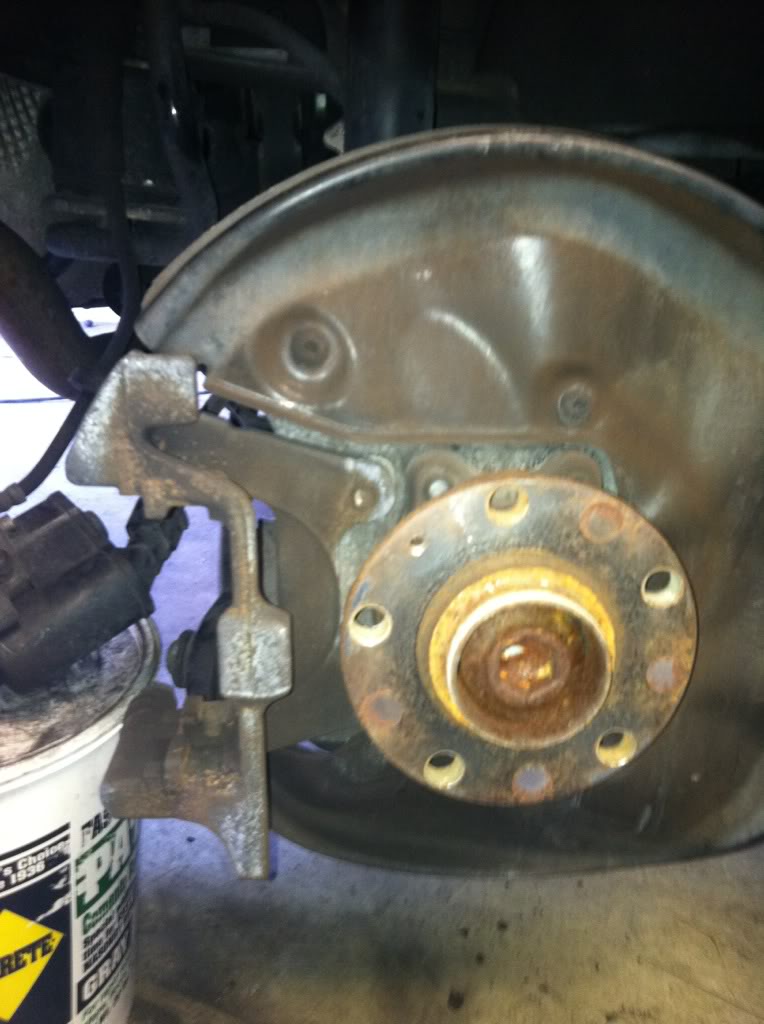
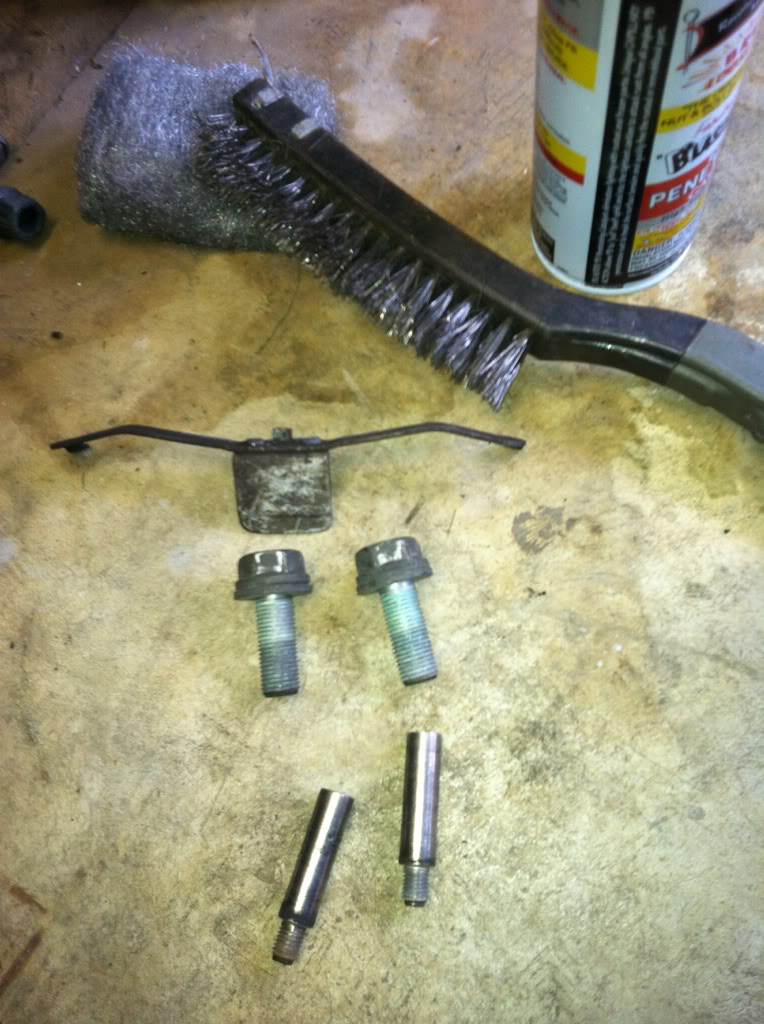
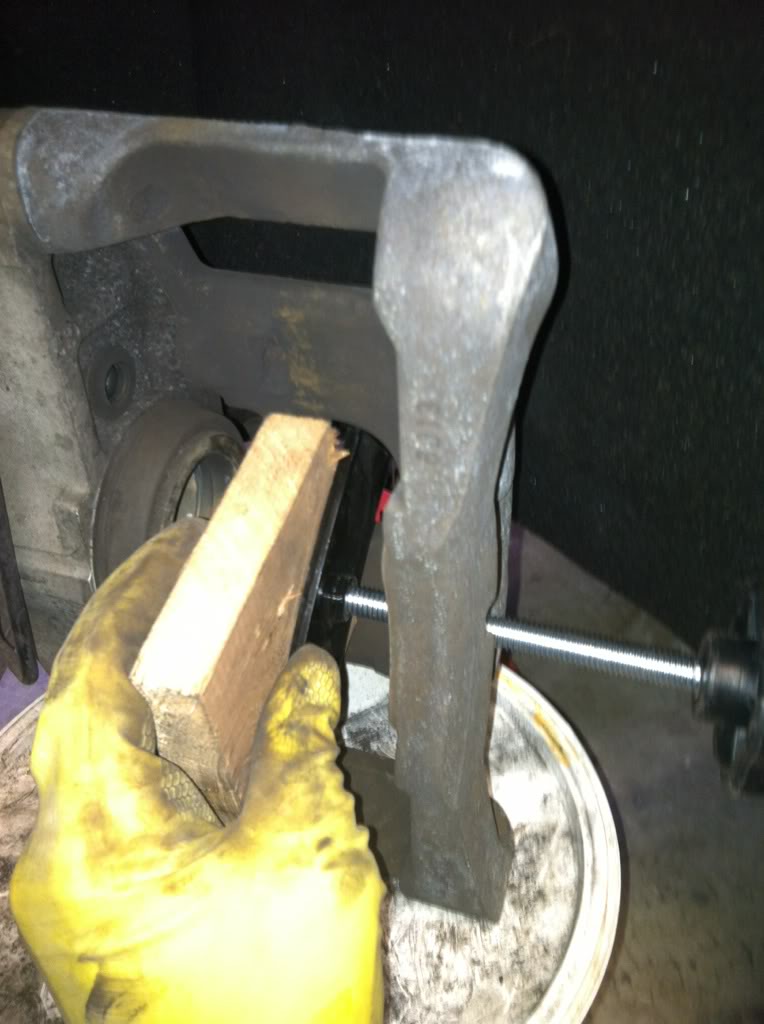
7) Grab your 15mm wrench and 13mm wrench/ratchet (ratchet is easier). Remove the two self-locking caliper bolts.

[IMG]http://i484.photobucket.com/albums/rr204/r111racer/2010-06-2523-29-07_0154.jpg
[/IMG]
8) Take off caliper and sit it on your wheel


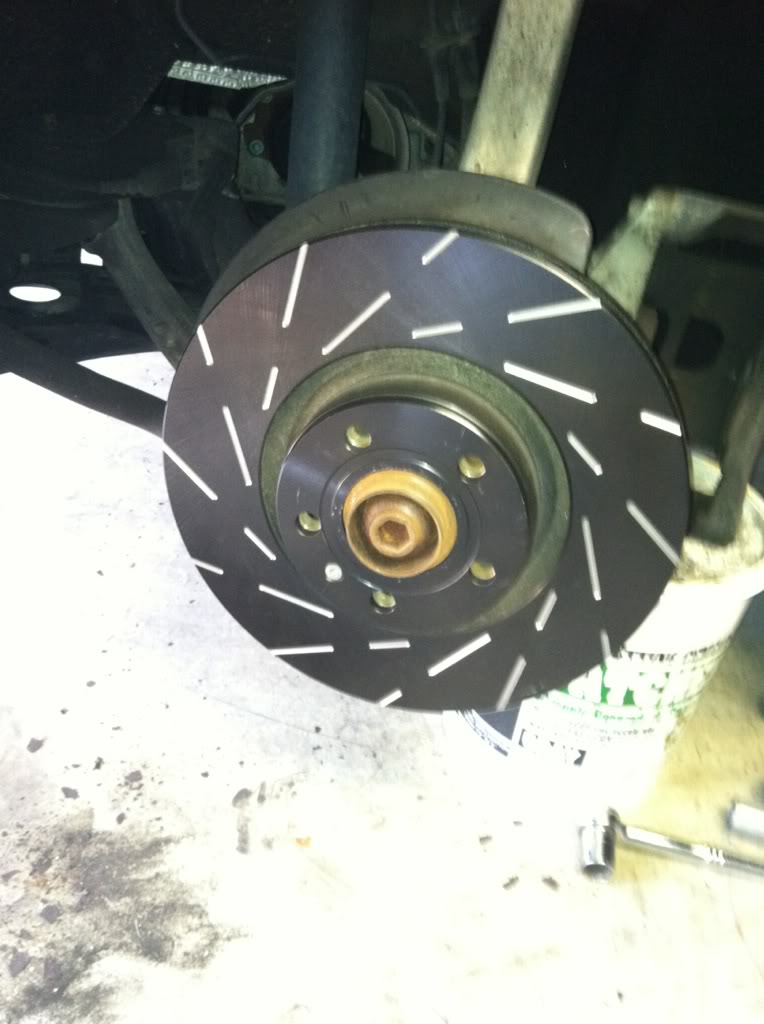
9) Remove old pads and clips and hit the caliper (both sections) with some mineral spirits (suggested by audi) or brake cleaner. The rotor wear limit is 20mm. Remove the T30 torx screw from the rotor and simply take off. No need to take off the carrier.
10) Replace the old anti-rattle clips with new ones (part no. 1K0-615-231-B) and make sure they snap into place on both sides of rotor then pop in the new pads. You need two per side for a total of four. If you don't have replacements just give the old ones a good cleaning.


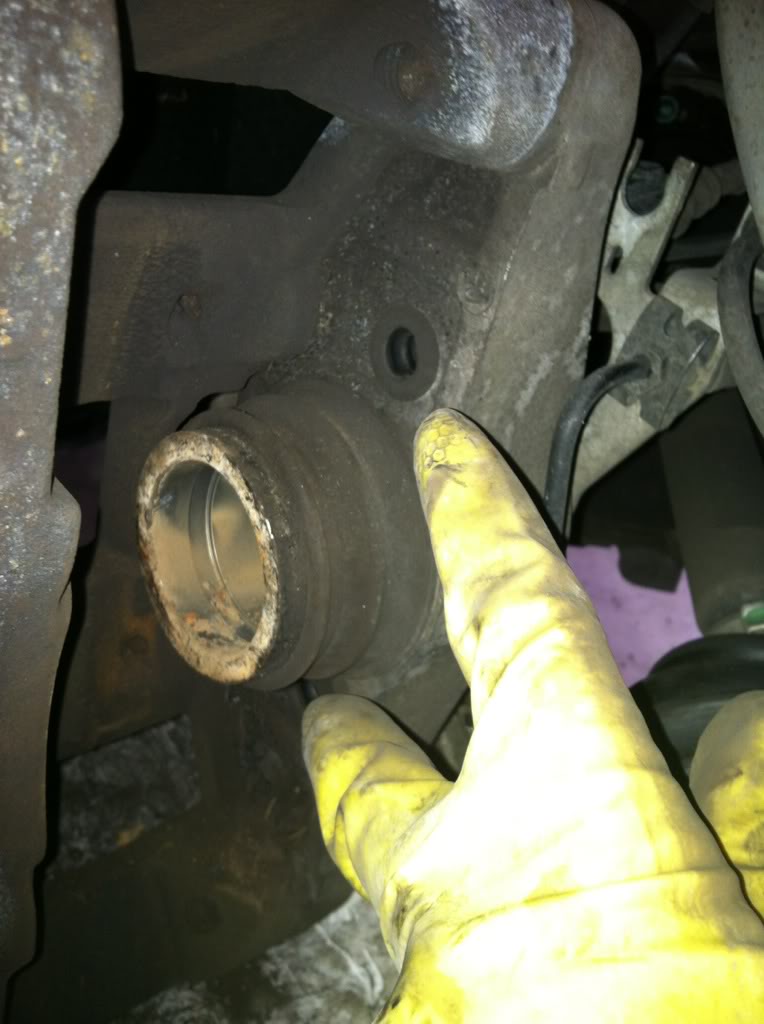
11) Remove the brake reservoir cap along with a little fluid especially if your fluid is level is at max. Wrap a towel around it so it doesn't overflow when pushing the piston back. Take a c-clamp or piston tool and push the piston back enough so the caliper will fit over the pads.Doing so will allow the piston to move and ensure that there's not too much fluid/pressure in the reservoir. In my case, I knew that my reservoir was at the max level before starting so I had to remove about 2 tablespoons per wheel.


12) Replace the 13mm self-locking bolts with new ones (part no. N-010-241-24). You need to order two per side for a total of four. Torque to 35nm. If you don't have them you definitely need to buy some loctite (non-permanent type) and put around the ends of the bolts.
13) Put the wheel back on and repeat on the other side. Lug bolt torque I believe is 110ft/lbs.
14) Go back to VCDS software and go to "Select" module, then "53-Parking Brake," then "Basic Settings-04" type in "006" in the "Group" section and press "go." You will hear the e-brake closing for about 5 seconds. You will then hear another 1-2 seconds of noise as the piston adjusts.The value in VCDS should automatically switch to "001". Close the software and disconnect cable.
15) Cycle the e-brake on and off and the malfunction light will go off.
Front Pads & Rotors.
You need a 21mm socket with a 3/8 ratchet as 1/2 inch ratchet is too big. Also need a size 7 hex bit and a leverage bar or long ratchet as the carrier bolts are on tight.
1) Remove the brake pin by prying up and pulling it off.
2) Remove the two hex bolts from the carrier. They have two plastic caps covering them that must be removed first.
3) Remove the 21mm carrier bolts.

4) Pull it off the caliper and carrier, remove the rotor and disconnect the brake sensor You may have to bang on the rotor to get it off. Don' be scared to hit it hard.
5) Pop the pads out and give everything a good cleaning. A wire brush and brake cleaner work well.
6) Push the caliper back with a caliper tool. Be sure to check the brake reservoir as you will have to remove some fluid.
7) Put the new rotor on and pop in the new pads. Reassemble everything and put the pin back on after everything is bolted in place.
Test drive and your good to go. Probably want to go easy on the brakes for 500 miles or so. No more squealing for me !!!
!!!
1) Hook up a battery charger.
2) Turn on car accessory and cycle parking brake on first then off.
3) With car now off hook up VAG cable to car and computer. Turn ignition/accessories on (car not running) and open VCDS software.
4) Go to "Select" module, then "53-Parking Brake," then "Basic Settings-04" type in "007" in the "Group" section and press "go." You will hear the e-brake retracting for about 5-10 seconds. Exit to the main screen but keep the software open. You will get a beep and some blinking on the dash saying parking brake malfunction. Don't worry. The pic below shows the screen in VCDS but I have value "006" in as I took the pic after I was done. Value 006 is to close the e-brake not open so make sure you put in "007" in this step and "006" in step 14.
5) Loosen lug bolts while car is still on the ground.
6) Jack up the car and take off wheel on one side, place stand underneath and also place wheel underneath exhaust as you can use this to set the caliper on.
7) Grab your 15mm wrench and 13mm wrench/ratchet (ratchet is easier). Remove the two self-locking caliper bolts.
[IMG]http://i484.photobucket.com/albums/rr204/r111racer/2010-06-2523-29-07_0154.jpg
[/IMG]
8) Take off caliper and sit it on your wheel
9) Remove old pads and clips and hit the caliper (both sections) with some mineral spirits (suggested by audi) or brake cleaner. The rotor wear limit is 20mm. Remove the T30 torx screw from the rotor and simply take off. No need to take off the carrier.
10) Replace the old anti-rattle clips with new ones (part no. 1K0-615-231-B) and make sure they snap into place on both sides of rotor then pop in the new pads. You need two per side for a total of four. If you don't have replacements just give the old ones a good cleaning.
11) Remove the brake reservoir cap along with a little fluid especially if your fluid is level is at max. Wrap a towel around it so it doesn't overflow when pushing the piston back. Take a c-clamp or piston tool and push the piston back enough so the caliper will fit over the pads.Doing so will allow the piston to move and ensure that there's not too much fluid/pressure in the reservoir. In my case, I knew that my reservoir was at the max level before starting so I had to remove about 2 tablespoons per wheel.
12) Replace the 13mm self-locking bolts with new ones (part no. N-010-241-24). You need to order two per side for a total of four. Torque to 35nm. If you don't have them you definitely need to buy some loctite (non-permanent type) and put around the ends of the bolts.
13) Put the wheel back on and repeat on the other side. Lug bolt torque I believe is 110ft/lbs.
14) Go back to VCDS software and go to "Select" module, then "53-Parking Brake," then "Basic Settings-04" type in "006" in the "Group" section and press "go." You will hear the e-brake closing for about 5 seconds. You will then hear another 1-2 seconds of noise as the piston adjusts.The value in VCDS should automatically switch to "001". Close the software and disconnect cable.
15) Cycle the e-brake on and off and the malfunction light will go off.
Front Pads & Rotors.
You need a 21mm socket with a 3/8 ratchet as 1/2 inch ratchet is too big. Also need a size 7 hex bit and a leverage bar or long ratchet as the carrier bolts are on tight.
1) Remove the brake pin by prying up and pulling it off.
2) Remove the two hex bolts from the carrier. They have two plastic caps covering them that must be removed first.
3) Remove the 21mm carrier bolts.
4) Pull it off the caliper and carrier, remove the rotor and disconnect the brake sensor You may have to bang on the rotor to get it off. Don' be scared to hit it hard.
5) Pop the pads out and give everything a good cleaning. A wire brush and brake cleaner work well.
6) Push the caliper back with a caliper tool. Be sure to check the brake reservoir as you will have to remove some fluid.
7) Put the new rotor on and pop in the new pads. Reassemble everything and put the pin back on after everything is bolted in place.
Test drive and your good to go. Probably want to go easy on the brakes for 500 miles or so. No more squealing for me
!!!
Last edited by r1racer; 02-18-2012 at 10:16 AM. Reason: Updated to include front rotors and pads

 06-26-2010, 08:17 PM
#3

Absolutely fantastic tutorial. Thanks so much for taking the time to do this. I was suprised to find my rears VERY thin after only 28K miles. Looks like this will be my first DIY after warranty.
 06-28-2010, 03:11 PM
#5
AudiWorld Member

Join Date: Apr 2009
Location: South Carolina
Posts: 85
Likes: 0
Received 0 Likes
on
0 Posts
Nicely done!
One feedback... pushing the caliper piston back with a C clamp at the angle your picture shows is not a good idea. It appears to show that the clamp is pushing on one edge of the piston. That can cause the piston to get cocked sideways, damaging its seal, or worse.
There is a simple and inexpensive tool you can pick up from a parts store that will put an even pressure on the piston, and prevents damage. It's worth the meager investment.
Here's one: http://www.toolfetch.com/Category/Au...?per=15&page=4
It says not for use with rear calipers that have parking brakes built in, but that's on cars without the vagcom retraction feature. On those, you have to screw the piston back into the caliper with one of these:
http://www.toolfetch.com/Category/Au...?per=15&page=4
06-28-2010, 04:30 PM
#6
AudiWorld Senior Member

Leave it to r1racer to use quality U.S Made Forged Tools, and also a thx to Boxter for the link 
Last edited by mystrodo; 06-28-2010 at 04:38 PM. Reason: added thx
06-28-2010, 06:24 PM
#7
AudiWorld Senior Member
Thread Starter
Nicely done!
One feedback... pushing the caliper piston back with a C clamp at the angle your picture shows is not a good idea. It appears to show that the clamp is pushing on one edge of the piston. That can cause the piston to get cocked sideways, damaging its seal, or worse.
There is a simple and inexpensive tool you can pick up from a parts store that will put an even pressure on the piston, and prevents damage. It's worth the meager investment.
Here's one: http://www.toolfetch.com/Category/Au...?per=15&page=4
It says not for use with rear calipers that have parking brakes built in, but that's on cars without the vagcom retraction feature. On those, you have to screw the piston back into the caliper with one of these:
http://www.toolfetch.com/Category/Au...?per=15&page=4
One feedback... pushing the caliper piston back with a C clamp at the angle your picture shows is not a good idea. It appears to show that the clamp is pushing on one edge of the piston. That can cause the piston to get cocked sideways, damaging its seal, or worse.
There is a simple and inexpensive tool you can pick up from a parts store that will put an even pressure on the piston, and prevents damage. It's worth the meager investment.
Here's one: http://www.toolfetch.com/Category/Au...?per=15&page=4
It says not for use with rear calipers that have parking brakes built in, but that's on cars without the vagcom retraction feature. On those, you have to screw the piston back into the caliper with one of these:
http://www.toolfetch.com/Category/Au...?per=15&page=4
Last edited by r1racer; 06-29-2010 at 05:39 PM.
Trending Topics
03-30-2012, 07:20 AM
#9
Audiworld Junior Member
Join Date: Nov 2010
Posts: 27
Likes: 0
Received 0 Likes
on
0 Posts
Very good tutorial but I�m stuck I followed all the steps and I was able put both new rotors and pads one at a time as described. When I came back to select [006] to undo the parking brake and it did not work. Noticed car battery ran out of juice even though I hooked up the charger (Schumacher SC-600A) before starting this job. Most likely that AC/Heat/Lights were on during whole time. Total brake job took me 2 hrs.
1. I packed up everything and turned off the car and put the battery to charge over night to continues next morning.
2. Next morning I checked the charger and showed battery was fully charged but car MMI display was showing 30%, anyhow I plugged the cable and fired-up the VAGCOM software and selected [006] to close the piston but It did not work.
3. Next I don�t know what the heck I did probably repeated vagcom procedure [006] and [007] few times and heard noise from rear brake, didn�t know if it was opening or closing of piston.
4. Now on my dash all brake related lights blinking like Christmas tree.
5. Question did I mess something up ? or it was OK to repeat [006]/[007].
6. I really didn�t like the idea for keeping the Vagcom/laptop/car ON for long time while performing 2 hrs brake job. Task were very vulnerable and everything was dependant on uninterrupted power, too many things could go wrong. This is what happened my car ran out of power at final stage.
7. But I still have hope�.
Here are my recent codes.
Friday,30,March,2012,08:12:21:07185
VCDS Version: Release 11.11.2
Address 53: Parking Brake Labels: 4F0-910-801.clb
Control Module Part Number: 4F0 910 801 HW: 4F0 907 801
Component and/or Version: EPB C63C0030 H03 0030
Software Coding: 0005022
Work Shop Code: WSC 02335 785 00200
VCID: DDB1AF83042A2FB
1 Fault Found:
02433 - Supply Voltage for Right Parking Brake Motor (V283)
012 - Electrical Fault in Circuit - MIL ON
Freeze Frame:
Fault Status: 11111100
Fault Priority: 1
Fault Frequency: 1
Reset counter: 168
Mileage: 207168 km
Time Indication: 0
Date: 2012.03.30
Time: 07:21:10
Freeze Frame:
Voltage: 10.87 V
Count: 87
1. I packed up everything and turned off the car and put the battery to charge over night to continues next morning.
2. Next morning I checked the charger and showed battery was fully charged but car MMI display was showing 30%, anyhow I plugged the cable and fired-up the VAGCOM software and selected [006] to close the piston but It did not work.
3. Next I don�t know what the heck I did probably repeated vagcom procedure [006] and [007] few times and heard noise from rear brake, didn�t know if it was opening or closing of piston.
4. Now on my dash all brake related lights blinking like Christmas tree.
5. Question did I mess something up
? or it was OK to repeat [006]/[007].6. I really didn�t like the idea for keeping the Vagcom/laptop/car ON for long time while performing 2 hrs brake job. Task were very vulnerable and everything was dependant on uninterrupted power, too many things could go wrong. This is what happened my car ran out of power at final stage.
7. But I still have hope�.
Here are my recent codes.
Friday,30,March,2012,08:12:21:07185
VCDS Version: Release 11.11.2
Address 53: Parking Brake Labels: 4F0-910-801.clb
Control Module Part Number: 4F0 910 801 HW: 4F0 907 801
Component and/or Version: EPB C63C0030 H03 0030
Software Coding: 0005022
Work Shop Code: WSC 02335 785 00200
VCID: DDB1AF83042A2FB
1 Fault Found:
02433 - Supply Voltage for Right Parking Brake Motor (V283)
012 - Electrical Fault in Circuit - MIL ON
Freeze Frame:
Fault Status: 11111100
Fault Priority: 1
Fault Frequency: 1
Reset counter: 168
Mileage: 207168 km
Time Indication: 0
Date: 2012.03.30
Time: 07:21:10
Freeze Frame:
Voltage: 10.87 V
Count: 87
04-02-2012, 07:07 AM
#10
Audiworld Junior Member
Join Date: Nov 2010
Posts: 27
Likes: 0
Received 0 Likes
on
0 Posts
Update�
I recycled parking brake couple of times ignition off and on position. Some combination finally worked and all lights disappeared.
I thought right rear brake motor broke since there was no voltage detected during VAGCOM scan. After all brake lights gone I scanned again and I noticed in vagcom tool that both motor shows equal voltage 10.87 V. Today I drove my car to work 40 miles and so far no issue.