


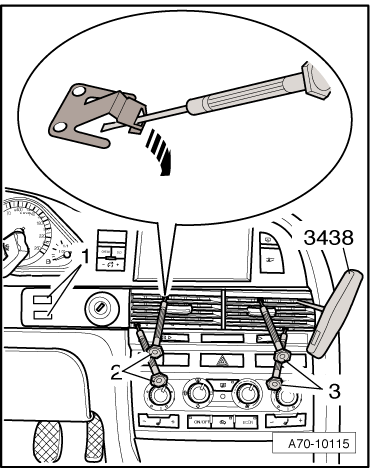
hazard button switch
AudiWorld Senior Member
Joined: Jan 2010
Posts: 881
Likes: 6
From: Stafford. U.K.
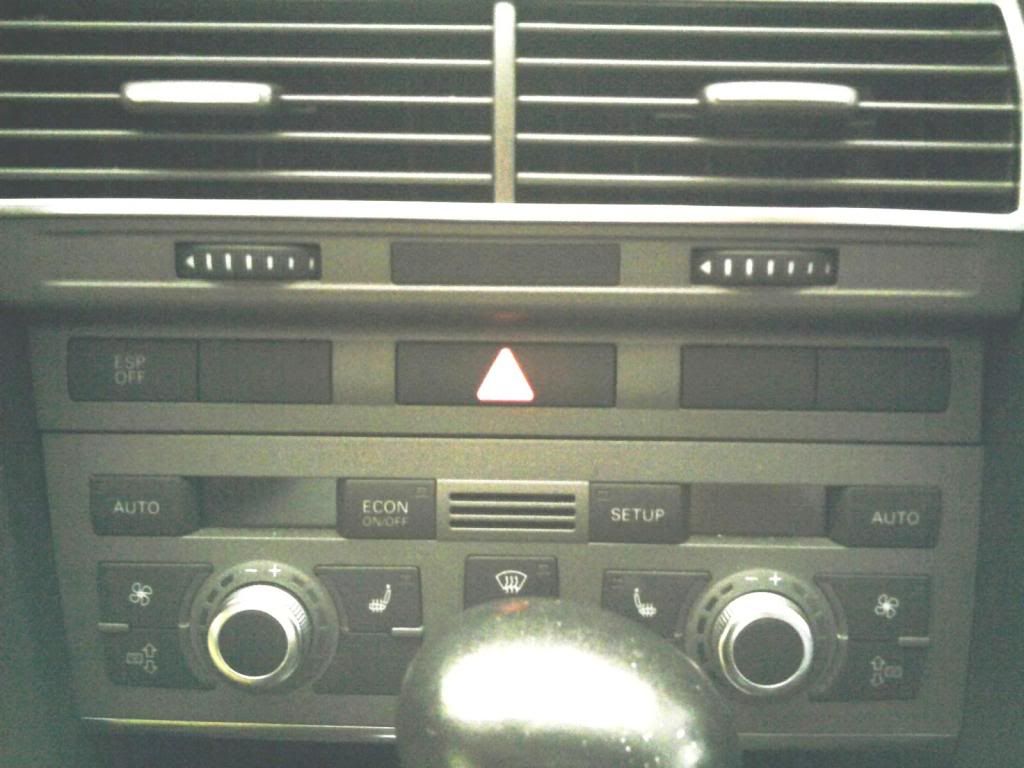
<TABLE cellSpacing=0 cellPadding=0 width="100%"><TBODY><TR><TD class=spalte-text><TABLE class="cc abstand-kap einzug-standard"><TBODY><TR><TD class=titel-kap>Removing and installing hazard warning light switch -E3-</TD></TR></TBODY></TABLE></TD><TD class=spalte-pfeil></TD><TD class=spalte-marg></TD></TR></TBODY></TABLE><TABLE cellSpacing=0 cellPadding=0 width="100%"><TBODY><TR><TD class=spalte-text><TABLE class="cc einzug-standard abstand-standard absatz-hervor"><TBODY><TR><TD>Removing</TD></TR></TBODY></TABLE><TABLE class="cc einzug-standard abstand-standard "><TBODY><TR><TD class=einzug-liste>� </TD><TD>Move steering wheel down and to rear as far as possible, making use of full range of steering column adjuster.</TD></TR></TBODY></TABLE><TABLE class="cc einzug-standard abstand-standard "><TBODY><TR><TD class=einzug-liste>� </TD><TD>Switch off ignition and take out ignition key.</TD></TR></TBODY></TABLE><TABLE class="cc einzug-standard abstand-standard "><TBODY><TR><TD class=einzug-liste>� </TD><TD>Remove dash panel vent (centre)</TD></TR></TBODY></TABLE><TABLE class="cc einzug-standard abstand-standard "><TBODY><TR><TD class=einzug-liste>� </TD><TD>Press the hazard warning light switch -E3--item 1- out of air vent trim -arrow-.</TD></TR></TBODY></TABLE><TABLE class="cc einzug-standard abstand-standard absatz-hervor"><TBODY><TR><TD>Installing</TD></TR></TBODY></TABLE><TABLE class="cc einzug-standard abstand-standard "><TBODY><TR><TD>Installation is carried out in the reverse order; note the following:</TD></TR></TBODY></TABLE><TABLE class="cc einzug-standard abstand-standard "><TBODY><TR><TD class=einzug-liste>� </TD><TD>Press switch into switch housing until catch engages.</TD></TR></TBODY></TABLE><TABLE class="cc einzug-standard abstand-standard "><TBODY><TR><TD class=einzug-liste>� </TD><TD>Install dash panel vent (centre)
</TD></TR></TBODY></TABLE>
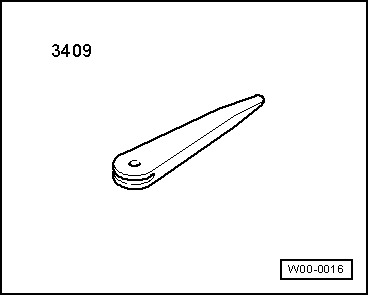
<TABLE cellSpacing=0 cellPadding=0 width="100%"><TBODY><TR><TD class=spalte-text><TABLE class="cc abstand-kap einzug-standard"><TBODY><TR><TD class=titel-kap>Removing and installing dash panel vent (centre)</TD></TR></TBODY></TABLE><TABLE class="cc abstand-standard einzug-standard"><TBODY><TR><TD class=wz-liste-kopf>Special tools and workshop equipment required</TD></TR></TBODY></TABLE></TD><TD class=spalte-pfeil></TD><TD class=spalte-marg></TD></TR></TBODY></TABLE><TABLE cellSpacing=0 cellPadding=0 width="100%"><TBODY><TR><TD class=spalte-text><TABLE class="cc abstand-standard einzug-standard "><TBODY><TR><TD class=einzug-liste></TD><TD>Removal wedge -3409-</TD></TR></TBODY></TABLE>
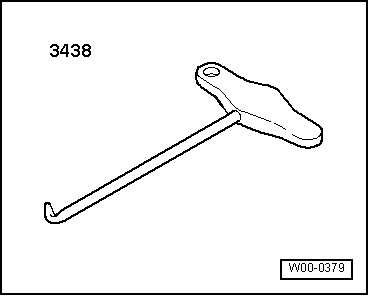
<TABLE cellSpacing=0 cellPadding=0 width="100%"><TBODY><TR><TD class=spalte-text><TABLE class="cc abstand-liste einzug-standard "><TBODY><TR><TD class=einzug-liste></TD><TD>Hook -3438-</TD></TR></TBODY></TABLE></TD></TR></TBODY></TABLE>
<TABLE cellSpacing=0 cellPadding=0 width="100%"><TBODY><TR><TD class=spalte-text><TABLE class="cc abstand-liste einzug-standard "><TBODY><TR><TD class=einzug-liste></TD><TD></TD></TR></TBODY></TABLE>Note
<TABLE class="cc abstand-liste-erster einzug-standard hinweis-rumpf"><TBODY><TR><TD>There are 2 different versions of the dash panel vent (centre). The procedures for removing the different versions of the dash panel vent (centre) differ. First the procedure for removing version 1 (for older vehicles) and then for removing version 2 (installed in majority of vehicles) is described. Check which version is installed in the vehicle and remove the dash panel vent (centre) as described.</TD></TR></TBODY></TABLE><TABLE class="cc einzug-standard abstand-standard absatz-hervor"><TBODY><TR><TD>Removing version 1</TD></TR></TBODY></TABLE><TABLE class="cc einzug-standard abstand-standard "><TBODY><TR><TD class=einzug-liste>�
</TD><TD>Lower steering wheel as far as possible towards rear, making use of the full range of the steering column adjuster.
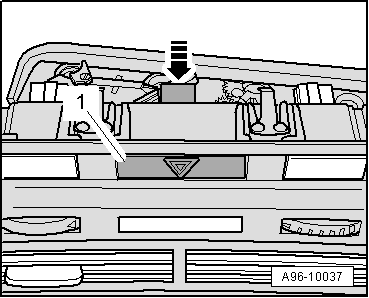
Carefully release spring pins -1- on trim panel from dash panel using removal wedge -3409-.
</TD></TR></TBODY></TABLE>Note
<TABLE class="cc abstand-liste-erster einzug-standard hinweis-rumpf"><TBODY><TR><TD>The dash panel vent has holes on both sides for inserting the hook -3438-.</TD></TR></TBODY></TABLE>
<TABLE class="cc einzug-standard abstand-standard "><TBODY><TR><TD class=einzug-liste>� </TD><TD>Carefully pull dash panel vent out of opening on both sides using the hook -3438-.</TD></TR></TBODY></TABLE>
<TABLE class="cc einzug-standard abstand-standard "><TBODY><TR><TD>If dash panel vent cannot be pulled out in this way, proceed as follows:</TD></TR></TBODY></TABLE>
<TABLE class="cc einzug-standard abstand-standard "><TBODY><TR><TD class=einzug-liste>� </TD><TD>Bring louvres in dash panel vent into a horizontal position.</TD></TR></TBODY></TABLE>
<TABLE class="cc einzug-standard abstand-standard "><TBODY><TR><TD class=einzug-liste>� </TD><TD>Release all retaining clips -arrow- by inserting jeweller screwdrivers -2- and -3-.</TD></TR></TBODY></TABLE>
<TABLE class="cc einzug-standard abstand-standard "><TBODY><TR><TD class=einzug-liste>� </TD><TD>Pull dash panel vent out of opening on both sides using the hook -3438- and leaving the jeweller screwdrivers inserted.
</TD></TR></TBODY></TABLE>
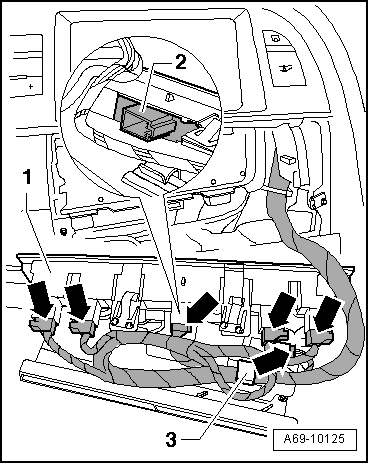
<TABLE class="cc einzug-standard abstand-standard "><TBODY><TR><TD class=einzug-liste></TD><TD>Disengage wiring harness from clip -3-.</TD></TR></TBODY></TABLE>
<TABLE class="cc einzug-standard abstand-standard "><TBODY><TR><TD class=einzug-liste>� </TD><TD>Unplug all electrical connectors -arrows-.</TD></TR></TBODY></TABLE>
Note
<TABLE class="cc abstand-liste-erster einzug-standard hinweis-rumpf"><TBODY><TR><TD>The illustration shows a centre vent trim panel with full switch assignment. There may also be dummy covers fitted depending on equipment version.
</TD></TR></TBODY></TABLE>
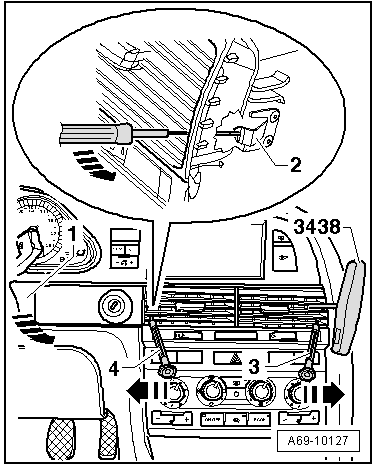
<TABLE class="cc einzug-standard abstand-standard absatz-hervor"><TBODY><TR><TD>Removing version 2</TD></TR></TBODY></TABLE><TABLE class="cc einzug-standard abstand-standard "><TBODY><TR><TD class=einzug-liste>� </TD><TD>Lower steering wheel as far as possible towards rear, making use of the full range of the steering column adjuster.
<TABLE class="cc einzug-standard abstand-standard "><TBODY><TR><TD>Detach �trim strip� of centre vent trim panel -1- (left-side) in direction of -arrow-. Unclip using removal wedge -3409- if necessary.</TD></TR></TBODY></TABLE><TABLE class="cc einzug-standard abstand-standard "><TBODY><TR><TD class=einzug-liste>� </TD><TD>Set louvres of centre vent trim panel -1- to horizontal position.</TD></TR></TBODY></TABLE><TABLE class="cc einzug-standard abstand-standard "><TBODY><TR><TD class=einzug-liste>� </TD><TD>Use a small, commercially available screwdriver -3- and -4- to release metal clips -2- in direction of -arrow-.
</TD></TR></TBODY></TABLE>
Note
<TABLE class="cc abstand-liste-erster einzug-standard hinweis-rumpf"><TBODY><TR><TD>A hole is provided on both sides of the centre vent trim panel for engaging the hook -3438-.</TD></TR></TBODY></TABLE><TABLE class="cc einzug-standard abstand-standard "><TBODY><TR><TD class=einzug-liste>� </TD><TD>Pull centre vent trim panel -1- (both sides) out of dash panel installation opening using hook -3438- and leaving screwdrivers -3- and -4- inserted.
<TABLE cellSpacing=0 cellPadding=0 width="100%"><TBODY><TR><TD class=spalte-text><TABLE class="cc einzug-standard abstand-standard "><TBODY><TR><TD class=einzug-liste>� </TD><TD>Disengage wiring harness from clip -3-.</TD></TR></TBODY></TABLE><TABLE class="cc einzug-standard abstand-standard "><TBODY><TR><TD class=einzug-liste>� </TD><TD>Unplug all electrical connectors -arrows-.</TD></TR></TBODY></TABLE></TD></TR></TBODY></TABLE>

</TD></TR></TBODY></TABLE>
</TD></TR></TBODY></TABLE>
Note
<TABLE class="cc abstand-liste-erster einzug-standard hinweis-rumpf"><TBODY><TR><TD>The illustration shows a centre vent trim panel with full switch assignment. There may also be dummy covers fitted depending on equipment version.</TD></TR></TBODY></TABLE><TABLE class="cc einzug-standard abstand-standard absatz-hervor"><TBODY><TR><TD>Installing</TD></TR></TBODY></TABLE><TABLE class="cc einzug-standard abstand-standard "><TBODY><TR><TD>Install in reverse order of removal.</TD></TR></TBODY></TABLE>
</TD></TR></TBODY></TABLE>
</TD></TR></TBODY></TABLE>
</TD></TR></TBODY></TABLE>
Last edited by royclark; May 10, 2012 at 09:58 AM.
Thread Starter
AudiWorld Senior Member
Joined: Jun 2009
Posts: 792
Likes: 2
From: Atlantic City Metro Area
arrgh wish i could somehow grab it from the front.
eventually i will try this myself and will take some pics and post updates
anyway Roy... ur reply was very helpful and appreciated.
u da man
thanks
eventually i will try this myself and will take some pics and post updates
anyway Roy... ur reply was very helpful and appreciated.
u da man
thanks
Thread Starter
AudiWorld Senior Member
Joined: Jun 2009
Posts: 792
Likes: 2
From: Atlantic City Metro Area
new vs old
what would u do?
the old is used and prob have shorter lifespan but best for color match
the part new will prob last longer costs LESS but looks like slightly darker shade

what would u do?
the old is used and prob have shorter lifespan but best for color match
the part new will prob last longer costs LESS but looks like slightly darker shade
AudiWorld Member
Joined: Mar 2012
Posts: 93
Likes: 0
From: Dallas, TX
Do you really have to buy the whole switch assembly just for the cover? They don't sell just the cover? Also... can you access the button if you remove the lower part of the instrument cluster instead of removing the vents?
MainlandMig.. did you go with the new or old?
My cover came off two days ago from vacuuming as well.
MainlandMig.. did you go with the new or old?
My cover came off two days ago from vacuuming as well.
Thread Starter
AudiWorld Senior Member
Joined: Jun 2009
Posts: 792
Likes: 2
From: Atlantic City Metro Area
it seems like its the base of the button that breaks not the cap/cover so a whole button is needed
good thinking... i will try it out.. but im thinking the inner part of button may be wider then the opening of the console nad it could be blocked in which may require removing vents 1st.
old one already sold on ebay but that's ok bc i was leaning twds new anyway... havent had a chance ..new job and all ..been pretty hectic

old one already sold on ebay but that's ok bc i was leaning twds new anyway... havent had a chance ..new job and all ..been pretty hectic

Last edited by MainlandMig; May 24, 2012 at 01:52 PM.
AudiWorld Member
Joined: Mar 2012
Posts: 93
Likes: 0
From: Dallas, TX
Trending Topics
Thread Starter
AudiWorld Senior Member
Joined: Jun 2009
Posts: 792
Likes: 2
From: Atlantic City Metro Area
BUT
i got the button/switch out without removing the vents
the formal procedure with removing the vents would be ideal say u dont have a broken or faulty button and u dont want to scratch the center dash housing
but if the button is broke especially if the cap/cover is off u can carefully use pliers and carefully pull fwd
vents not removed

base of button still plugged in

plug poking out from dash

AudiWorld Stories
Bringing Audi to Life for Audi Fans

Top 10 Most Expensive Audis Ever Sold on Bring-A-Trailer
Brett Foote
10 Audi Features & Options We Miss the Most!
Joe Kucinski
Audi Recreates Crazy-Looking Speed Record Breaker From 1935
Verdad Gallardo
Coachbuilder Recreates the 1995 Audi TTS Concept
Verdad Gallardo
Every Audi V10 Car Ranked!
Joe Kucinski
9 Audi Designs That Aged Like Fine Wine
Verdad Gallardo
2026 Audi Q5 Buyer's Guide (Every Model Explained)
Brett Foote
Ranking Every Current Audi 'S' Model From Worst to First!
Joe Kucinski
10 Best Audis That are FINALLY LEGAL to Import to the U.S.!
Joe Kucinski
Thread Starter
AudiWorld Senior Member
Joined: Jun 2009
Posts: 792
Likes: 2
From: Atlantic City Metro Area
purchased new from GenuineAudiParts.com ... its on route via FedEx ground from Cali so it will take a few days to get to NJ.. it sux that it broke but it was not super expensive. i will install and post pics ASAP... i only expect slight color differences