


WRITEUP: 2.7T Secondary Air Injection SAI Pump rebuild

Thread Starter
AudiWorld Senior Member
Joined: Oct 2003
Posts: 1,209
Likes: 0
If you're getting insufficient flow CELs P1423 P141 1, some part of your SAI system is faulty. In my case the pump itself was seized up - you can do a simple check by running 12V directly to the pump. It should blow air like a regular hair dryer. Also check the air pump fuse (40A in the ECU box), mine was blown. In any case, new pumps run around $400, so rebuilding is the preferred way to go.
Tools needed:
- Metric socket set
- Torx bit set
- PB Blaster
- Engine Degreaser/Carb cleaner
- Rust Remover spray
- Chain lube or something similar
1) Start off by removing the Ypipe and then unplugging the rubber/plastic T tube that connects the SAI pump to the combi valves. Unplug the electrical connector on the pump.
2)Undo the two 10mm bolts that hold the SAI pump bracket to the plenum. Also loosen the 10mm nut that holds bracket on the right side (kind of a pain to see). Now you should be able to wiggle the pump out of the bay.
EXPLODED VIEW:

3)Remove 3 round clips off the bottom of the pump and the bottom ring with the filter should come off (top right in the exploded view)
4)Remove 5 metal clips that hold the main assmebly together. Now the bottom half should come off (top, second from the right)
5)You should be looking at something like this:
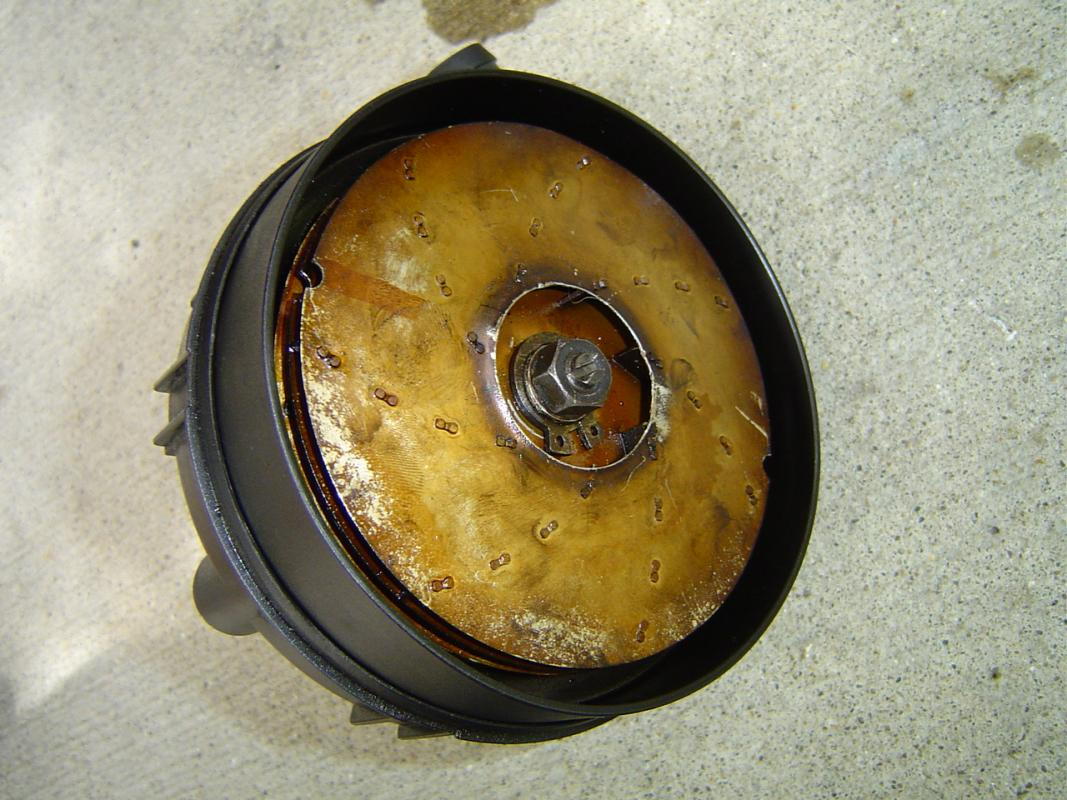
Use cir clip pliers to remove the clip and then spray down the nut with PB Blaster. Give it 5 minutes to soak up and then remove the nut with a wrench and a screw driver.
6)Remove the small brass spacers and the first impeller/fan. The big black impeller (second from left, top) should now come off also
7)Spray a ton of PB Blaster on the long spacer, wait and then pull it off. It helps to use two wrenches for leverage. Once the spacer is off, the second impeller should come off
8)Unscrew the two Torx screws and pull the motor out:
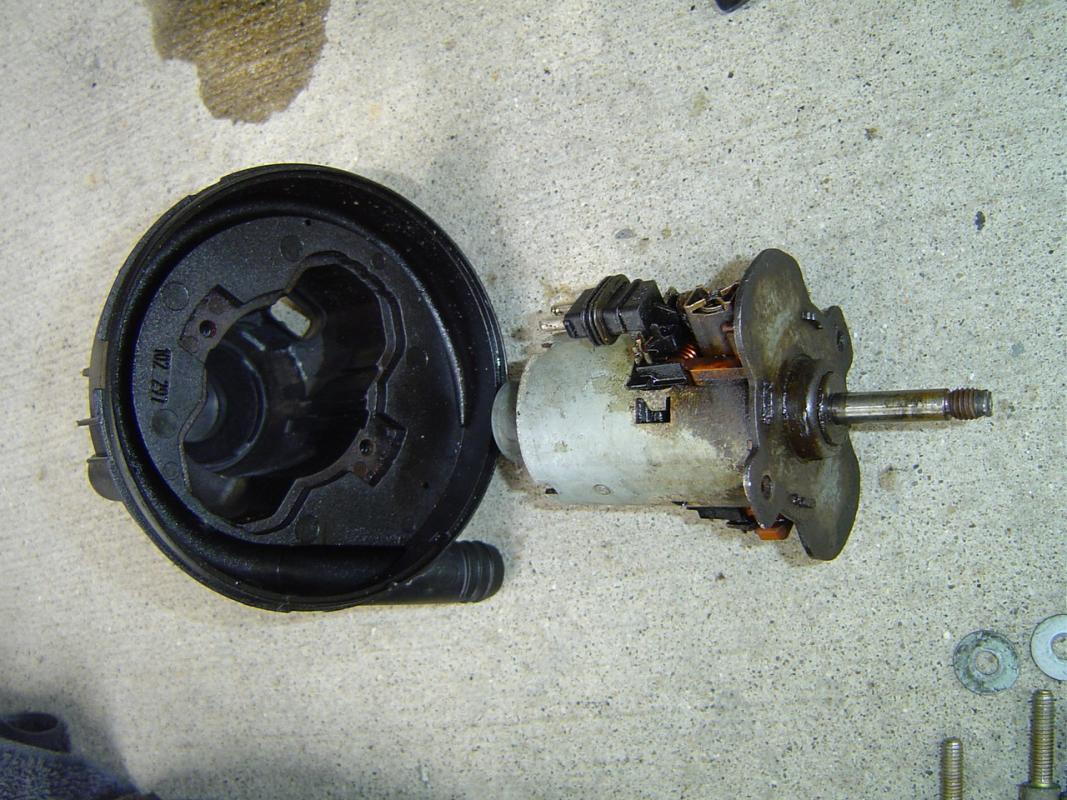
As far as rebuilding goes, I used a combination or PB Blaster, Rust Remover, Carb Cleaner and Chain lube (in that order) to get it spinning freely. The motor in my pump was all sorts of rusted, so I used the rust remover was the key... but YMMV. It's a good idea to test the motor using the car battery to make sure it's actually working.
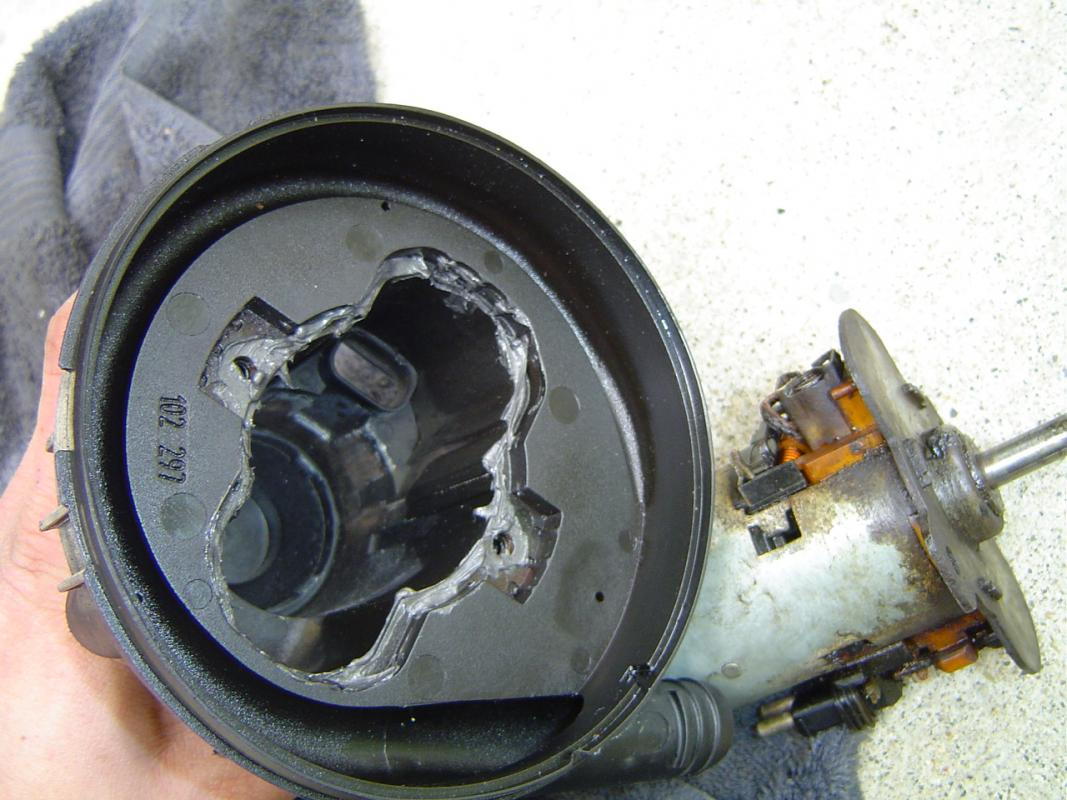
Also I used a bunch of RTV silicone to seal the motor from the rest of the assembly, hopefully this will keep the moisture away.
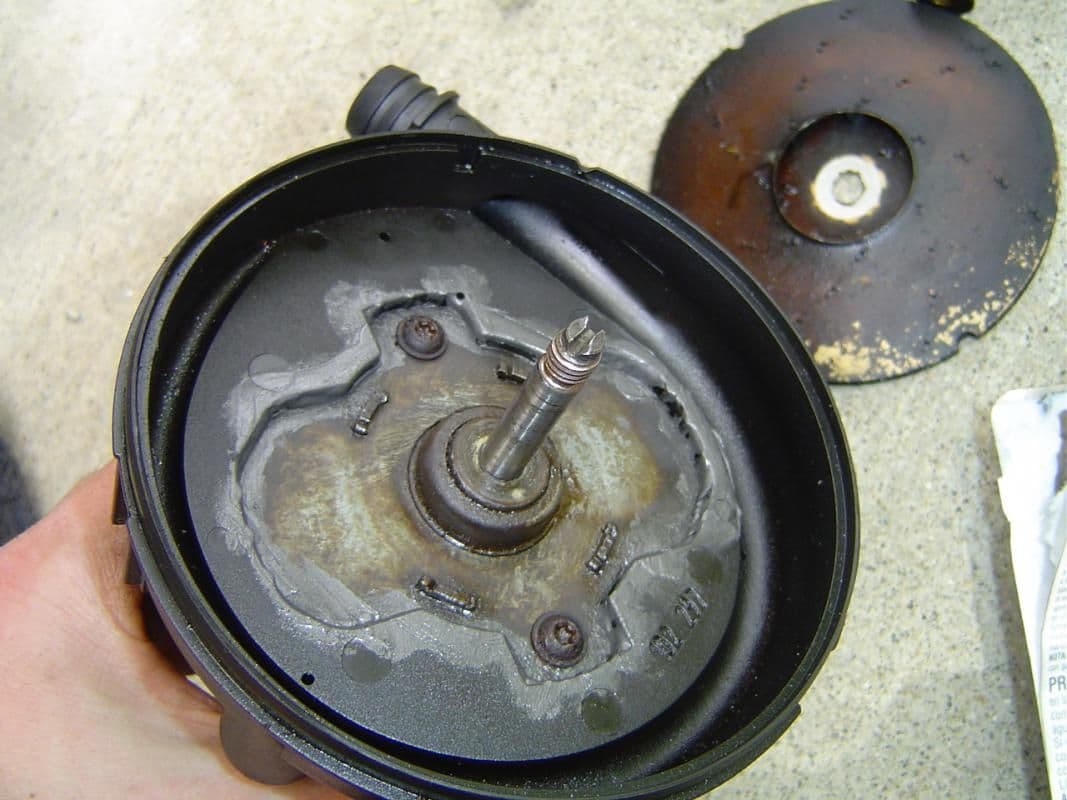
Finally a reference of how all the parts go together:

EDIT Feb-2010:
Year after the rebuild the pump crapped out again. The issue, as it turns out, is the bearing in the front of the pump motor( the bulge in the front face of the motor). Interestingly enough you can find a replacement bearing in any hardware store - I was able to remove the old one and replace it with a 1/4" (if i remember correctly) bearing from Ace Hardware. Just take the pump motor with you to the store and buy the bearing that fits EXACTLY on the output shaft of the motor. Year later I'm problem free.
Tools needed:
- Metric socket set
- Torx bit set
- PB Blaster
- Engine Degreaser/Carb cleaner
- Rust Remover spray
- Chain lube or something similar
1) Start off by removing the Ypipe and then unplugging the rubber/plastic T tube that connects the SAI pump to the combi valves. Unplug the electrical connector on the pump.
2)Undo the two 10mm bolts that hold the SAI pump bracket to the plenum. Also loosen the 10mm nut that holds bracket on the right side (kind of a pain to see). Now you should be able to wiggle the pump out of the bay.
EXPLODED VIEW:
3)Remove 3 round clips off the bottom of the pump and the bottom ring with the filter should come off (top right in the exploded view)
4)Remove 5 metal clips that hold the main assmebly together. Now the bottom half should come off (top, second from the right)
5)You should be looking at something like this:
Use cir clip pliers to remove the clip and then spray down the nut with PB Blaster. Give it 5 minutes to soak up and then remove the nut with a wrench and a screw driver.
6)Remove the small brass spacers and the first impeller/fan. The big black impeller (second from left, top) should now come off also
7)Spray a ton of PB Blaster on the long spacer, wait and then pull it off. It helps to use two wrenches for leverage. Once the spacer is off, the second impeller should come off
8)Unscrew the two Torx screws and pull the motor out:
As far as rebuilding goes, I used a combination or PB Blaster, Rust Remover, Carb Cleaner and Chain lube (in that order) to get it spinning freely. The motor in my pump was all sorts of rusted, so I used the rust remover was the key... but YMMV. It's a good idea to test the motor using the car battery to make sure it's actually working.
Also I used a bunch of RTV silicone to seal the motor from the rest of the assembly, hopefully this will keep the moisture away.
Finally a reference of how all the parts go together:
EDIT Feb-2010:
Year after the rebuild the pump crapped out again. The issue, as it turns out, is the bearing in the front of the pump motor( the bulge in the front face of the motor). Interestingly enough you can find a replacement bearing in any hardware store - I was able to remove the old one and replace it with a 1/4" (if i remember correctly) bearing from Ace Hardware. Just take the pump motor with you to the store and buy the bearing that fits EXACTLY on the output shaft of the motor. Year later I'm problem free.
Last edited by halik; Feb 4, 2010 at 08:03 AM.

AudiWorld Member
Joined: Dec 2003
Posts: 469
Likes: 0
yours made a high pitch "dentist" drill noise when it ran?
How about... now that you fixed it... does it make any high pitch dentist noise or none at all?
After ready many different posts.... I'm guessing that the SAIP is suppose to run pretty quiet... unless it's heading south.
Nice work btw!!
How about... now that you fixed it... does it make any high pitch dentist noise or none at all?
After ready many different posts.... I'm guessing that the SAIP is suppose to run pretty quiet... unless it's heading south.
Nice work btw!!

Audiworld Junior Member
Joined: Jan 2009
Posts: 25
Likes: 0
what was your procedure for getting to the bearing that you needed to replace? Do you mean the one at the base of the shaft?
If you're getting insufficient flow CELs P1423 P141 1, some part of your SAI system is faulty. In my case the pump itself was seized up - you can do a simple check by running 12V directly to the pump. It should blow air like a regular hair dryer. Also check the air pump fuse (40A in the ECU box), mine was blown. In any case, new pumps run around $400, so rebuilding is the preferred way to go.
Tools needed:
- Metric socket set
- Torx bit set
- PB Blaster
- Engine Degreaser/Carb cleaner
- Rust Remover spray
- Chain lube or something similar
1) Start off by removing the Ypipe and then unplugging the rubber/plastic T tube that connects the SAI pump to the combi valves. Unplug the electrical connector on the pump.
2)Undo the two 10mm bolts that hold the SAI pump bracket to the plenum. Also loosen the 10mm nut that holds bracket on the right side (kind of a pain to see). Now you should be able to wiggle the pump out of the bay.
EXPLODED VIEW:
3)Remove 3 round clips off the bottom of the pump and the bottom ring with the filter should come off (top right in the exploded view)
4)Remove 5 metal clips that hold the main assmebly together. Now the bottom half should come off (top, second from the right)
5)You should be looking at something like this:
Use cir clip pliers to remove the clip and then spray down the nut with PB Blaster. Give it 5 minutes to soak up and then remove the nut with a wrench and a screw driver.
6)Remove the small brass spacers and the first impeller/fan. The big black impeller (second from left, top) should now come off also
7)Spray a ton of PB Blaster on the long spacer, wait and then pull it off. It helps to use two wrenches for leverage. Once the spacer is off, the second impeller should come off
8)Unscrew the two Torx screws and pull the motor out:
As far as rebuilding goes, I used a combination or PB Blaster, Rust Remover, Carb Cleaner and Chain lube (in that order) to get it spinning freely. The motor in my pump was all sorts of rusted, so I used the rust remover was the key... but YMMV. It's a good idea to test the motor using the car battery to make sure it's actually working.
Also I used a bunch of RTV silicone to seal the motor from the rest of the assembly, hopefully this will keep the moisture away.
Finally a reference of how all the parts go together:
EDIT Feb-2010:
Year after the rebuild the pump crapped out again. The issue, as it turns out, is the bearing in the front of the pump motor( the bulge in the front face of the motor). Interestingly enough you can find a replacement bearing in any hardware store - I was able to remove the old one and replace it with a 1/4" (if i remember correctly) bearing from Ace Hardware. Just take the pump motor with you to the store and buy the bearing that fits EXACTLY on the output shaft of the motor. Year later I'm problem free.
Thread Starter
AudiWorld Senior Member
Joined: Oct 2003
Posts: 1,209
Likes: 0
I ended up cutting into the metal face of the motor to expose the outer race of the bearing and then hammered it out. It was the bearing closer to the impellers that crapped out.
Trending Topics

AudiWorld Member
Joined: Nov 2006
Posts: 317
Likes: 1
I would love to do this rather than spending $300 on a new pump.
just want to know if I could still use the car while this is out. Do I need to plug the hose or not?
also, it would have been nice to know where you cut the hole in the motor to get that bearing out. a pic would have been great or maybe you can show exactly where in one of your pics, circle it or something...
AudiWorld Stories
Bringing Audi to Life for Audi Fans

10 Strangest Audi Designs That Actually Made Production
Joe Kucinski
2027 Audi Q7 and SQ7: Audi Upgraded EVERYTHING!
Michael S. Palmer
Audi Unveils Absurdly Cool New Supercar: 10 Things You Need to Know!
Verdad Gallardo
The Highs & Lows of Every Audi C-Class Generation
Joe Kucinski
Top 10 Most Expensive Audis Ever Sold on Bring-A-Trailer
Brett Foote
10 Audi Features & Options We Miss the Most!
Joe Kucinski
Audi Recreates Crazy-Looking Speed Record Breaker From 1935
Verdad Gallardo
Coachbuilder Recreates the 1995 Audi TTS Concept
Verdad Gallardo

