Understanding differences between Audi A4 clusters and the compatibility issues
 01-27-2013, 10:36 AM
#121
AudiWorld Newcomer

Join Date: Jan 2013
Posts: 5
Likes: 0
Received 0 Likes
on
0 Posts
The same problem. But i dont need BC, Ijust want that my hall lcd start showing outside temperature. What i must to do? I rewire new wire from cluster 23pin(green socket) into clima black socket 2pin, but no emotion. LCD showing in black
p.s. when open the door in lcd showing simbol and all check is working, after show simbol OK lcd come in black.
Very thank for help. I whrite in my county audiklub.com forum, but nobody know how to fix this problem.
And sorry for mistakes ..
..
p.s. when open the door in lcd showing simbol and all check is working, after show simbol OK lcd come in black.
Very thank for help. I whrite in my county audiklub.com forum, but nobody know how to fix this problem.
And sorry for mistakes
..
 02-26-2013, 02:59 PM
#122
AudiWorld Newcomer

Join Date: Feb 2013
Posts: 2
Likes: 0
Received 0 Likes
on
0 Posts
Hi MetalMen, well im new in this house and already have some questions about this DIY, in first did you have some fotos about wiper arm to FIS connector?? i do it like you have ins this section but only one of the + position works the reset and - buton no. Can you please tell me where exactly did you connect the wires between wiper arm and FIS cables??
Many many thanks.
Many many thanks.
11-12-2013, 10:26 PM
#123
AudiWorld Newcomer

Join Date: Nov 2013
Posts: 2
Likes: 0
Received 0 Likes
on
0 Posts
Disclaimer. The information on this post is for informational purposes only.
This post and all of the information it contains are provided 'as is' without warranty of any kind, whether express or implied.
The wiring information was taken from "Bentley Publishers CD and Hardcover copy", there may be omissions or inaccuracies in information contained in this post. Before making any decision or taking any action based on the information contained in this Post, you should double/triple check information regards to the vehicle you service.
If you found that the information is inaccurate and you have found the solution post it up and I will update the post.
*updated May 01, 2012* additional information provided by MetalMan
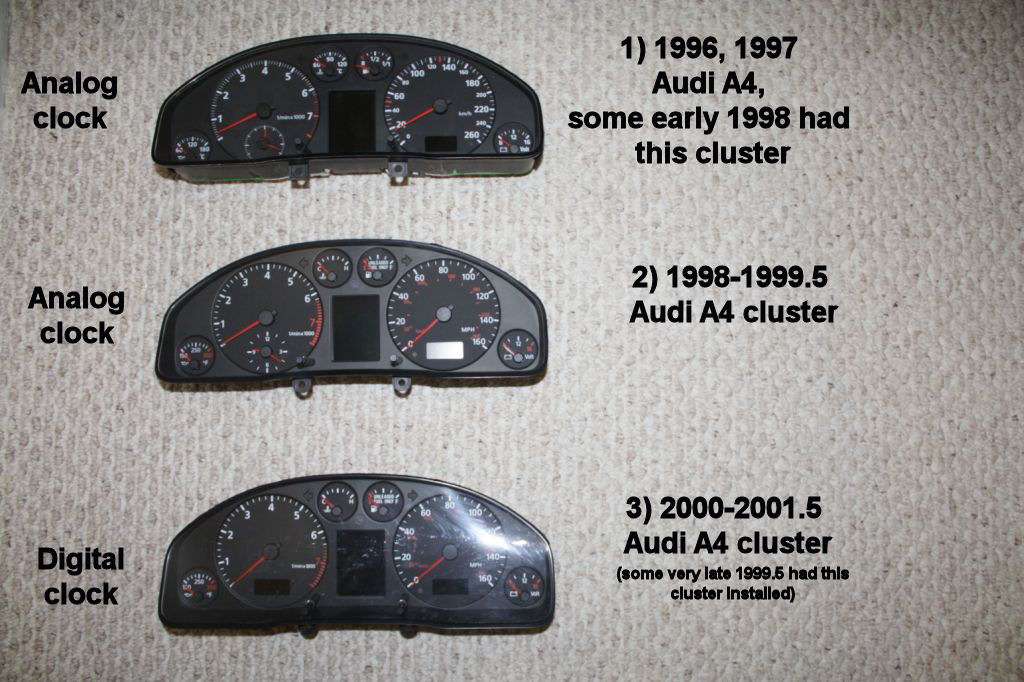
Couple people ask me if I can show the difference between instrument clusters from 1996 to 2001.5
The photo below shows all 3 instrument clusters from 1996 to 2001.5 with Full size LCD, some models didn't come with LCD screen because of the package was not selected during order back then.
Here is the back of the instrument clusters.
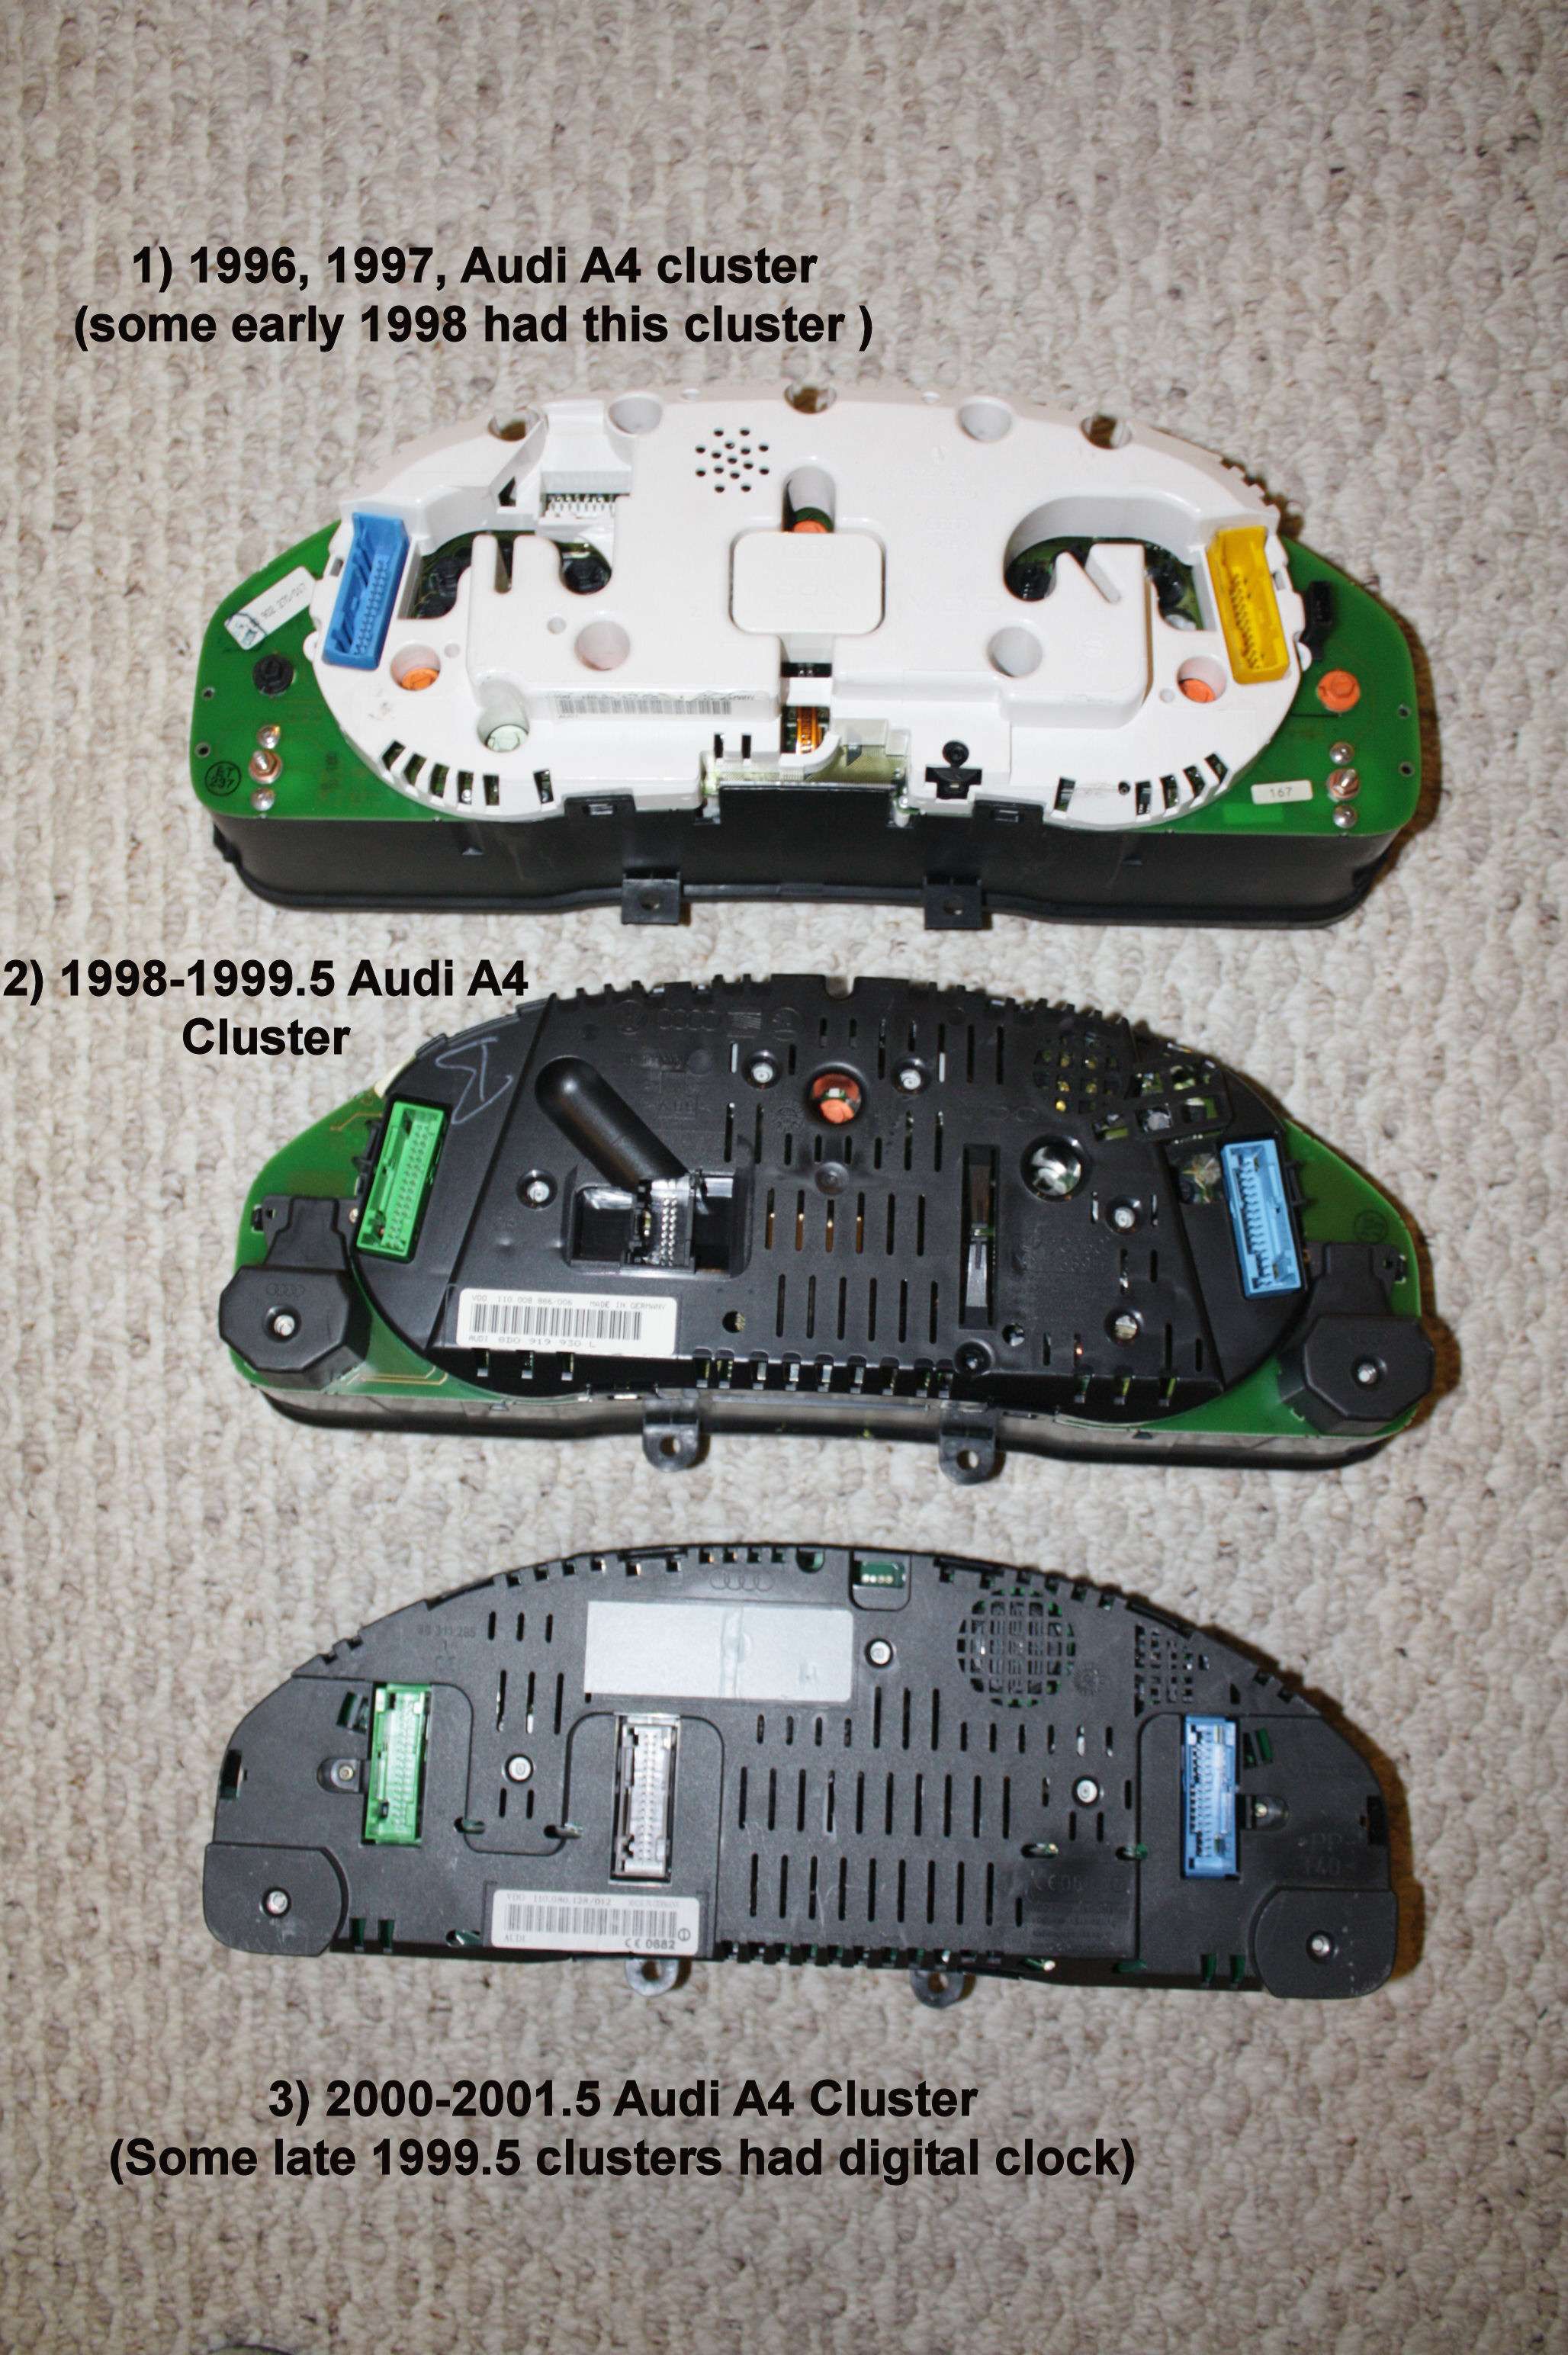
You can see the difference between all the clusters the cluster 1 is CDN or European but MPH is identical except speedometer is in MPH the other two are MPH clusters I had,
Cluster 1 was installed in 1996 and 1997 Audi A4 early models , no immobilizer the most visible difference is if you look at the analog clock has no digits at 3, 6, 9, at 12 o'clock comparing to cluster 2
Cluster 2 was installed in 1998 to 1999.5 Audi A4 models, , you could swap cluster between these years with no issues, no immobilizer.
Cluster 3 was installed in 2000 to 2001.5 Audi A4 models,some 99.5's with VIN > 8DY000001 had cluster with digital clock, the main difference was the analog clock was replaced with digital clock to match the mileage LCD, and in late 2001 immobilizer was added to system
NOW COMPATIBILITY
Legend
Cluster 2, and cluster 3 can not fit directly into cluster 1, because cluster 1 has different plugs , in order to fit you need to buy new plugs and new pins and rewire some connection.,
I know two people who proceed with this conversion one did the cluster 2 to cluster 1 and had partially working cluster,
all the gauges were working however compatibility was an issue and error code were reported cluster did not understand modules in the car, other did cluster 3 to cluster 1 and had only partial success two gauges were working , all the lights were lit up like Christmas tree .
Cluster 3 can be installed into cluster 2 however some rewiring is required to both blue and green plugs and the middle plug from cluster 3 doesn't fit cluster 2 which you need to rewire as well,
regards to immobilizer on some early 2001 clusters this feature can not be disabled in the instrument cluster the little car key will flash some people cover it with electrical tape, but it will beep at start up for 3 seconds.
Also Can Bus was introduced in some early 2000+ models which meant that vehicle in 1998-1999 didn't have can-bus and some clusters from 2001-2001.5 didn't work the tachometer or speedometer was not functional
If you really want to have digital clock in 1998-1999 A4 model try to get 1999.5 to 2000 instrument cluster that don't have immobilizer or Can-Bus requirement.
Cluster 3 with immobilizer will work in early cluster 3 however immobilizer light will be present during start and will flash continuously and it will beep for 3 seconds during start up.
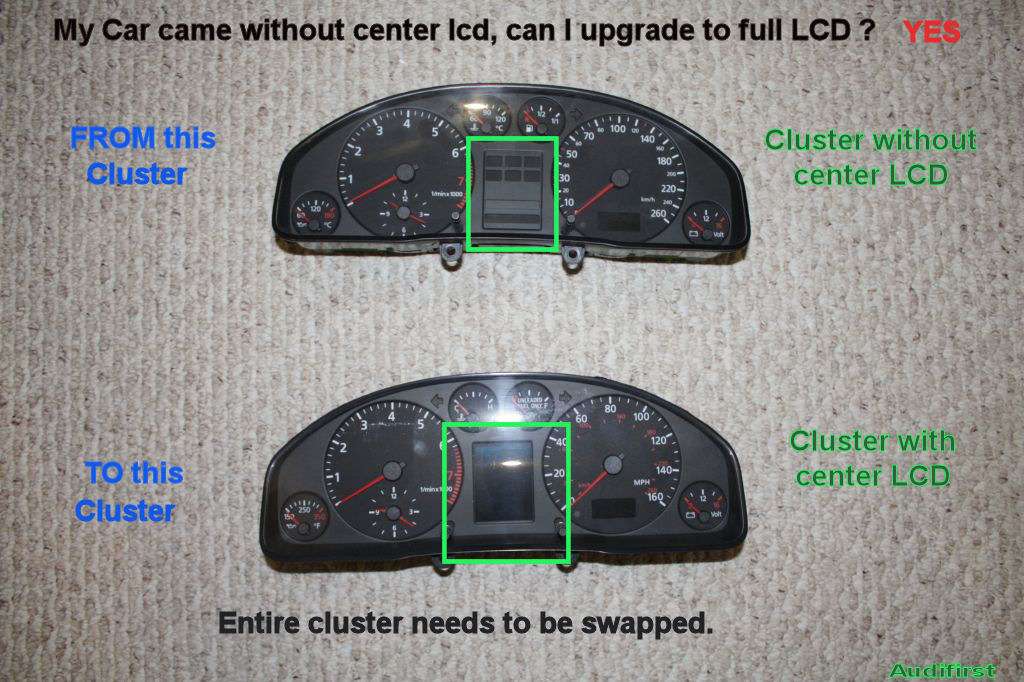
If your car came originally without center LCD , you can swap the cluster with LCD however in order to change menus you need to buy new wiper arm with switch and wiring and add wires between the cluster and wiper arm
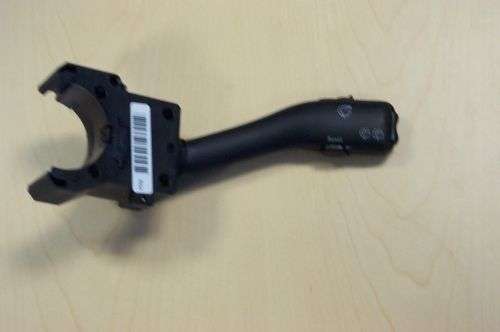
you will need the wiper control arm that has a switch at the end wiper arm to change menus on center LCD
for 1996 to 1997 Cluster 1
you need wiper arm
part# 8D9 953 503 A (sedan)
part# 8D9 953 503 C (Avant)
for 1998 to 2001.5 Cluster 2, and Cluster 3
Part# 4D0 953 503 B (sedan)
part# 8D0 953 503 D (Avant)
There are 3/4 sets of wires required for wiper arm control harness plug and for the instrument cluster harness plug for the Grey Connector on
Cluster 3, and red connector of Cluster 2 , black connector on cluster 1
I recommend to buy wires from Audi/VW dealer
On cluster 1
You need to insert wires into black 20 pin connector on instrument cluster and to 6 pin harness plug on the wiper arm
Black connector Pin 11 to wiper arm pin 1
Black connector Pin 14 to wiper arm pin 3
Black connector Pin 18 to wiper arm pin 4
Pin 2 on the wiper arm is ground
Pins 5, 6 are not used
On cluster 2
-added a wire between the longer ECU connector, pin 17 (yellow wire), to pin 1 on the RED instrument cluster connector
-grounded pins 9, 16, 19 on the RED instrument cluster connector since I don't need bulb out warnings or low washer fluid warning (this worked)
You need to insert wires into red 20 pin connector on instrument cluster and to 6 pin harness plug on the wiper arm
Red connector Pin 18 to wiper arm pin 1
Red connector Pin 14 to wiper arm pin 2
Red connector Pin 11 to wiper arm pin 4
Pin 3 on the wiper arm is ground , I just made a short segment and connected it to the wire coming off Pin 5
Pin 5: ground for the intermittent wiper selector on top of the wiper arm
Pin 6: feedback wire for position of the intermittent wiper selector
For people who have a no-LCD cluster, pins 5 and 6 on the wiper arm will already exist, and they are supposed to exist while using the LCD cluster too. They should not be removed.
Cluster 3
you need to insert wires into Grey connector on the instrument cluster and to 6 pin harness plug on the wiper arm
Grey Connector pin 17 to wiper arm pin 4
Grey Connector pin 18 to wiper arm pin 3
Grey Connector pin 19 to wiper arm pin 1
Pin 2 on the wiper arm is ground
Pins 5, 6 are not used
How do I know if my cluster has immobilizer ?

Answer regards Color LCD
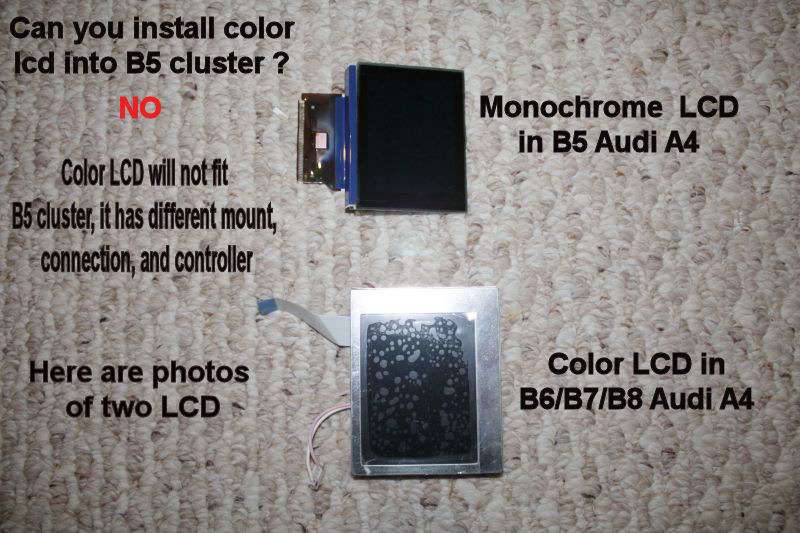
Here are Pin out for clusters with Full Size LCD
cluster 1
26-Pin Connector, Blue
1 - Open
2 - Signal for buzzer
3 - Terminal 15
4 - Terminal 15
5 - Open
6 - Terminal 61
7 - Parking brake/brake system malfunction
8 - ABS (input signal)
9 - Airbag (input signal)
10 - CAT
11 - Open
12 - Open
13 - Parking light, right
14 - Ignition switch, S-contact
15 - Chime signal
16 - Open
17 - Open
18 - Oil pressure 1.8 bar
19 - Terminal 58d
20 - Coolant level
21 - Turn signal, right
22 - Headlight high beams
23 - Speedometer Vehicle Speed Sensor (VSS) (checking → Chapter)
24 - Brake fluid
25 - Brake pads
26 - Parking light, left
26-Pin Connector, Yellow
1 - Terminal 58
2 - Terminal 58
3 - Engine RPM signal
4 - Air conditioner compressor
5 - Clock (output)
6 - Speed signal 1
7 - Speed signal 2
8 - Door contact (driver's door)
9 - Terminal 30
10 - Terminal 30
11 - Open
12 - Fuel tank warning
13 - Turn signal, left
14 - Open
15 - Open
16 - Seat belt buckle switch
17 - Open
18 - Terminal 31
19 - Terminal 31
20 - Diagnostic wire
21 - Open
22 - Open
23 - Open
24 - Open
25 - Sender for fuel gauge
26 - Engine coolant temperature sensor
20-Pin Connector, Black
1 - Fuel consumption signal
2 - Open
3 - Open
4 - Open
5 - Outside air temperature
6 - Selector lever display
7 - Open
8 - Open
9 - Coolant level
10 - Hydraulic pressure
11 - Trip computer - Reset
12 - Radio/Telephone - Clock
13 - Radio/Telephone - Data
14 - Trip computer (forward sequence)
15 - Radio/Telephone - Enable
16 - Rear lights/headlight low beams
17 - Open
18 - Trip computer (reverse sequence)
19 - Brake lights
20 - Open
4-Pin Connector, Black
1 - Oil temperature sensor
2 - Open
3 - Open
4 - Open
cluster 2
32-Pin Connector for Basic Functions, Blue
1 - Terminal 15
2 - Turn signal, right
3 - Speedometer output 1
4 - Open
5 - Sender for fuel gauge
6 - Airbag
7 - Terminal 31 sensor Ground (GND)
8 - Coolant temperature
9 - Terminal 31 load Ground (GND)
10 - Oil pressure switch
11 - Engine speed (RPM) signal
12 - Terminal 61
13 - CAT
14 - Self leveling suspension
15 - Terminal 58d
16 - Malfunction Indicator Lamp (MIL)
17 - High beam
18 - Turn signal, left
19 - ABS
20 - Terminal 58s
21 - Door contact (driver's door)
22 - Engine coolant low
23 - Terminal 30
24 - Terminal 31 load Ground (GND)
25 - K-wire
26 - Parking light, right
27 - Parking light, left
28 - Speedometer (input)
29 - Brake fluid level/pressure
30 - S-contact
31 - Seat belt buckle
32 - Electronic Stability Program (ESP)
32-Pin Connector for Additional Functions, Green
1 - Open
2 - Open
3 - Open
4 - Open
5 - W-wire
6 - Tailgate (Lowline model only)
7 - Brake pad (Highline model only)
8 - Input for outside buzzer control (currently not assigned)
9 - Input for outside chime control (currently not assigned)
10 - Low fuel level warning-output signal for Engine Control Module (ECM)
11 - Standing time output
12 - Air conditioning cutout
13 - Parking brake
14 - Electronic throttle
15 - Side marker light
16 - Open
17 - Open
18 - Open
19 - Open
20 - Open
21 - Oil temperature
22 - Open
23 - Open
24 - Open
25 - Open
26 - Open
27 - Open
28 - Open
29 - Open
30 - Speedometer output 2
31 - Open
32 - Open
20-Pin Connector for Multi-Function Display, Red
1 - Fuel consumption signal
2 - Open
3 - Open
4 - Open
5 - Outside air temperature
6 - Selector lever display
7 - Open
8 - Open
9 - Washer fluid
10 - Hydraulic pressure
11 - Trip computer reset
12 - Clock signal for radio frequency display
13 - Data signal for radio frequency display
14 - Trip computer (forward sequence)
15 - Enable signal for radio frequency display
16 - Tail lights/headlight low beam (indicator lights)
17 - Open
18 - Trip computer (reverse sequence)
19 - Brake lights
20 - Open
Cluster 3
Blue 32-Pin Multi-Pin Connector for Basic Functions
1 - Terminal 15
2 - Brake pad wear
3 - Tachometer output 1
4 - not occupied
5 - Tank sensor
6 - Tank warning OBD 2
7 - Terminal 31 (sensor Ground (GND))
8 - Coolant temperature
9 - Terminal 31 (load Ground (GND))
10 - Oil pressure 2 (high)
11 - RPM signal
12 - A/C shut-off
13 - E-Gas/glow plug control
14 - Level control
15 - Terminal 58d
16 - Trailer turn signal
17 - High beam
18 - Left turn signal
19 - not occupied
20 - Terminal 58s
21 - Driver door contact
22 - Low coolant
23 - Terminal 30
24 - Terminal 31 (load Ground (GND))
25 - Consumption signal
26 - Right parking light
27 - Left parking light
28 - Tachometer input
29 - Brake
30 - S-contact
31 - Tachometer output 2
32 - ESP/ASR
Green 32-Pin Multi-Pin Connector for Auxiliary Functions
1 - Door contact (all doors)
2 - Transponder 1
3 - not occupied
4 - not occupied
5 - W-wire
6 - Tailgate
7 - Right turn signal
8 - External buzzer
9 - External gong
10 - Airbag
11 - Stand-still time output
12 - Terminal 61
13 - Parking brake/BRAKE
14 - CHECK
15 - Oil level/oil temperature
16 - not occupied
17 - Transponder 2
18 - CAN high speed (powertrain) (high +)
19 - CAN high speed (powertrain) (low -)
20 - CAN high speed (powertrain) (screen)
21 - ABS
22 - CAN low speed (comfort) (high +)
23 - CAN low speed (comfort) (low -)
24 - CAN low speed (comfort) (screen)
25 - Engine lid
26 - not occupied
27 - Belt buckle
28 - K-wire
29 - Outside temperature -input
30 - not occupied
31 - Selector range display
32 - not occupied
Gray 32-Pin Multi-Pin Connector for Multi-Function Display
1 - Menu selection switch (menu)
2 - Menu selection switch (out A)
3 - Menu selection switch (out B)
4 - Menu selection switch (Enter)
5 - CAN high speed display (high +)
6 - CAN high speed display (low -)
7 - CAN high speed display (screen)
8 - Passenger door contact
9 - Right rear door contact
10 - Left rear door contact
11 - Enable
12 - Clock
13 - Data
14 - Brake light
15 - Windshield washer fluid level
16 - Rear lights/low beams
17 - Left board computer
18 - Right board computer
19 - Board computer, reset
20 - not occupied
21 - not occupied
22 - not occupied
23 - Button branch 1 navigation
24 - Button branch 2 navigation
25 - Button branch Telematic
26 - not occupied
27 - not occupied
28 - not occupied
29 - not occupied
30 - not occupied
31 - not occupied
32 - not occupied
Wiper Switch Pin, Terminal Assignments
A - 6-pin connector
1 - Board computer, reset
2 - Board computer, Terminal 31
3 - Board computer, right rocker switch
4 - Board computer, left rocker switch
5 - open
6 - open
B - 13-pin harness connector
1 - Wiper switch, terminal J
2 - Wiper switch, terminal 53 c
3 - Emergency light (hazard light) switch, terminal R
4 - Wiper switch, terminal 53 b
5 - Wiper switch, terminal 53 a
6 - Emergency light (hazard light) switch, terminal L
7 - Emergency light (hazard light) switch, terminal 49 a
8 - Wiper switch, terminal 53 e
9 - Wiper switch, terminal 53
If you have questions please post them here and I will answer them to best of my ability.
This post and all of the information it contains are provided 'as is' without warranty of any kind, whether express or implied.
The wiring information was taken from "Bentley Publishers CD and Hardcover copy", there may be omissions or inaccuracies in information contained in this post. Before making any decision or taking any action based on the information contained in this Post, you should double/triple check information regards to the vehicle you service.
If you found that the information is inaccurate and you have found the solution post it up and I will update the post.
*updated May 01, 2012* additional information provided by MetalMan
Couple people ask me if I can show the difference between instrument clusters from 1996 to 2001.5
The photo below shows all 3 instrument clusters from 1996 to 2001.5 with Full size LCD, some models didn't come with LCD screen because of the package was not selected during order back then.
Here is the back of the instrument clusters.
You can see the difference between all the clusters the cluster 1 is CDN or European but MPH is identical except speedometer is in MPH the other two are MPH clusters I had,
Cluster 1 was installed in 1996 and 1997 Audi A4 early models , no immobilizer the most visible difference is if you look at the analog clock has no digits at 3, 6, 9, at 12 o'clock comparing to cluster 2
Cluster 2 was installed in 1998 to 1999.5 Audi A4 models, , you could swap cluster between these years with no issues, no immobilizer.
Cluster 3 was installed in 2000 to 2001.5 Audi A4 models,some 99.5's with VIN > 8DY000001 had cluster with digital clock, the main difference was the analog clock was replaced with digital clock to match the mileage LCD, and in late 2001 immobilizer was added to system
NOW COMPATIBILITY
Legend
- Cluster 1 is 1996-1997 (no immobilizer, no Can-Bus)
- Cluster 2 is 1998-1999.5 (no immobilizer, no Can-Bus)
- Cluster 3 is 2000 to 2001.5 (00 had no immobilizer but Can-Bus was introduced, 01+ had Immobilizer and Can-Bus)
Cluster 2, and cluster 3 can not fit directly into cluster 1, because cluster 1 has different plugs , in order to fit you need to buy new plugs and new pins and rewire some connection.,
I know two people who proceed with this conversion one did the cluster 2 to cluster 1 and had partially working cluster,
all the gauges were working however compatibility was an issue and error code were reported cluster did not understand modules in the car, other did cluster 3 to cluster 1 and had only partial success two gauges were working , all the lights were lit up like Christmas tree .
Cluster 3 can be installed into cluster 2 however some rewiring is required to both blue and green plugs and the middle plug from cluster 3 doesn't fit cluster 2 which you need to rewire as well,
regards to immobilizer on some early 2001 clusters this feature can not be disabled in the instrument cluster the little car key will flash some people cover it with electrical tape, but it will beep at start up for 3 seconds.
Also Can Bus was introduced in some early 2000+ models which meant that vehicle in 1998-1999 didn't have can-bus and some clusters from 2001-2001.5 didn't work the tachometer or speedometer was not functional
If you really want to have digital clock in 1998-1999 A4 model try to get 1999.5 to 2000 instrument cluster that don't have immobilizer or Can-Bus requirement.
Cluster 3 with immobilizer will work in early cluster 3 however immobilizer light will be present during start and will flash continuously and it will beep for 3 seconds during start up.
If your car came originally without center LCD , you can swap the cluster with LCD however in order to change menus you need to buy new wiper arm with switch and wiring and add wires between the cluster and wiper arm
you will need the wiper control arm that has a switch at the end wiper arm to change menus on center LCD
for 1996 to 1997 Cluster 1
you need wiper arm
part# 8D9 953 503 A (sedan)
part# 8D9 953 503 C (Avant)
for 1998 to 2001.5 Cluster 2, and Cluster 3
Part# 4D0 953 503 B (sedan)
part# 8D0 953 503 D (Avant)
There are 3/4 sets of wires required for wiper arm control harness plug and for the instrument cluster harness plug for the Grey Connector on
Cluster 3, and red connector of Cluster 2 , black connector on cluster 1
I recommend to buy wires from Audi/VW dealer
On cluster 1
You need to insert wires into black 20 pin connector on instrument cluster and to 6 pin harness plug on the wiper arm
Black connector Pin 11 to wiper arm pin 1
Black connector Pin 14 to wiper arm pin 3
Black connector Pin 18 to wiper arm pin 4
Pin 2 on the wiper arm is ground
Pins 5, 6 are not used
On cluster 2
-added a wire between the longer ECU connector, pin 17 (yellow wire), to pin 1 on the RED instrument cluster connector
-grounded pins 9, 16, 19 on the RED instrument cluster connector since I don't need bulb out warnings or low washer fluid warning (this worked)
You need to insert wires into red 20 pin connector on instrument cluster and to 6 pin harness plug on the wiper arm
Red connector Pin 18 to wiper arm pin 1
Red connector Pin 14 to wiper arm pin 2
Red connector Pin 11 to wiper arm pin 4
Pin 3 on the wiper arm is ground , I just made a short segment and connected it to the wire coming off Pin 5
Pin 5: ground for the intermittent wiper selector on top of the wiper arm
Pin 6: feedback wire for position of the intermittent wiper selector
For people who have a no-LCD cluster, pins 5 and 6 on the wiper arm will already exist, and they are supposed to exist while using the LCD cluster too. They should not be removed.
Cluster 3
you need to insert wires into Grey connector on the instrument cluster and to 6 pin harness plug on the wiper arm
Grey Connector pin 17 to wiper arm pin 4
Grey Connector pin 18 to wiper arm pin 3
Grey Connector pin 19 to wiper arm pin 1
Pin 2 on the wiper arm is ground
Pins 5, 6 are not used
How do I know if my cluster has immobilizer ?
Answer regards Color LCD
Here are Pin out for clusters with Full Size LCD
cluster 1
26-Pin Connector, Blue
1 - Open
2 - Signal for buzzer
3 - Terminal 15
4 - Terminal 15
5 - Open
6 - Terminal 61
7 - Parking brake/brake system malfunction
8 - ABS (input signal)
9 - Airbag (input signal)
10 - CAT
11 - Open
12 - Open
13 - Parking light, right
14 - Ignition switch, S-contact
15 - Chime signal
16 - Open
17 - Open
18 - Oil pressure 1.8 bar
19 - Terminal 58d
20 - Coolant level
21 - Turn signal, right
22 - Headlight high beams
23 - Speedometer Vehicle Speed Sensor (VSS) (checking → Chapter)
24 - Brake fluid
25 - Brake pads
26 - Parking light, left
26-Pin Connector, Yellow
1 - Terminal 58
2 - Terminal 58
3 - Engine RPM signal
4 - Air conditioner compressor
5 - Clock (output)
6 - Speed signal 1
7 - Speed signal 2
8 - Door contact (driver's door)
9 - Terminal 30
10 - Terminal 30
11 - Open
12 - Fuel tank warning
13 - Turn signal, left
14 - Open
15 - Open
16 - Seat belt buckle switch
17 - Open
18 - Terminal 31
19 - Terminal 31
20 - Diagnostic wire
21 - Open
22 - Open
23 - Open
24 - Open
25 - Sender for fuel gauge
26 - Engine coolant temperature sensor
20-Pin Connector, Black
1 - Fuel consumption signal
2 - Open
3 - Open
4 - Open
5 - Outside air temperature
6 - Selector lever display
7 - Open
8 - Open
9 - Coolant level
10 - Hydraulic pressure
11 - Trip computer - Reset
12 - Radio/Telephone - Clock
13 - Radio/Telephone - Data
14 - Trip computer (forward sequence)
15 - Radio/Telephone - Enable
16 - Rear lights/headlight low beams
17 - Open
18 - Trip computer (reverse sequence)
19 - Brake lights
20 - Open
4-Pin Connector, Black
1 - Oil temperature sensor
2 - Open
3 - Open
4 - Open
cluster 2
32-Pin Connector for Basic Functions, Blue
1 - Terminal 15
2 - Turn signal, right
3 - Speedometer output 1
4 - Open
5 - Sender for fuel gauge
6 - Airbag
7 - Terminal 31 sensor Ground (GND)
8 - Coolant temperature
9 - Terminal 31 load Ground (GND)
10 - Oil pressure switch
11 - Engine speed (RPM) signal
12 - Terminal 61
13 - CAT
14 - Self leveling suspension
15 - Terminal 58d
16 - Malfunction Indicator Lamp (MIL)
17 - High beam
18 - Turn signal, left
19 - ABS
20 - Terminal 58s
21 - Door contact (driver's door)
22 - Engine coolant low
23 - Terminal 30
24 - Terminal 31 load Ground (GND)
25 - K-wire
26 - Parking light, right
27 - Parking light, left
28 - Speedometer (input)
29 - Brake fluid level/pressure
30 - S-contact
31 - Seat belt buckle
32 - Electronic Stability Program (ESP)
32-Pin Connector for Additional Functions, Green
1 - Open
2 - Open
3 - Open
4 - Open
5 - W-wire
6 - Tailgate (Lowline model only)
7 - Brake pad (Highline model only)
8 - Input for outside buzzer control (currently not assigned)
9 - Input for outside chime control (currently not assigned)
10 - Low fuel level warning-output signal for Engine Control Module (ECM)
11 - Standing time output
12 - Air conditioning cutout
13 - Parking brake
14 - Electronic throttle
15 - Side marker light
16 - Open
17 - Open
18 - Open
19 - Open
20 - Open
21 - Oil temperature
22 - Open
23 - Open
24 - Open
25 - Open
26 - Open
27 - Open
28 - Open
29 - Open
30 - Speedometer output 2
31 - Open
32 - Open
20-Pin Connector for Multi-Function Display, Red
1 - Fuel consumption signal
2 - Open
3 - Open
4 - Open
5 - Outside air temperature
6 - Selector lever display
7 - Open
8 - Open
9 - Washer fluid
10 - Hydraulic pressure
11 - Trip computer reset
12 - Clock signal for radio frequency display
13 - Data signal for radio frequency display
14 - Trip computer (forward sequence)
15 - Enable signal for radio frequency display
16 - Tail lights/headlight low beam (indicator lights)
17 - Open
18 - Trip computer (reverse sequence)
19 - Brake lights
20 - Open
Cluster 3
Blue 32-Pin Multi-Pin Connector for Basic Functions
1 - Terminal 15
2 - Brake pad wear
3 - Tachometer output 1
4 - not occupied
5 - Tank sensor
6 - Tank warning OBD 2
7 - Terminal 31 (sensor Ground (GND))
8 - Coolant temperature
9 - Terminal 31 (load Ground (GND))
10 - Oil pressure 2 (high)
11 - RPM signal
12 - A/C shut-off
13 - E-Gas/glow plug control
14 - Level control
15 - Terminal 58d
16 - Trailer turn signal
17 - High beam
18 - Left turn signal
19 - not occupied
20 - Terminal 58s
21 - Driver door contact
22 - Low coolant
23 - Terminal 30
24 - Terminal 31 (load Ground (GND))
25 - Consumption signal
26 - Right parking light
27 - Left parking light
28 - Tachometer input
29 - Brake
30 - S-contact
31 - Tachometer output 2
32 - ESP/ASR
Green 32-Pin Multi-Pin Connector for Auxiliary Functions
1 - Door contact (all doors)
2 - Transponder 1
3 - not occupied
4 - not occupied
5 - W-wire
6 - Tailgate
7 - Right turn signal
8 - External buzzer
9 - External gong
10 - Airbag
11 - Stand-still time output
12 - Terminal 61
13 - Parking brake/BRAKE
14 - CHECK
15 - Oil level/oil temperature
16 - not occupied
17 - Transponder 2
18 - CAN high speed (powertrain) (high +)
19 - CAN high speed (powertrain) (low -)
20 - CAN high speed (powertrain) (screen)
21 - ABS
22 - CAN low speed (comfort) (high +)
23 - CAN low speed (comfort) (low -)
24 - CAN low speed (comfort) (screen)
25 - Engine lid
26 - not occupied
27 - Belt buckle
28 - K-wire
29 - Outside temperature -input
30 - not occupied
31 - Selector range display
32 - not occupied
Gray 32-Pin Multi-Pin Connector for Multi-Function Display
1 - Menu selection switch (menu)
2 - Menu selection switch (out A)
3 - Menu selection switch (out B)
4 - Menu selection switch (Enter)
5 - CAN high speed display (high +)
6 - CAN high speed display (low -)
7 - CAN high speed display (screen)
8 - Passenger door contact
9 - Right rear door contact
10 - Left rear door contact
11 - Enable
12 - Clock
13 - Data
14 - Brake light
15 - Windshield washer fluid level
16 - Rear lights/low beams
17 - Left board computer
18 - Right board computer
19 - Board computer, reset
20 - not occupied
21 - not occupied
22 - not occupied
23 - Button branch 1 navigation
24 - Button branch 2 navigation
25 - Button branch Telematic
26 - not occupied
27 - not occupied
28 - not occupied
29 - not occupied
30 - not occupied
31 - not occupied
32 - not occupied
Wiper Switch Pin, Terminal Assignments
A - 6-pin connector
1 - Board computer, reset
2 - Board computer, Terminal 31
3 - Board computer, right rocker switch
4 - Board computer, left rocker switch
5 - open
6 - open
B - 13-pin harness connector
1 - Wiper switch, terminal J
2 - Wiper switch, terminal 53 c
3 - Emergency light (hazard light) switch, terminal R
4 - Wiper switch, terminal 53 b
5 - Wiper switch, terminal 53 a
6 - Emergency light (hazard light) switch, terminal L
7 - Emergency light (hazard light) switch, terminal 49 a
8 - Wiper switch, terminal 53 e
9 - Wiper switch, terminal 53
If you have questions please post them here and I will answer them to best of my ability.
 11-13-2013, 04:26 PM
#125
Audiworld Junior Member

Join Date: Sep 2013
Posts: 25
Likes: 0
Received 0 Likes
on
0 Posts
Great thread!
Especially since I'm looking for a replacement for the cluster in my 96 a4 to try to help find the source of a problem with the speedo and tach not always working.
It does raise a new question though and that's if I do find one with the info display box that mine currently doesn't have do I just need to add the new stalk with the buttons and plug it in or does it need all those wires listed to be installed?
I'm asking because if installing all those new wires it is like completely rewiring the entire stalk.
If it does require total rewire etc do you think it would be worth just keep looking for the same one without the info display?
12-15-2013, 03:06 PM
#126
AudiWorld Newcomer

Join Date: Apr 2012
Location: Norway
Posts: 2
Likes: 0
Received 0 Likes
on
0 Posts
Hello,
Thanks for a great guide that helped a lot when I decided to swap my cluster!
My car is a 2000 Avant quattro with the PD TDI engine (which I have recently swapped as well). The old instrument, without extra gauges and only the half-size LCD, died a couple of weeks ago.
I bought a used one with all the bells and whistles, that have had the LCD replaced and odo reprogrammed, off of eBay. I also bought a used wiper stalk with the buttons needed for the computer.
When I took the old cluster out it actually appeared to be gen. 2 (from the back side), but a quick check on ELSA showed I have the cluster 3 pin assignments. Also, there is no gray connector in my car, and the new instrument gives warning for 'bulb out', 'brake light' and 'washer fluid' as there is no provision for this in my car.
My question is: Do anyone have part numbers for the gray 32-pin connector on the instrument and the 6-pin connector on the wiper stalk? Part number for the repair wires would have been great aswell!
Can I code some of the warnings out (guided function for coding in ODIS did not mention any of the), or should I insert wires in pins 14, 15 and 16 on the grey connector and ground them?
Should I do any other wiring for the gray connector? It seems I have CAN at the radio (brown wires), if that makes any difference.
Thanks a lot!
12-24-2013, 02:13 AM
#127
AudiWorld Newcomer

Join Date: Dec 2013
Location: Sweden
Posts: 1
Likes: 0
Received 0 Likes
on
0 Posts
Hi I am a new user at this forum so sorry if Im posting this wrong.
I have been building and customising my A4 on and off for some years now even tho almost everyone says that Im stupid to want to personalise my car becous it is not the famous 1.8t it just a 1.6
I have read this post with intrest and aaw to find that there are likeminded peaple that wish to change there cluster to a newer version and not be hated for it.
Im trying to fit a -98 RS4 cluster in a -97 A4 and intend to make a adapter between the old 26pin blue, 26pin yellow, 10pin black and the new 32pin blue, 32pin green, 32pin grey connections.
I have figured out most of the pin directions thanks to this thread. But as I dont get any help here from friends Im stuck trying to figure out all the pins that I dont understand.
Like what w-wire and k-wire is and how they relate to the diagnostic-wire in the old connections. I hope you all dont see me as dumb and are willing to help me.
for last, sorry for my spelling Im from sweden and Im dysletic
Merry chrismas to all
//Nackmar
12-31-2014, 08:18 AM
#128
Audiworld Junior Member

Join Date: Oct 2013
Posts: 14
Likes: 0
Received 0 Likes
on
0 Posts
I have read through this thread but I am still unsure if it can be done. I have a 96 A4 with out the LCD display. I recent purchased a 00 A4 cluster with the wiper stalk and harness plugs. Can I wire in this new cluster to have the digital clock and the lcd display functional along with the gauges?
12-31-2014, 08:52 AM
#129
AudiWorld Super User
Thread Starter

I have read through this thread but I am still unsure if it can be done. I have a 96 A4 with out the LCD display. I recent purchased a 00 A4 cluster with the wiper stalk and harness plugs. Can I wire in this new cluster to have the digital clock and the lcd display functional along with the gauges?