Please Help, water in footwells!
 06-13-2012, 08:36 AM
#1
AudiWorld Newcomer
Thread Starter

Join Date: Jun 2012
Posts: 6
Likes: 0
Received 0 Likes
on
0 Posts
Hi, i have an audi a6 3.0tdi se tip which due to the heavy rains has for whatever reason filled up with water mainly in the front drivers and rear drivers footwell.
Got the car on a ramp today, and managed to get the rubber gromets out underneath the drivers side front and rear, by which a load of water drained out.
Problem is now my drivers side electric seat has stopped working a few days back. Do the electric seats have a separate fuse which could have blown, as the passenger electric seat is working fine???....or could it be worse?
Also could someone tell me where the water drain holes are so i can see if they are blocked, so it doesnt fill up with water again?
any help much appreciated.
 06-13-2012, 09:19 AM
#5
AudiWorld Newcomer
Thread Starter
Join Date: Jun 2012
Posts: 6
Likes: 0
Received 0 Likes
on
0 Posts
hi, sorry to sound stupid, but which is the cowl drain?
Is there a way of moving the seat or taking it out as i cant get to the module?
06-13-2012, 09:43 AM
#6
AudiWorld Super User
Am going to have to defer to the folks who do more of their own work.
Our A6 mostly goes to the main Audi dealer.
I also found the C5 battery thread, but since your's is in the boot....
Our A6 mostly goes to the main Audi dealer.
I also found the C5 battery thread, but since your's is in the boot....
06-13-2012, 12:33 PM
#7
AudiWorld Senior Member
Hi, i have an audi a6 3.0tdi se tip which due to the heavy rains has for whatever reason filled up with water mainly in the front drivers and rear drivers footwell.
Got the car on a ramp today, and managed to get the rubber gromets out underneath the drivers side front and rear, by which a load of water drained out.
Problem is now my drivers side electric seat has stopped working a few days back. Do the electric seats have a separate fuse which could have blown, as the passenger electric seat is working fine???....or could it be worse?
Also could someone tell me where the water drain holes are so i can see if they are blocked, so it doesnt fill up with water again?
any help much appreciated.
Got the car on a ramp today, and managed to get the rubber gromets out underneath the drivers side front and rear, by which a load of water drained out.
Problem is now my drivers side electric seat has stopped working a few days back. Do the electric seats have a separate fuse which could have blown, as the passenger electric seat is working fine???....or could it be worse?
Also could someone tell me where the water drain holes are so i can see if they are blocked, so it doesnt fill up with water again?
any help much appreciated.
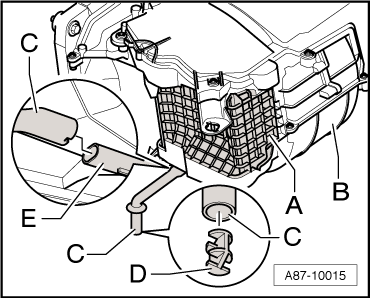
<TABLE cellSpacing=0 cellPadding=0 width="100%"><TBODY><TR><TD class=spalte-text><TABLE class="cc abstand-kap einzug-standard"><TBODY><TR><TD class=titel-kap>Checking, cleaning, removing and installing plenum chamber water drain </TD></TR></TBODY></TABLE>Note
</TD><TD class=spalte-pfeil></TD><TD class=spalte-marg></TD></TR></TBODY></TABLE><TABLE cellSpacing=0 cellPadding=0 width="100%"><TBODY><TR><TD class=spalte-text><TABLE class="cc abstand-liste-erster einzug-standard hinweis-rumpf"><TBODY><TR><TD class=einzug-liste>t </TD><TD>Drainage of water out of plenum chamber may be impaired by deposits such as leaves and pine needles accumulating in the water drains. If the vehicle is then driven through a car wash or in the event of heavy rainfall, the water level in the plenum chamber will rise and water ingress via the fresh-air intake -A- into the air intake unit -B-.</TD></TR></TBODY></TABLE><TABLE class="cc abstand-liste einzug-standard hinweis-rumpf"><TBODY><TR><TD class=einzug-liste>t </TD><TD>The water drain hose -C- is intended to discharge the small amounts of water entering the air intake unit via the fresh-air intake in normal operation.</TD></TR></TBODY></TABLE><TABLE class="cc abstand-liste einzug-standard hinweis-rumpf"><TBODY><TR><TD class=einzug-liste>t </TD><TD>The water drains via the water drain hose -C- out of the plenum chamber (via connection -D-) into the transmission tunnel in the area behind the noise and heat insulation mat (a hole is provided specifically for this in the bottom of the plenum chamber).</TD></TR></TBODY></TABLE><TABLE class="cc abstand-liste einzug-standard hinweis-rumpf"><TBODY><TR><TD class=einzug-liste>t </TD><TD>A plastic element -D- for reducing the cross-section is inserted in the water drain hose -C-. If plastic element -D- is not fitted, noise may occur depending on fresh-air blower -V2- speed.</TD></TR></TBODY></TABLE></TD></TR></TBODY></TABLE>
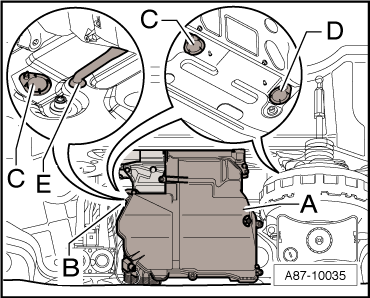
<TABLE cellSpacing=0 cellPadding=0 width="100%"><TBODY><TR><TD class=spalte-text><TABLE class="cc abstand-liste einzug-standard hinweis-rumpf"><TBODY><TR><TD class=einzug-liste>t </TD><TD>The water drain socket -C- is accessible after removing the alarm horn -H12- of the anti-theft alarm -B-. The water drain socket -D- is not accessible with the brake servo and air intake unit -A- in position.</TD></TR></TBODY></TABLE><TABLE class="cc abstand-liste einzug-standard hinweis-rumpf"><TBODY><TR><TD class=einzug-liste>t </TD><TD>If the water drain sockets -C- and -D- are clogged with leaves and pine needles, the drains may freeze up in winter and prevent water drainage. After driving a short distance, the heat emitted by the engine and exhaust system causes the ice in the drains to thaw again. It is possible that the water will have drained off from the plenum chamber again by the time the vehicle arrives at the workshop.</TD></TR></TBODY></TABLE><TABLE class="cc abstand-liste einzug-standard hinweis-rumpf"><TBODY><TR><TD class=einzug-liste>t </TD><TD>The water drain socket -C- can be cleaned for example after removing the alarm horn -H12- of the anti-theft alarm -B- (removing alarm horn -H12-</TD></TR></TBODY></TABLE><TABLE class="cc abstand-liste einzug-standard hinweis-rumpf"><TBODY><TR><TD class=einzug-liste>t </TD><TD>Coarse dirt can be removed from the water drain socket -D- using a commercially available flexible gripping tool for example. Fine deposits and sludge can be removed for example using a thin water hose or a pressure-feed spray gun -V.A.G 1538- and a nylon probe -V.A.G 1538/2-.</TD></TR></TBODY></TABLE><TABLE class="cc abstand-liste einzug-standard hinweis-rumpf"><TBODY><TR><TD class=einzug-liste>t </TD><TD>If one of the two water drain sockets -C- or -D- is blocked and there are leaves, for example, in the plenum chamber, remove coarse dirt from the area beneath the air intake unit using a commercially available flexible gripping tool for instance. Fine deposits and sludge can be removed for example using a thin water hose or a pressure-feed spray gun -V.A.G 1538- and a nylon probe -V.A.G 1538/2-.</TD></TR></TBODY></TABLE><TABLE class="cc abstand-liste einzug-standard hinweis-rumpf"><TBODY><TR><TD class=einzug-liste>t </TD><TD>To stop water from the plenum chamber flowing via the water drain hose -E- into the air intake unit, the hose ends in the area behind the noise and heat insulation mat in the transmission tunnel.</TD></TR></TBODY></TABLE></TD></TR></TBODY></TABLE>
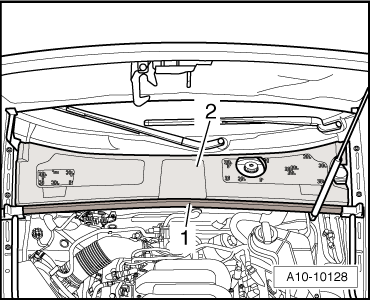
<TABLE cellSpacing=0 cellPadding=0 width="100%"><TBODY><TR><TD class=spalte-text><TABLE class="cc abstand-kap einzug-standard"><TBODY><TR><TD class=titel-kap>Removing and installing alarm horn -H12-</TD></TR></TBODY></TABLE><TABLE class="cc einzug-standard abstand-standard "><TBODY><TR><TD>Fitting location: in plenum chamber (front) between electronics box (right-side) and blower box.</TD></TR></TBODY></TABLE></TD><TD class=spalte-pfeil></TD><TD class=spalte-marg></TD></TR></TBODY></TABLE><TABLE cellSpacing=0 cellPadding=0 width="100%"><TBODY><TR><TD class=spalte-text><TABLE class="cc einzug-standard abstand-standard absatz-hervor"><TBODY><TR><TD>Removing</TD></TR></TBODY></TABLE><TABLE class="cc einzug-standard abstand-standard "><TBODY><TR><TD class=einzug-liste>� </TD><TD>Switch off ignition and take out ignition key.</TD></TR></TBODY></TABLE><TABLE class="cc einzug-standard abstand-standard "><TBODY><TR><TD class=einzug-liste>� </TD><TD>Pull off rubber seal -1- for plenum chamber cover.</TD></TR></TBODY></TABLE><TABLE class="cc einzug-standard abstand-standard "><TBODY><TR><TD class=einzug-liste>� </TD><TD>Remove plenum chamber cover -2-.</TD></TR></TBODY></TABLE>
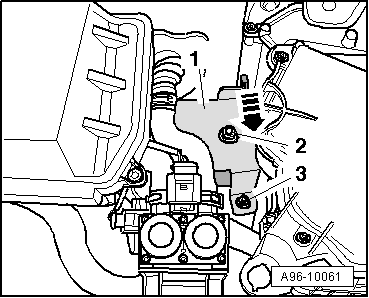
<TABLE cellSpacing=0 cellPadding=0 width="100%"><TBODY><TR><TD class=spalte-text><TABLE class="cc einzug-standard abstand-standard "><TBODY><TR><TD class=einzug-liste>� </TD><TD>Unscrew nut -2- for alarm horn -H12-.</TD></TR></TBODY></TABLE><TABLE class="cc einzug-standard abstand-standard "><TBODY><TR><TD class=einzug-liste>� </TD><TD>Unscrew nut -3- for retainer -1-.</TD></TR></TBODY></TABLE><TABLE class="cc einzug-standard abstand-standard "><TBODY><TR><TD class=einzug-liste>� </TD><TD>Remove bracket from blower box -arrow- and take out retainer from plenum chamber.</TD></TR></TBODY></TABLE><TABLE class="cc einzug-standard abstand-standard "><TBODY><TR><TD class=einzug-liste>� </TD><TD>Unplug electrical connector and remove alarm horn -H12- from plenum chamber.</TD></TR></TBODY></TABLE><TABLE class="cc einzug-standard abstand-standard absatz-hervor"><TBODY><TR><TD>Installing</TD></TR></TBODY></TABLE><TABLE class="cc einzug-standard abstand-standard "><TBODY><TR><TD>Installation is carried out in the reverse order; note the following:</TD></TR></TBODY></TABLE><TABLE class="cc einzug-standard abstand-standard "><TBODY><TR><TD class=einzug-liste>� </TD><TD>Note bonded rubber bush for blower box when installing bracket.</TD></TR></TBODY></TABLE></TD></TR></TBODY></TABLE>
Tightening torques
<TABLE class="abstand-tabelle layoutnormal frameall" border=1 cellSpacing=0 cellPadding=0 align=bleedleft><TBODY><TR class=th vAlign=top><TD class=cellborderrightbottom-th vAlign=top>Component</TD><TD class=cellborderbottom-th vAlign=top align=middle>Nm</TD></TR><TR class=td vAlign=top><TD class=cellborderrightbottom vAlign=top>Alarm horn -H12- to bracket</TD><TD class=cellborderbottom vAlign=top align=middle>5</TD></TR><TR class=td vAlign=top><TD class=cellborderright vAlign=top>Bracket to body</TD><TD class=cellbordernone vAlign=top align=middle>7</TD></TR></TBODY></TABLE>
</TD></TR></TBODY></TABLE>
<TABLE class="cc einzug-explo abstand-explo "><TBODY><TR><TD class=einzug-liste></TD><TD></TD></TR></TBODY></TABLE>
Last edited by royclark; 06-16-2012 at 12:57 PM.
Trending Topics
07-13-2012, 11:29 AM
#8

I am desperately in need of some help. This great British summer and the excellent design of the Audi plenum plugs are filling my a6 (c6) with water.
I couldn't follow the diagrams above, does anyone have any photos or video links to help. I am stressing about this now.
Will Audi help out given it is a known (ish) fault?
Ben.
I couldn't follow the diagrams above, does anyone have any photos or video links to help. I am stressing about this now.
Will Audi help out given it is a known (ish) fault?
Ben.
The following users liked this post:
LoveHateAudi (05-16-2021)
07-13-2012, 01:27 PM
#9
Audiworld Junior Member
Join Date: Apr 2012
Posts: 90
Likes: 0
Received 0 Likes
on
0 Posts
Actually this a problem in a lot of cars. Not just Audi. If you live or park in an area with lots of tree debris then the drain/udders will fill. Its a maintenance problem and not a design problem.
07-15-2012, 10:32 AM
#10
AudiWorld Senior Member
I am desperately in need of some help. This great British summer and the excellent design of the Audi plenum plugs are filling my a6 (c6) with water.
I couldn't follow the diagrams above, does anyone have any photos or video links to help. I am stressing about this now.
Will Audi help out given it is a known (ish) fault?
Ben.
I couldn't follow the diagrams above, does anyone have any photos or video links to help. I am stressing about this now.
Will Audi help out given it is a known (ish) fault?
Ben.
cowlpanel.png?t=1342375126
Open your hood and remove the strip of rubber that goes from one wing to the other (No5 in the picture), then lift off the plastic cover (No4 in the picture).
Below this cover you will see something like the following picture.
drainhole.gif?t=1342376113
Shine a torch down in the area where the red circle is and there is a rubber bung with a cross shaped cut in it, this is the drain pipe.
You can just about get at it with a vacuum cleaner hose, I taped a piece of rubber pipe onto the cleaner hose to make it easier.
If you can't get down there, remove the nuts and lift the alarm horn to one side for better access.
Clean all debris out of this chamber before replacing the cover.
It is so easy to remove this cover that you should make this part of cleaning the car.
I hope this makes it a little clearer for you.
Sorry, the part marked "Alarm Horn" is the heater valves.
Last edited by royclark; 06-25-2015 at 10:09 AM.