When you click on links to various merchants on this site and make a purchase, this can result in this site earning a commission. Affiliate programs and affiliations include, but are not limited to, the eBay Partner Network.
Close hatch/tail gate via remote - comfort module install
2010 Q5 Close hatch/tail gate via remote
Hello everyone! I am pretty new to the Audi world, as I recently decided to sell my M5 and purchased a 2010 Q5. Well, (among other things) I quickly got sick of not being able to close the trunk via remote or driver door button, so I decided to purchase a module that will enable this functionality. After some research, Kauftec seemed no longer available and also a bit restrictive, as it only closed the trunk gate via the remote, but not the door button (from what I saw online).
I purchased the comfort module from Bexpro for 60 Euros. With today�s exchange rate, it is around $70 USD with shipping to the US and it came from Germany in about 10 days. You can find the module here: Heckklappenmodul Comfort Audi Q5-701
I found it extremely difficult to find proper instructions of how to install the module, as no instructions were included with the module and everything else I found was poor German translations. I could only find this relevant thread for a Q7: https://www.audiworld.com/forums/q7-...odule-2828674/. Thus, I figured I will write this as it may help other people in the future that want to this on their Q5.
I installed the module this morning and am happy to report that the gate closes via keyless remote and driver door button, just as advertised. The job should not take more than an hour and requires basic tools: torx 25 screwdriver, some plastic trim removal tools (optional), five 18-20 gauge wiretaps, and a set of pliers (to squeeze on the wiretaps). Below is what I did, and this was on a 2010 Q5, so I can�t guarantee if wire colors/position will be the same for all Q5 models. Also, I take no responsibility if anything goes south while you do this on your own cars.
1. Remove trunk gate inside lower trim. There are four torx 25 screws. Two of the screws are hidden below the long rectangular lid in the middle. Not sure what this is for but mine is empty inside (possibly an emergency triangle?). It has a plastic screw on the right that you need to rotate by hand and pull down. It will pop out and will swing downwards at 90 degree angle on its hinges on the left. Unscrew the two exposed torx screws.
2. There are two square looking lids towards the top end of the trim on the far left and far rights corners. Remove these to access the other two torx screws. These lids pop right out if you push down on them from the outside. There is little notch where you can push into with a trim removal tool (or flat head screw driver). Remove the two screws.
3. The entire trim is ready to be pulled down. It is held in place by numerous metal clips. It needs a good amount of downward pulling force. The tabs will not bend/break and are completely reusable. Trim removal tools are helpful here. Some rubber pieces that sit between the trim and the metal of the gate may fall off, so make sure to gather them and put them back on before reinstallation. They probably reduce vibration/friction of the trim to metal.
4. Once the trim has popped out, it will still be attached to the car via two wire plugs. One if for the light on the left and the other for close button on the right. Unplug these two and put the panel away. Note: you may actually do this before step #3 if you gently pull/ pry out the light and the button out of the trim first. This will be easier to unplug, as otherwise you may want a second person to hold the panel up while it is hanging on the wires, while you are trying to disconnect the wire harnesses.
Now to the module: It has 5 wires that you will need to connect: brown, yellow, green, white and grey
5. Using your wiretaps connect Brown wire from module to Brown wire from the light (this is ground/negative). Then connect Yellow wire from module to the white wire from the light (this is the hot wire/positive). These two wires provide power to the module, so it will only operate when the light is ON�only when the gate is in open position. At this point you can see if there is power to the module. The module has a little On/Off button on it that slides left and right. Slide it and if your two wire connections are solid you should see a red LED light up in solid red and will start blinking after 3-4 seconds. This means you are good to proceed further with the installation. Switch the module to off position and read on.
6. Green wire of the module needs to be connected to one of four wires on the latch mechanism. The four wires are arranged in a square harness. On my car one of the wires was brown (ground/negative) and the other three wires were green with different colored stripes. I used a voltmeter to see which wire had 12V current when I pressed the remote control trunk button for 2 seconds. On my car it was the Green/Red wire, which was in the lower right corner of the harness right below the brown wire. So connect the Green wire of the module to the green/red wire of the gate�s latch.
7. That leaves you with White and Grey module wires, which need to be connected to the button on the right side of the gate. The button has four wires arranged in a row. Connect the White and Grey wires to the two middle wires of that plug. I don�t think it matters which wire of the module (grey or white) connects to which of the two middle wires of the button. Order is not important here.
8. At this point, you can switch the module back on via the On/Off slider (make sure the trunk lights are ON) and test if it works by pressing the trunk middle button on your OEM remote for two seconds. You will hear the latch to click and after a short moment, the gate should start closing down. The same should happen when you use the driver door trunk button. When the remote button is pressed, the red LED in the module will go off, and a green LED will light up indicating that it is receiving signal from the remote.
9. Put everything back together. Remember the rubber thingies that may have fallen off during trim removal. The module will remain behind the trim and will not be visible. I added an inch of double sided tape to the back of the module to keep in still and vibrating behind the trim (this is really optional). Also, I had a problem with my wiretaps as they were not cutting thru the wire insulation that well and initially I was not getting good connections, so make sure they are making good electrical connection. The insulation on these wires is hard, but the wires are easy to tear (ask me how I know) so be gentle. Also note that the module wires are only a foot or so long. The module will remain in the center of the gate around the latch mechanism, so make sure when you make your connections you still have enough slag of the harnesses so the plugs for the light and button can reach back their original position. Otherwise the plugs wires may short making it impossible to connect back. I also did not need to disconnect the battery, but you may choose to do so�
Overall, an easy job anyone can do with proper instructions. It took me a while to figure out the wires as I was going by the Q7 thread that has different wire color coding.
Cannot fathom why one can't close the deck lid via key or driver's side door button. A safety issue, perhaps? But my 2008 Mazda CX-9 allowed you to close via key fob, inside switch, and trunk lid switch. Strange.
Indeed, I suppose Audi decided that it is a safety concern, which I don't understand because when the gate is going down, it takes a little resistance for it to stop closing...so there must be some sensor on the motor, monitoring pressure against the gate.
I just completed the install on my 2015 Q5. New versions of the module are a 6 wire module so I am attaching the instructions here for the wiring. Everything else followed MA3HOK instructions above.
MODULE --> Q5 Wiring Harness
BLACK --> White (interior light)
BROWN --> Brown (interior light)
RED --> Green/Red (servo lock on the tailgate)
ORANGE --> Blue/Yellow (on the tailgate closing switch)
GREEN --> Brown (on the tailgate closing switch 3rd wire)
YELLOW --> xxxxxxxxx (do not use)
I used Self Stripping Tap Connectors (18-22 AWG). One hadn't connected properly so took some fiddling till it worked. Also, the power to the interior light shuts down after the trunk is open for a while so had to shut and then open again the rear hatch to get power to the module.
I also just installed the module on my Q5. I'm not sure if my module is newer or older than the previous poster, but I only had five wires (no green), the yellow remains disconnected. I also found that I needed to tap the lamp wires (module brown and black) near where the lamp bundle of wires joins the larger bundle of wires, if I tapped the wires near the lamp plug the module wires weren't long enough to stretch from the lamp to the push button.
I also just installed the module on my Q5. I'm not sure if my module is newer or older than the previous poster, but I only had five wires (no green), the yellow remains disconnected. I also found that I needed to tap the lamp wires (module brown and black) near where the lamp bundle of wires joins the larger bundle of wires, if I tapped the wires near the lamp plug the module wires weren't long enough to stretch from the lamp to the push button.
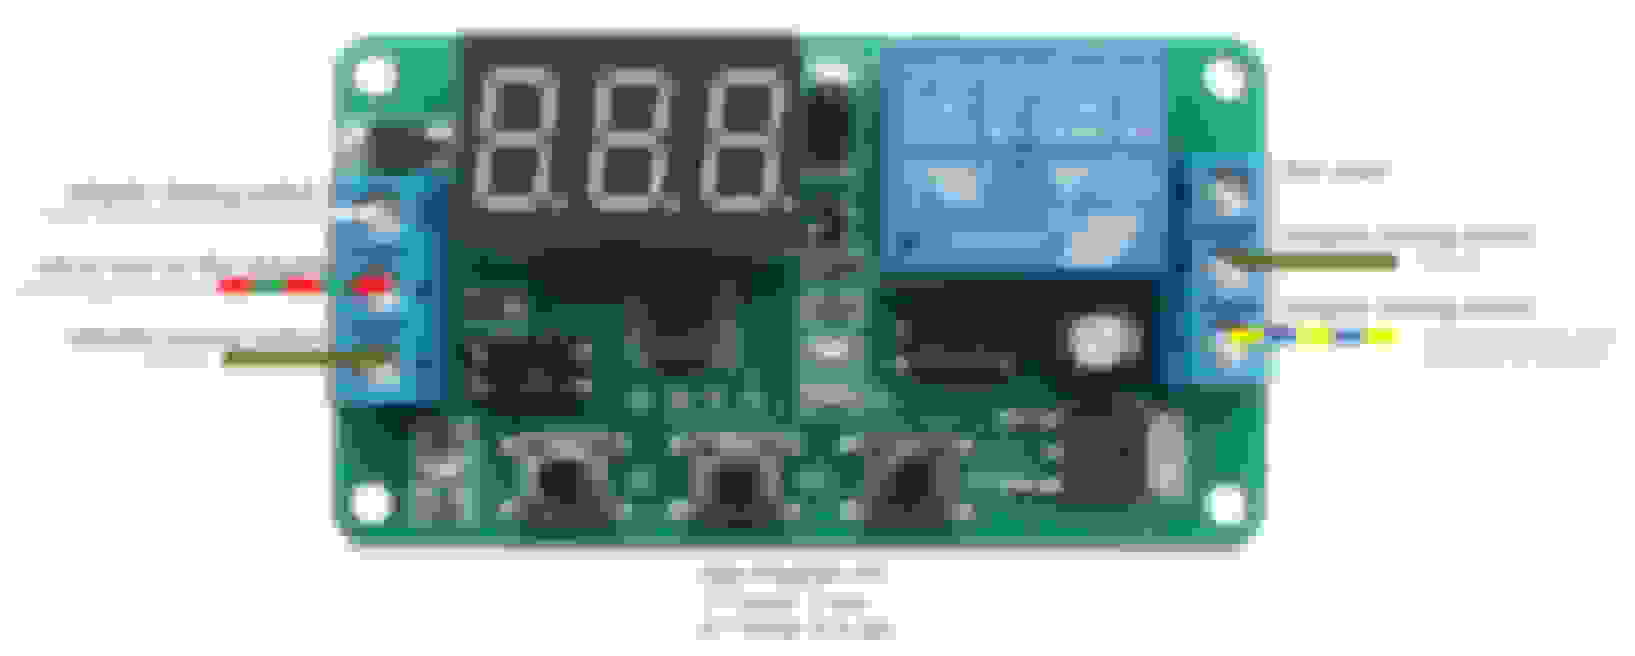
Just reviving this topic for those looking for a cheap solution. I like figuring things out and even $100 was too much to spend on a ready made solution. Based on the wiring tips here and in other threads I was able to make this work perfectly with just a timer relay off of amazon for $17. There are even cheaper ones which have the same functionality, but this particular one already had a casing and digital read out for programming. You need to be comfortable in basic electronics but it works in the end.
The wire connections is the same as outlined above, and I created a quick diagram on how to wire it up. The instructions from the manufacturer is in typical broken English translated from Chinese, but it was possible to make out how to program it the first time.
With this setup the module is only active when the cargo area lights are lit (about 5 minutes after opening the hatch).
 04-05-2015, 07:40 PM