B&O Subwoofer Upgrade Install Guide
 09-12-2010, 10:01 PM
#1
AudiWorld Member
Thread Starter
I think the B&O system sounds great but find the bass just a little bit lacking. I'm not looking for big, boomy bass, but I do want to hear all of the notes in my music, including the ones below 60hz.
After reading the following guides for the S5 and the improvement people were hearing after swapping out the stock B&O sub I decided to give it a go. The installation is pretty much the same, with a couple of minor differences I'll cover below.
https://www.audiworld.com/forums/sho...47&mode=linear
http://kmarei.homeip.net:8000/files/...%20Install.pdf
Results:
The new sub sounds substantially better. I could tell a difference right away. Much fuller, stronger bass that reaches all the way down. Very precise, not boomy or muddy. No rattles. The JL driver meshes well with the rest of the B&O speakers. It sounds like it belongs and doesn't stand out. I felt like the system was missing something before and don't feel that way now. If what you're after is crazy powerful bass, the kind they'll feel in the next car over, then this isn't for you. You would be better served by a separate amp and dedicated sealed sub. For anyone else looking to round out the already great system, I would recommend this highly.
The only shortcoming I've noticed is the JL sub needs a little more juice before it starts to move and push any air, so at really low volumes there is less bass than the stock sub. At low to normal volumes it's good. If using other subs I'd be sure to check their minimum power requirement. I believe the JL 10W1V2-8 I used is speced for 60W minimum. I'd be wary of using a more powerful sub like the 10W3v3-8.
Time:
The installation was reasonably easy. I would estimate about 2 hours to do it, taking your time with the trim removal and laying out lots of dynamat. I spent about 4 hours as I've never done this sort of thing before, had a car seat to remove and reinstall, took my time on everything, had fun checking out all the stuff behind the trim, and was needlessly too precise with the dynamat. So that's a good upper bound on time for this. If you're familiar with trim removal and dynamat installation you could probably get it down to an hour.
Parts:
- (1) 10" 8 ohm subwoofer. I used a JL Audio 10W1V2-8 as in the S5 post.
- (1) 4 sq. ft. roll of Dynamat Xtreme
- (1) short piece of 14 or 16 guage speaker wire, approx 6" in length
- (2) quick disconnects or wire nuts
- (3) machine screws #8-32 1/2" (i.e. bolts and nuts)
Tools:
- T25 torx bit and driver (I used a small side ratcheting one)
- short flat screwdriver
- paint can opener (or real trim removal tools if you have them)
- wire cutters/strippers
Installation:
Quick Overview - you'll need to remove the D-pillar covers, remove the B&O speaker grills, remove a few torx screws, remove the rear deck cover, swap the sub, lay some dynamat (optional, but highly recommended), wire it in, and put the trim back on.
Steps:
1. Drop the back seats down. You'll need to do this for easy access and to get at the rear deck cover lip.
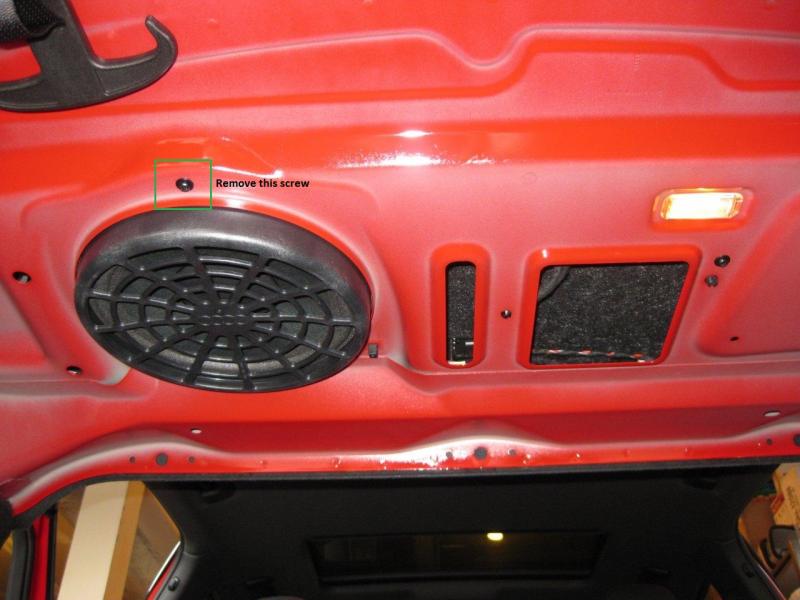
2. Remove the torx screw from the bottom of the stock sub, accessible from the trunk.
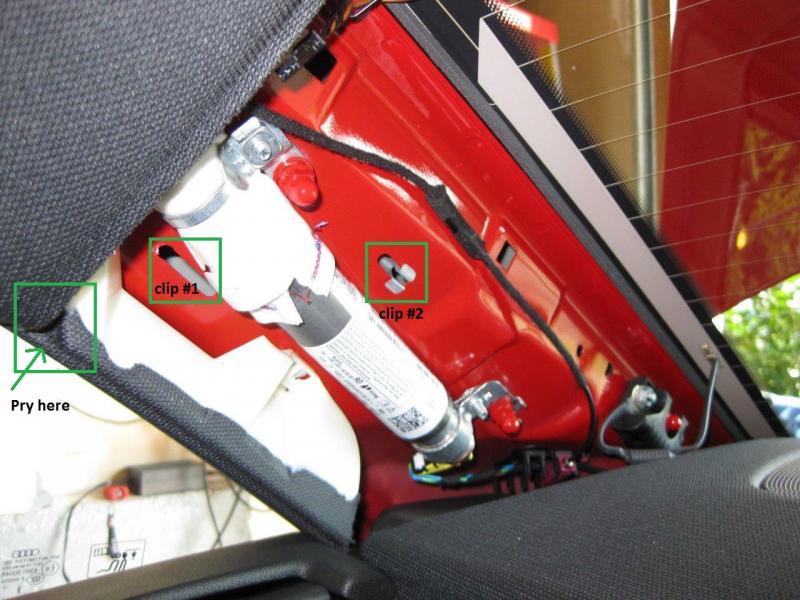
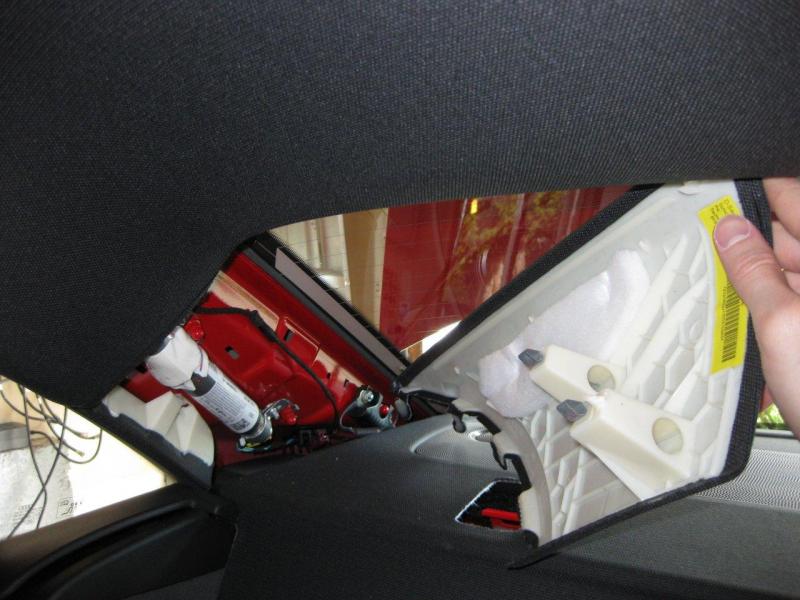
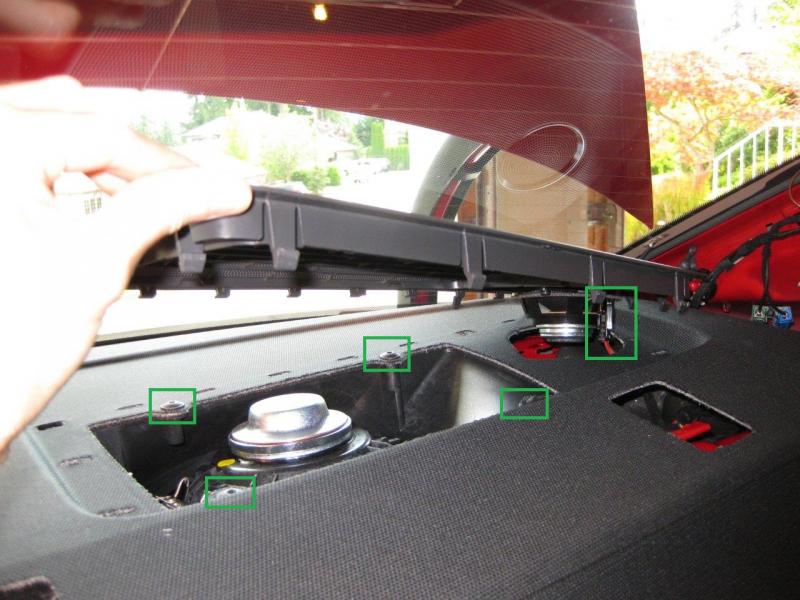
3. Remove the D-pillar covers. These are the farthest back pillars, right in front of the rear window. These must come off as there are 4 tabs that slot into the rear deck lid. There is a small notch at the top front of the cover where it meets the headliner that you can use to slip in a screwdriver to pry. Use a short one as you don't want to damage the airbag charge that's inside the pillar. Pry out slowly until the clips give way and the panel pops off. There are two clips inside that hold it in place. The middle clip came out on both of my covers but were easy to put back in.
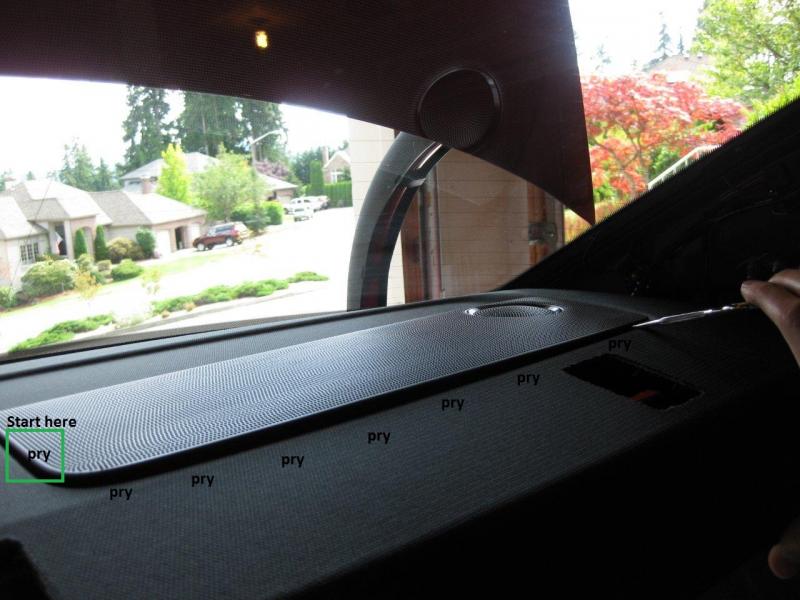
4. Remove the B&O speaker grills. You'll need to remove both the left and right to remove other screws holding the deck cover in place. I found that the tool you use to open paint cans was perfect for this. A screw driver would probably work as well. The goal is to gently pry up around the edge from one end to another until the whole thing pops out. CAUTION - the grill is very, very easily cracked. Go slow and gentle, don't flex it too much, and watch out in cold weather. The plastic could be even more brittle. If you should happen to crack it, it will probably not be noticeable once it's snapped back in place.
5. Remove the speaker wire from the tweeter (small speaker). Remove the 4 torx screws holding the deck cover to the subwoof housing.
(continued)
After reading the following guides for the S5 and the improvement people were hearing after swapping out the stock B&O sub I decided to give it a go. The installation is pretty much the same, with a couple of minor differences I'll cover below.
https://www.audiworld.com/forums/sho...47&mode=linear
http://kmarei.homeip.net:8000/files/...%20Install.pdf
Results:
The new sub sounds substantially better. I could tell a difference right away. Much fuller, stronger bass that reaches all the way down. Very precise, not boomy or muddy. No rattles. The JL driver meshes well with the rest of the B&O speakers. It sounds like it belongs and doesn't stand out. I felt like the system was missing something before and don't feel that way now. If what you're after is crazy powerful bass, the kind they'll feel in the next car over, then this isn't for you. You would be better served by a separate amp and dedicated sealed sub. For anyone else looking to round out the already great system, I would recommend this highly.
The only shortcoming I've noticed is the JL sub needs a little more juice before it starts to move and push any air, so at really low volumes there is less bass than the stock sub. At low to normal volumes it's good. If using other subs I'd be sure to check their minimum power requirement. I believe the JL 10W1V2-8 I used is speced for 60W minimum. I'd be wary of using a more powerful sub like the 10W3v3-8.
Time:
The installation was reasonably easy. I would estimate about 2 hours to do it, taking your time with the trim removal and laying out lots of dynamat. I spent about 4 hours as I've never done this sort of thing before, had a car seat to remove and reinstall, took my time on everything, had fun checking out all the stuff behind the trim, and was needlessly too precise with the dynamat. So that's a good upper bound on time for this. If you're familiar with trim removal and dynamat installation you could probably get it down to an hour.
Parts:
- (1) 10" 8 ohm subwoofer. I used a JL Audio 10W1V2-8 as in the S5 post.
- (1) 4 sq. ft. roll of Dynamat Xtreme
- (1) short piece of 14 or 16 guage speaker wire, approx 6" in length
- (2) quick disconnects or wire nuts
- (3) machine screws #8-32 1/2" (i.e. bolts and nuts)
Tools:
- T25 torx bit and driver (I used a small side ratcheting one)
- short flat screwdriver
- paint can opener (or real trim removal tools if you have them)
- wire cutters/strippers
Installation:
Quick Overview - you'll need to remove the D-pillar covers, remove the B&O speaker grills, remove a few torx screws, remove the rear deck cover, swap the sub, lay some dynamat (optional, but highly recommended), wire it in, and put the trim back on.
Steps:
1. Drop the back seats down. You'll need to do this for easy access and to get at the rear deck cover lip.
2. Remove the torx screw from the bottom of the stock sub, accessible from the trunk.
3. Remove the D-pillar covers. These are the farthest back pillars, right in front of the rear window. These must come off as there are 4 tabs that slot into the rear deck lid. There is a small notch at the top front of the cover where it meets the headliner that you can use to slip in a screwdriver to pry. Use a short one as you don't want to damage the airbag charge that's inside the pillar. Pry out slowly until the clips give way and the panel pops off. There are two clips inside that hold it in place. The middle clip came out on both of my covers but were easy to put back in.
4. Remove the B&O speaker grills. You'll need to remove both the left and right to remove other screws holding the deck cover in place. I found that the tool you use to open paint cans was perfect for this. A screw driver would probably work as well. The goal is to gently pry up around the edge from one end to another until the whole thing pops out. CAUTION - the grill is very, very easily cracked. Go slow and gentle, don't flex it too much, and watch out in cold weather. The plastic could be even more brittle. If you should happen to crack it, it will probably not be noticeable once it's snapped back in place.
5. Remove the speaker wire from the tweeter (small speaker). Remove the 4 torx screws holding the deck cover to the subwoof housing.
(continued)
Last edited by Brandonb; 01-22-2011 at 10:19 PM.
 09-12-2010, 10:14 PM
#2
AudiWorld Member
Thread Starter
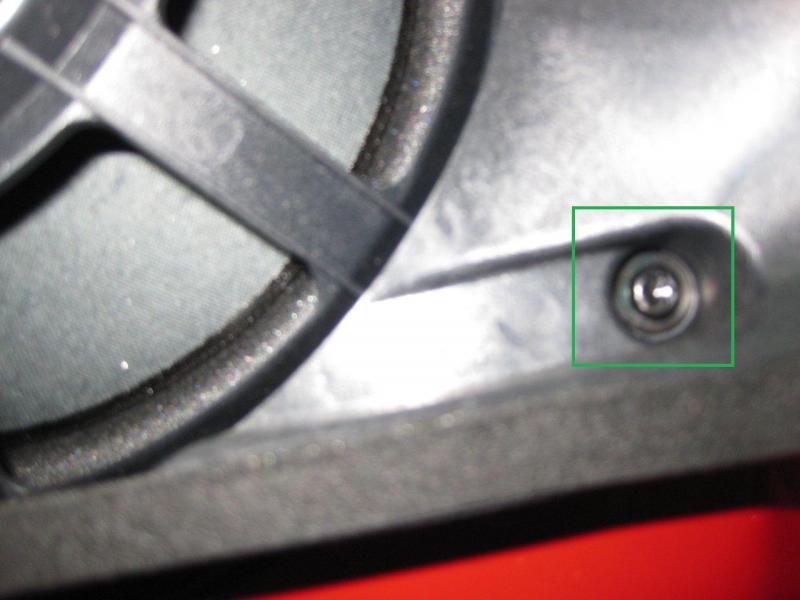
6. Remove the torx screw under the left speaker grill. This holds the deck cover on to a support bracket below. The S5 did not appear to have this support bracket and extra screw.
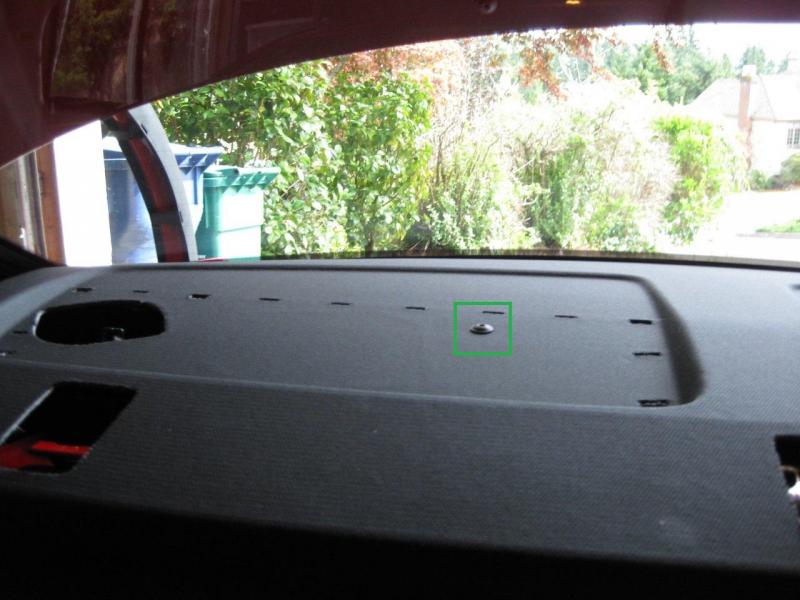
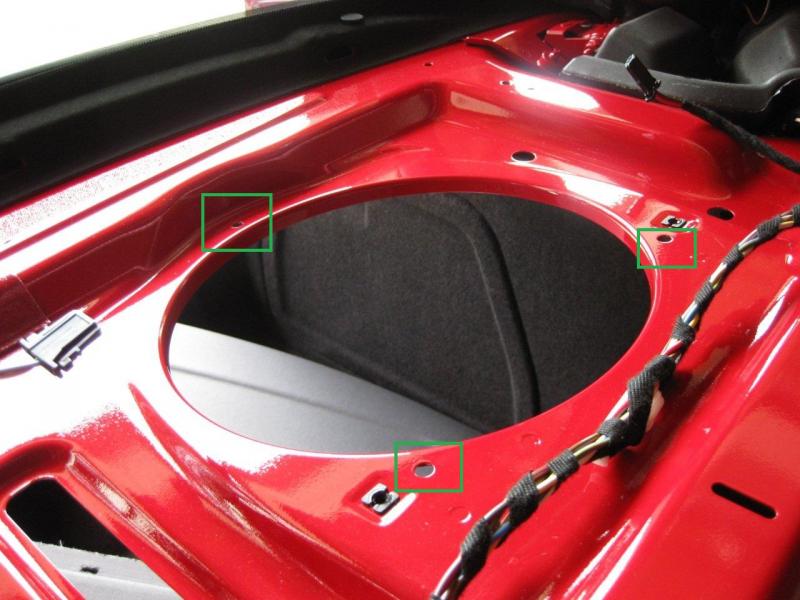
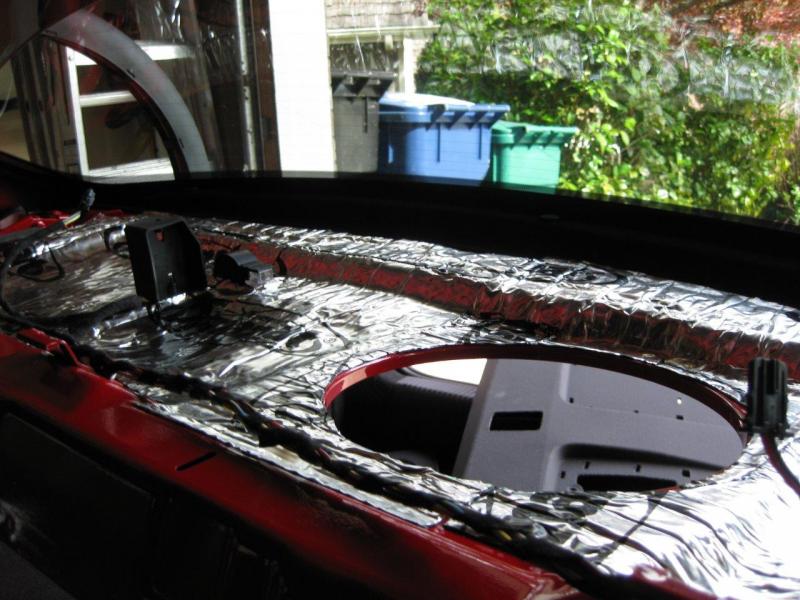
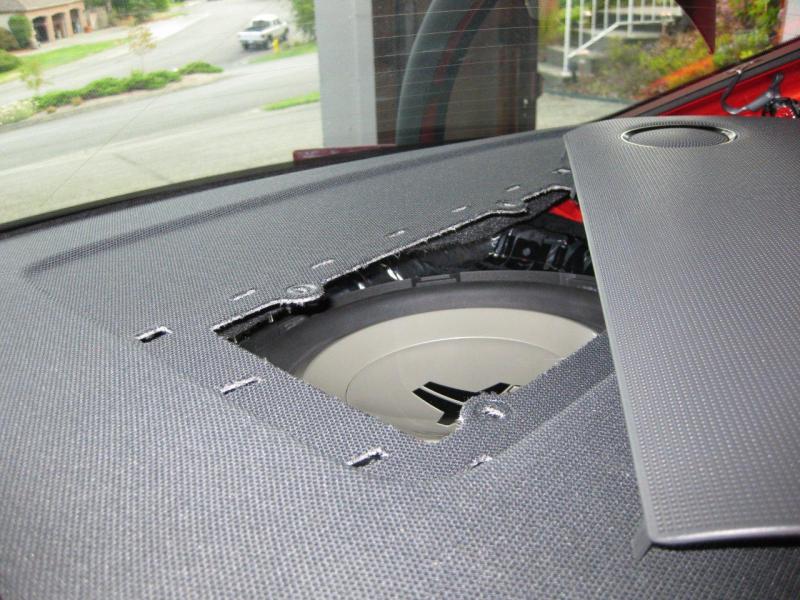
7. The deck cover should now be free to remove. There are four clips holding it in along the front of deck, where the seat backs lean up against it. I found it easiest to lay down across the folded down seats and push up against the front of the deck cover. It took a little more force than I would have guessed. Pop each one off from one side to the other. In this picture the middle two clips points are highlighted.
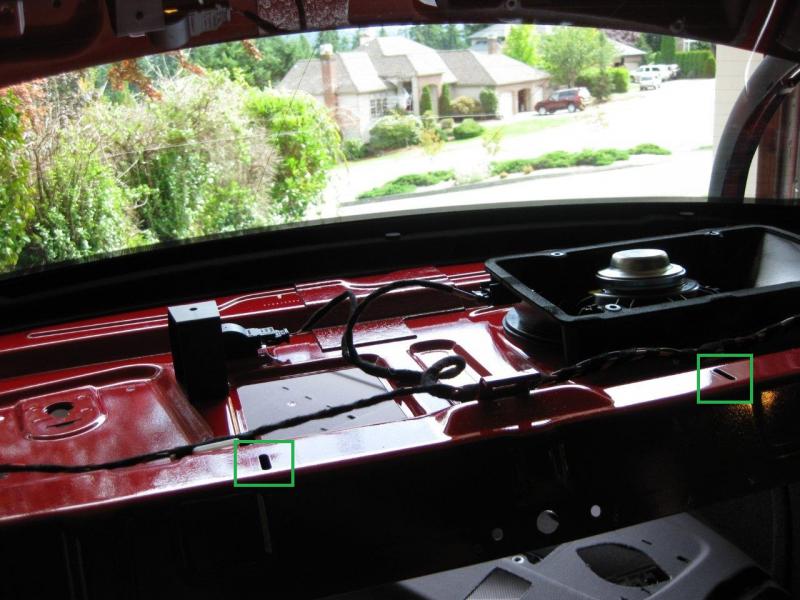
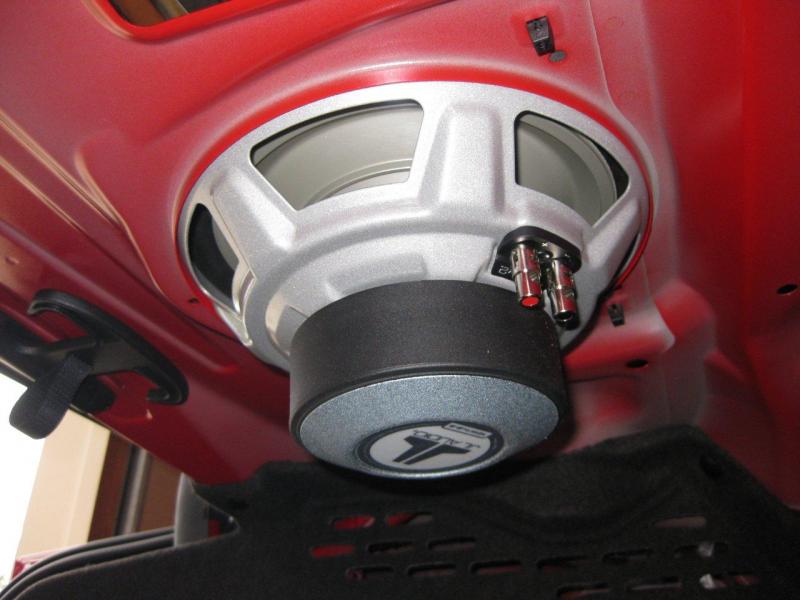
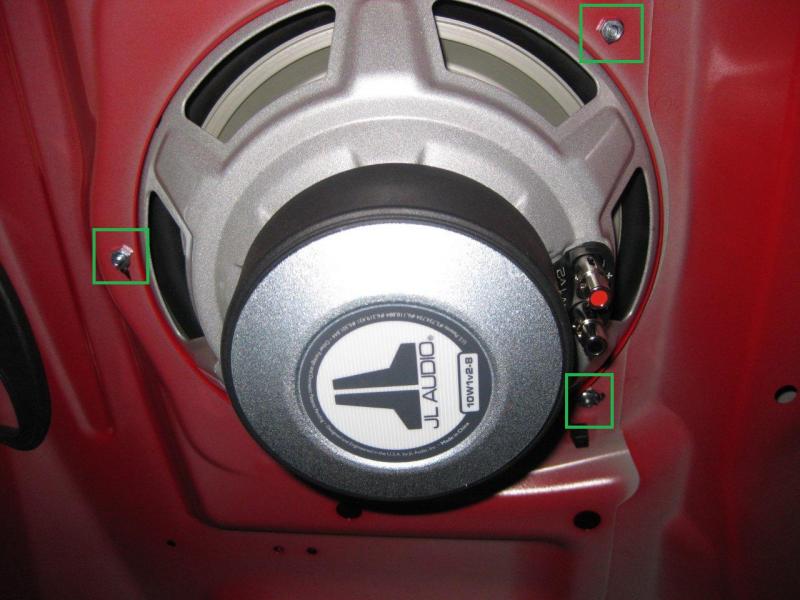
8. There are two torx screws down inside the front of the sub housing. Remove these and the housing should lift out. Disconnect the speaker wire.
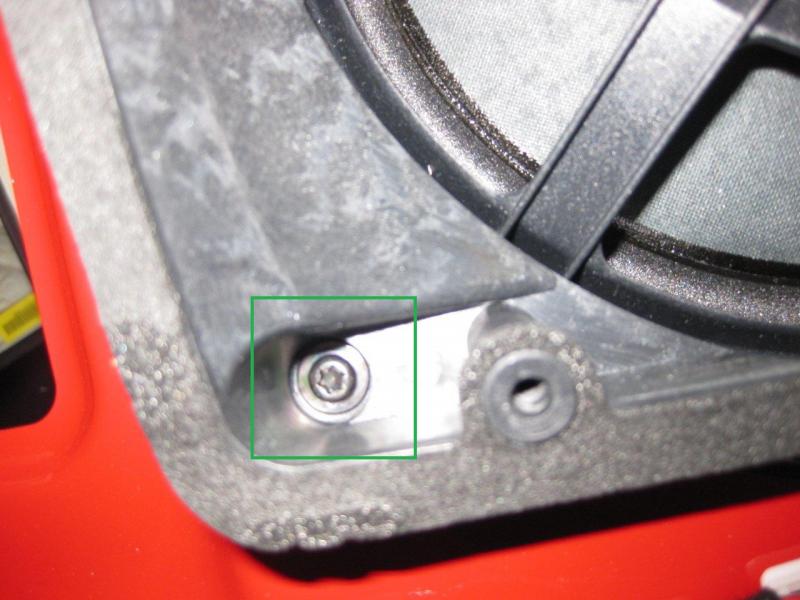
9. The new sub drops right in the hole from the old sub. There are 3 screw holes around the housing that line up perfectly with the mounting holes in the new JL sub.
(continued)
7. The deck cover should now be free to remove. There are four clips holding it in along the front of deck, where the seat backs lean up against it. I found it easiest to lay down across the folded down seats and push up against the front of the deck cover. It took a little more force than I would have guessed. Pop each one off from one side to the other. In this picture the middle two clips points are highlighted.
8. There are two torx screws down inside the front of the sub housing. Remove these and the housing should lift out. Disconnect the speaker wire.
9. The new sub drops right in the hole from the old sub. There are 3 screw holes around the housing that line up perfectly with the mounting holes in the new JL sub.
(continued)
09-12-2010, 10:21 PM
#3
AudiWorld Member
Thread Starter
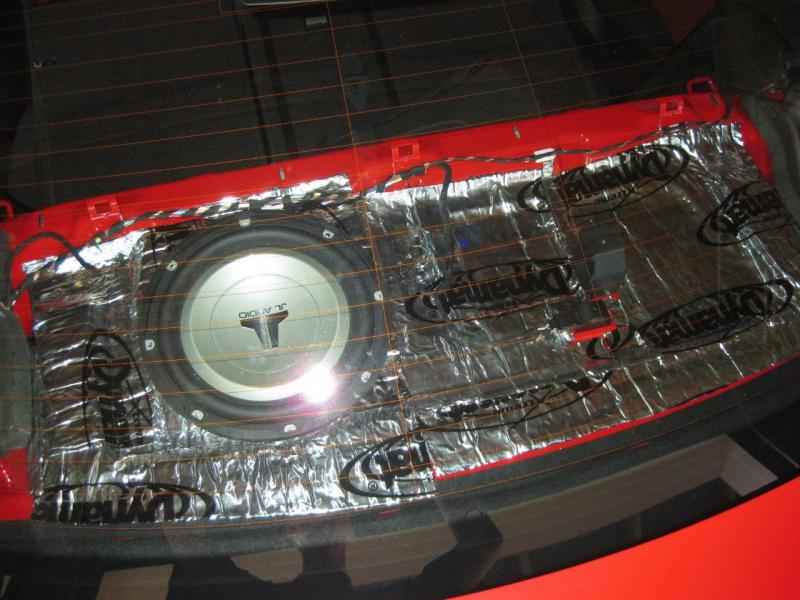
Here are some more shots of the sub in place, before I pulled it back out to apply the dynamat.
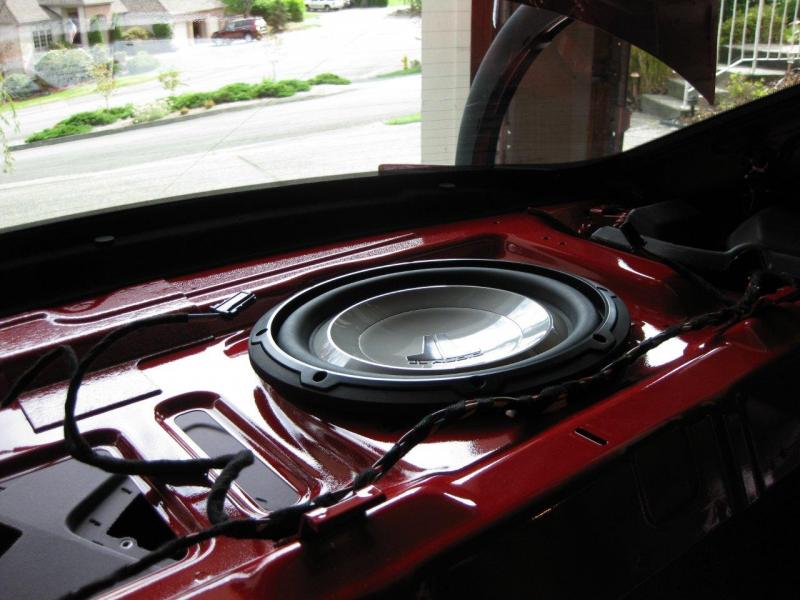
10. Time to apply some dynamat. You want to make sure all holes are covered and that the dynamat sticks to the metal everywhere it's applied (no air bubbles) otherwise it won't be effective. Close the truck lid and look under the rear deck for light coming in.
(continued)
10. Time to apply some dynamat. You want to make sure all holes are covered and that the dynamat sticks to the metal everywhere it's applied (no air bubbles) otherwise it won't be effective. Close the truck lid and look under the rear deck for light coming in.
(continued)
09-12-2010, 10:44 PM
#4
AudiWorld Member
Thread Starter
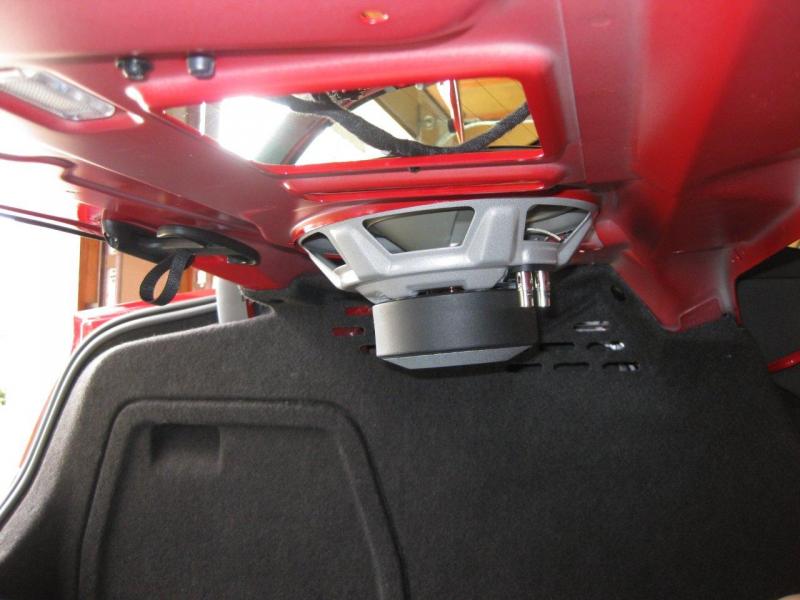
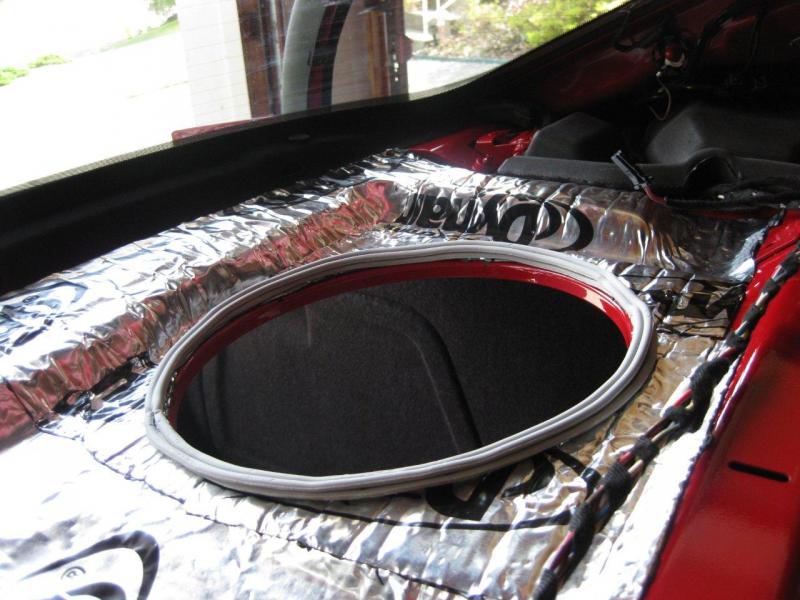
11. I noticed the lip of the new sub didn't quite set flush against the deck even with a layer of dynamat on it. The hole for the sub is just a tad bit too small. So I decided to build up a little rim for it to set down on using some sticky rope caulk I had laying around. The picture shows it stacked two high, but that proved to be too much, so I removed the top ring. You could probably skip this step as the sub seals against the hole really well, or just build up the dynamat around there a bit thicker.
12. Bolt the sub in place using #8-32 1/2" (or longer) machine screws. There are three holes that line up with the mounting holes in the sub. I didn't feel a need to drill additional holes.
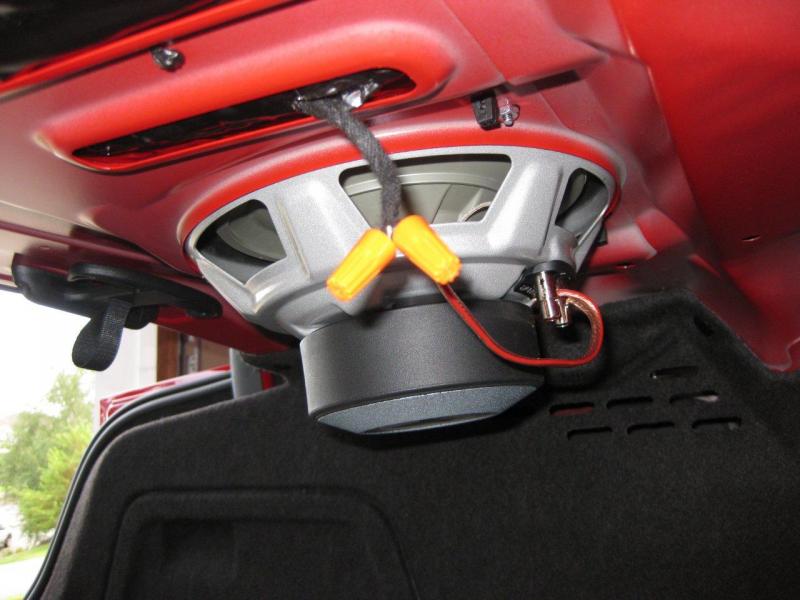
13. Wire the new sub in. I opted to cut the factory harness off and patch the wires in using a short run of cable. I had wire nuts handy, but will probably replace them with some automotive quick disconnects later and tie the cable up against the deck for a neater appearance. If you rotate the sub 90 degrees clockwise you might be able to get the factory wires to reach without a jumper, but I didn't want to expose the terminals to the trunk where they could get damaged. In one of the S5 write-ups someone worked out that you could grind down some spades to mate up with the factory harness. [edit from sworksone] You could also split the sub wire off from the tweeter and trunk light wiring harness to have more slack to pull it into the trunk and wire it to the sub directly.
NOTE ON POLARITY - Technically you should wire the new sub with the polarity reversed versus the stock sub as it faces the other way. However, I couldn't find any markings for polarity on the stock sub so it was a guess and test game. I found that wiring the blue/yellow factory wire to the red terminal was the correct polarity. If you wire it up the other way the bass cancels out and it's really obviously bad.
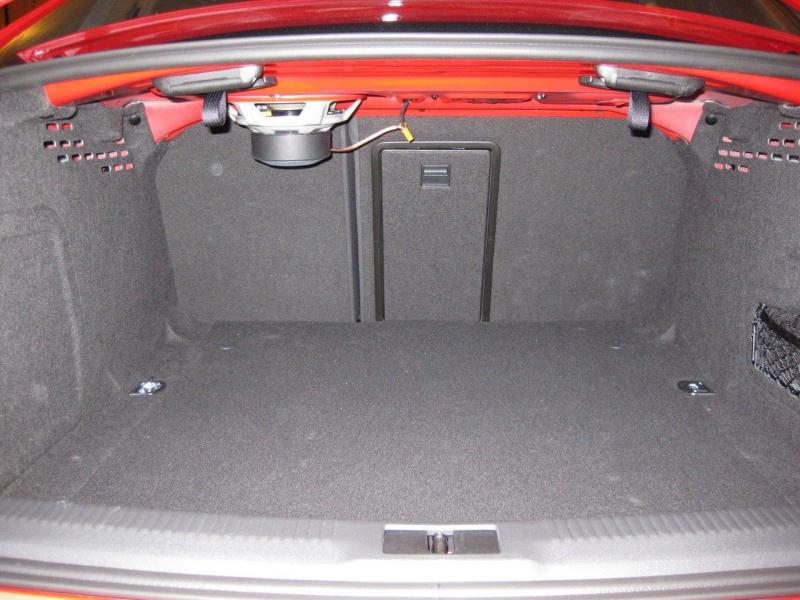
14. Put the deck cover back in place. You can see that there's plenty of clearance for the new sub. Don't forget to re-attach the speaker wires for the tweeters and screw back into the center support bracket. Push down along the front to pop the 4 clips back in.
15. Push the B&O speaker grills back into place.
16. Slot the 4 tabs in the D-pillar covers back into the deck cover and pop them back into place.
17. Enjoy your new sub!
12. Bolt the sub in place using #8-32 1/2" (or longer) machine screws. There are three holes that line up with the mounting holes in the sub. I didn't feel a need to drill additional holes.
13. Wire the new sub in. I opted to cut the factory harness off and patch the wires in using a short run of cable. I had wire nuts handy, but will probably replace them with some automotive quick disconnects later and tie the cable up against the deck for a neater appearance. If you rotate the sub 90 degrees clockwise you might be able to get the factory wires to reach without a jumper, but I didn't want to expose the terminals to the trunk where they could get damaged. In one of the S5 write-ups someone worked out that you could grind down some spades to mate up with the factory harness. [edit from sworksone] You could also split the sub wire off from the tweeter and trunk light wiring harness to have more slack to pull it into the trunk and wire it to the sub directly.
NOTE ON POLARITY - Technically you should wire the new sub with the polarity reversed versus the stock sub as it faces the other way. However, I couldn't find any markings for polarity on the stock sub so it was a guess and test game. I found that wiring the blue/yellow factory wire to the red terminal was the correct polarity. If you wire it up the other way the bass cancels out and it's really obviously bad.
14. Put the deck cover back in place. You can see that there's plenty of clearance for the new sub. Don't forget to re-attach the speaker wires for the tweeters and screw back into the center support bracket. Push down along the front to pop the 4 clips back in.
15. Push the B&O speaker grills back into place.
16. Slot the 4 tabs in the D-pillar covers back into the deck cover and pop them back into place.
17. Enjoy your new sub!
Last edited by Brandonb; 09-19-2010 at 09:39 AM.
The following users liked this post:
Rutendo Saunyama (08-13-2020)
09-12-2010, 11:17 PM
#5
Thanks for your great write-up! I will definitely go the same route. I could not find any info about the JL sub being suitable for infinite baffle installation, so even though it works, it's possible that there are other subs. Also wondering if adding a dedicated and more powerful amp for the sub would produce better results.
09-13-2010, 05:00 AM
#7
Thanks for your great write-up! I will definitely go the same route. I could not find any info about the JL sub being suitable for infinite baffle installation, so even though it works, it's possible that there are other subs. Also wondering if adding a dedicated and more powerful amp for the sub would produce better results.
With a more powerful amp, the only thing you'd really do, IMO, is possibly blow the sub. Power handling will not be as high as the sub is rated for with that much air space behind it, although sealing the rear with dynamat drastically helps in this regard. If you wanted to use a dedicated amp, you'd have to have a sub with both high power handling, lower sensitivity, and longer throw. Sensitivity is the reason that JL sub is reported to not do as well at low volumes, so any of you looking at other subs to fix this, try to find something with higher sensitivity.
Trending Topics
09-13-2010, 05:19 AM
#8
AudiWorld Super User

Join Date: Mar 2000
Posts: 15,951
Likes: 0
Received 0 Likes
on
0 Posts
Wow... great job but the only issue I see is that the speaker comes to far down into the trunk space. And with the S4 already having limited deck clearance I personally wouldn't do this mod.
09-13-2010, 07:02 AM
#9
11. I noticed the lip of the new sub didn't quite set flush against the deck even with a layer of dynamat on it. The hole for the sub is just a tad bit too small. So I decided to build up a little rim for it to set down on using some sticky rope caulk I had laying around. The picture shows it stacked two high, but that proved to be too much, so I removed the top ring. You could probably skip this step as the sub seals against the hole really well, or just build up the dynamat around there a bit thicker.
http://www.eliteinstallersupply.com/...roducts_id=184
09-13-2010, 07:15 AM
#10
AudiWorld Super User
Great DIY and writeup Brandon! We'll have to arrange a meet and do a sound comparison. I'm sure having an independant amp and driver will make mine louder, but that is not the point (for me anyway). If I could get better low end fill from something that doesn't require a box in my trunk I am all for it. I could care less if I rattle the car next to mine.