
 08-22-2016, 03:07 PM
Last edit by: IB Advertising
See related guides and technical advice from our community experts:
- Audi A4 B8 How to Install Radar Detector<br>Step by step instructions for do-it-yourself repairs.

Detector install w/power from overhead console
04-19-2011, 11:27 AM
#1
AudiWorld Super User

Thread Starter
Here's a simple way of installing your detector via power in the overhead console. Credit to forum brother Elevens for posting much the same on the Q5 forum.
(I've got three brands of detectors: V1, BEL and a couple of Escorts. All my detectors can use this connection with the exception of an original Passport I have from the 1980s.)
You're going to need a few basic items including a hardwire power kit often included with the purchase of a new detector. I see these on eBay for $10. It will make the job very quick. I fabricated my own including the 1A fuse.
Executive Summary:
In-depth look:
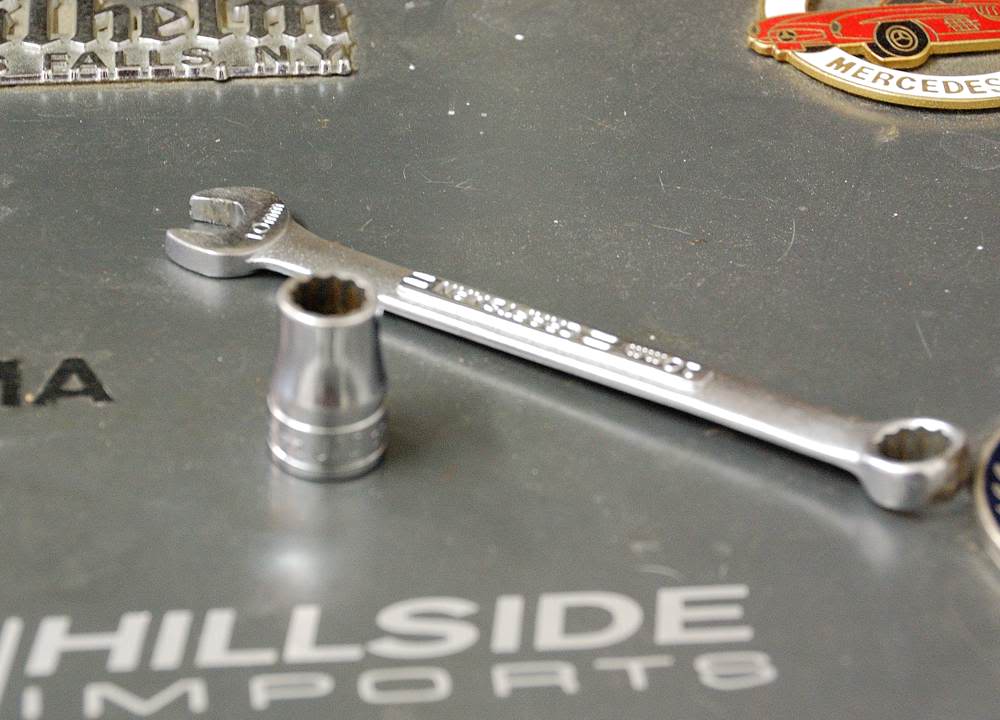
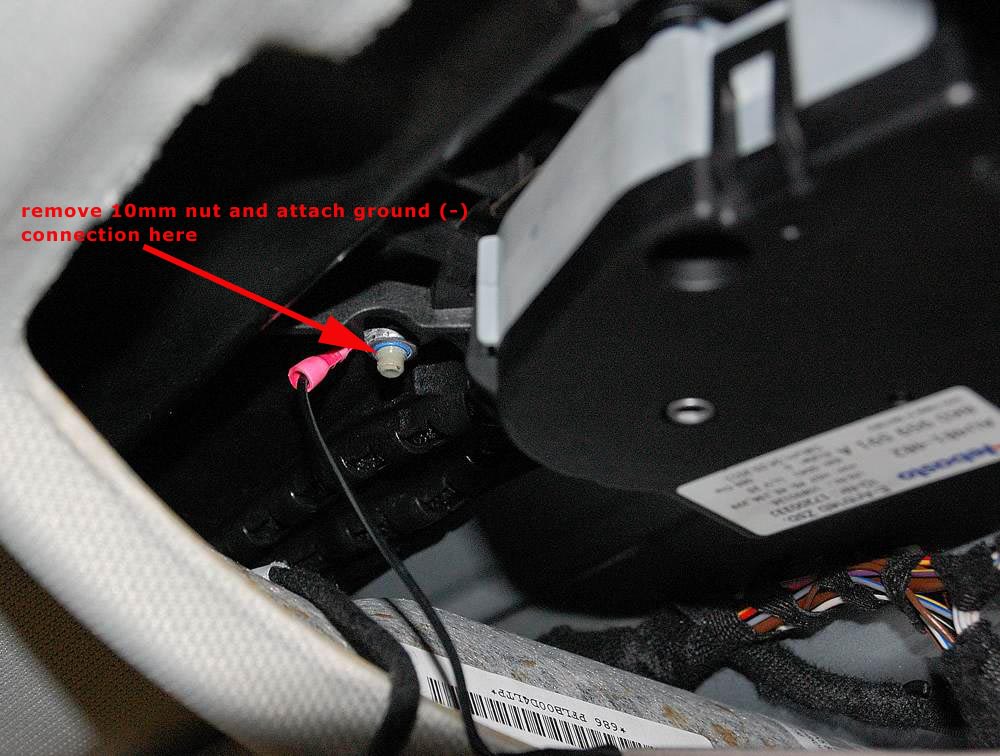
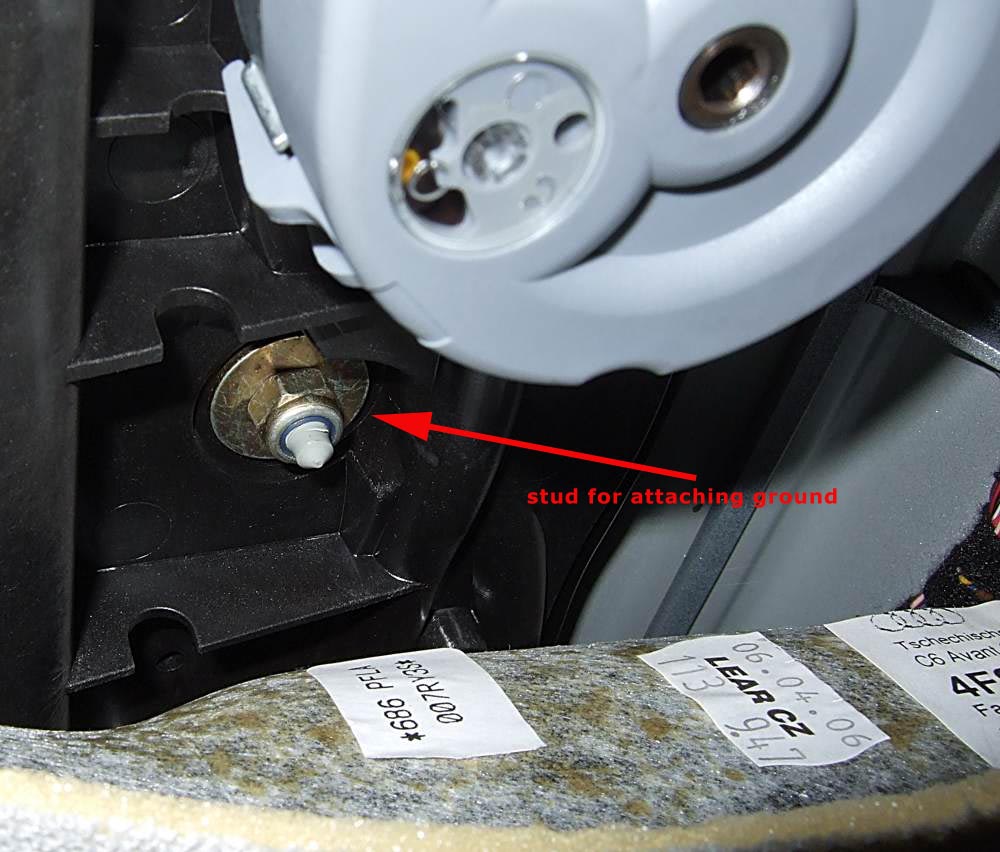
You will need either a 10mm wrench or a 10mm socket to remove the nut when connecting the ground (-) lead to the stud.
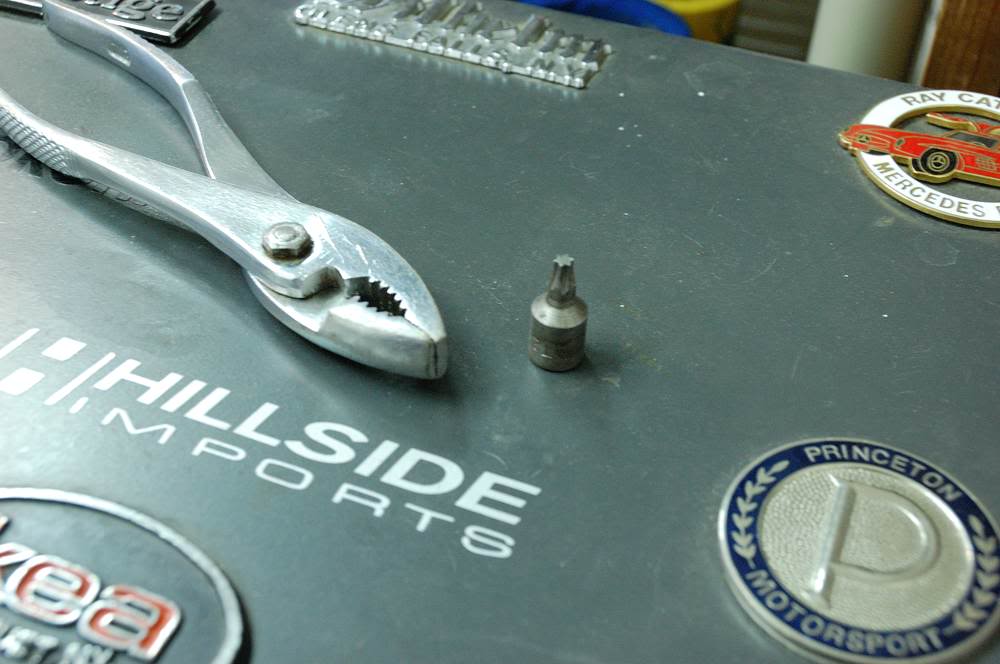
You will need pliers (to crimp Quik-tap) and a T25 Torx bit. I know you can find the Torx tools at Autozone, etc. I've seen single Torx drivers (looks like a screwdriver) at auto parts stores. You could buy just the T25 driver. You would find all these tools at Sears, too. These items are common.
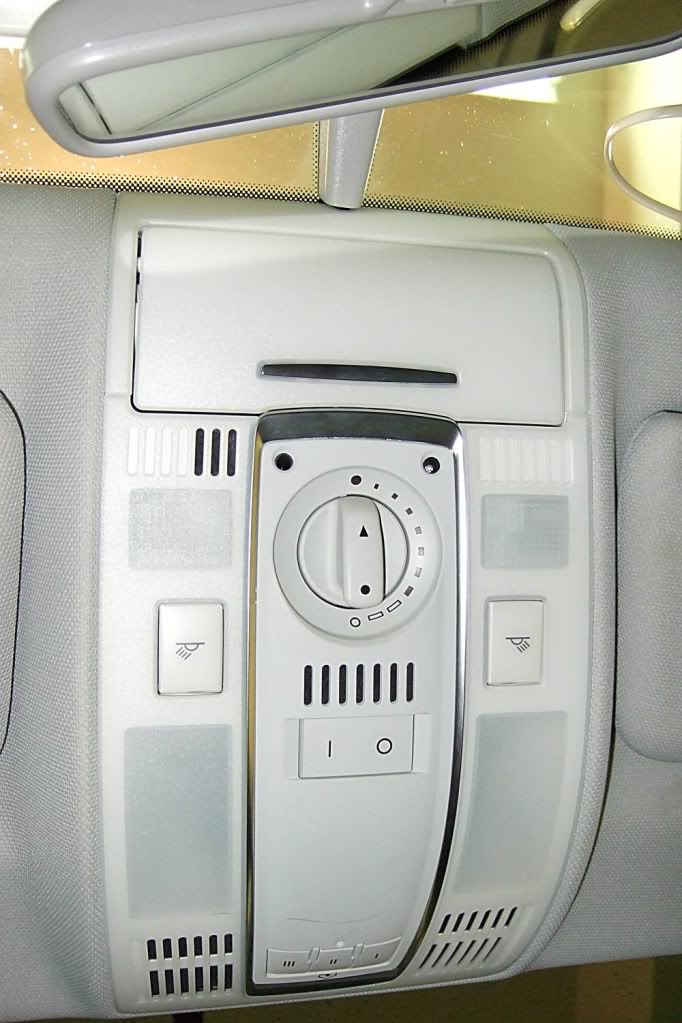
You need to get into the sunglass compartment to remove the T25 fastener:
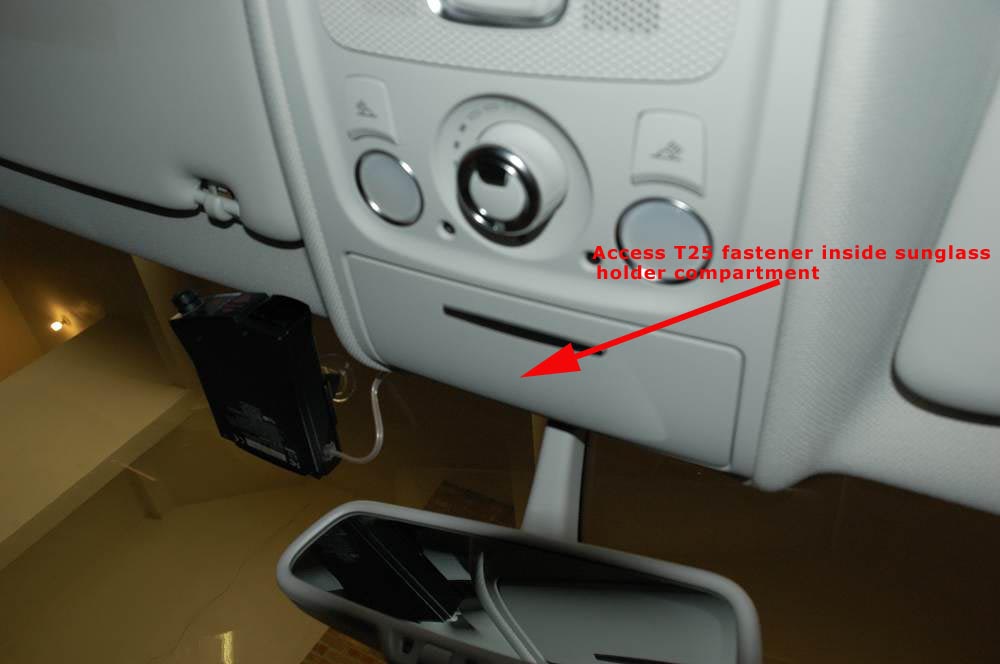
Remove fastener:
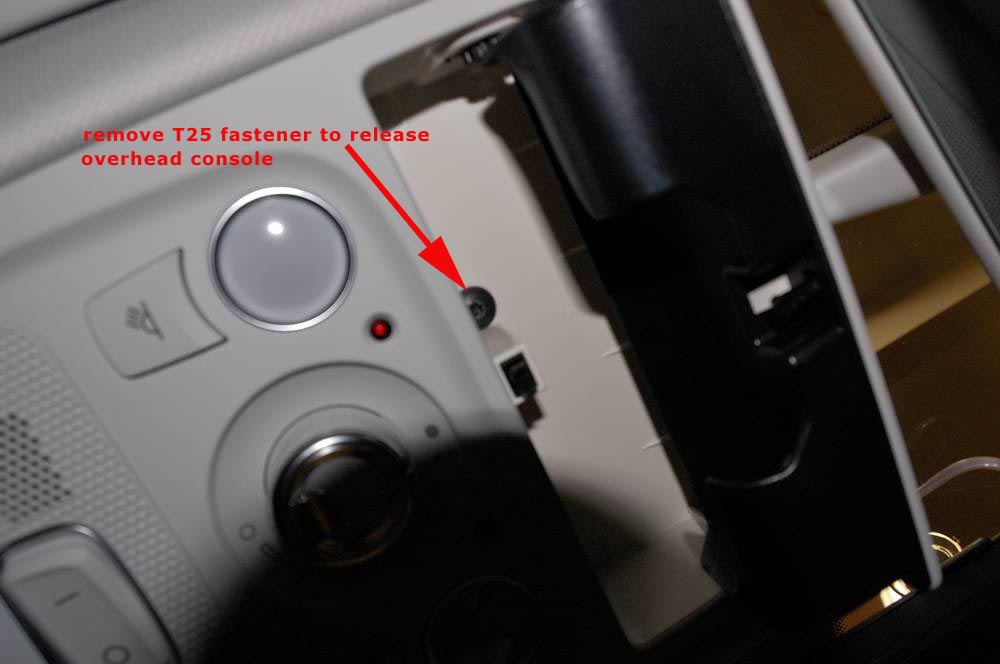
T25 fastener:

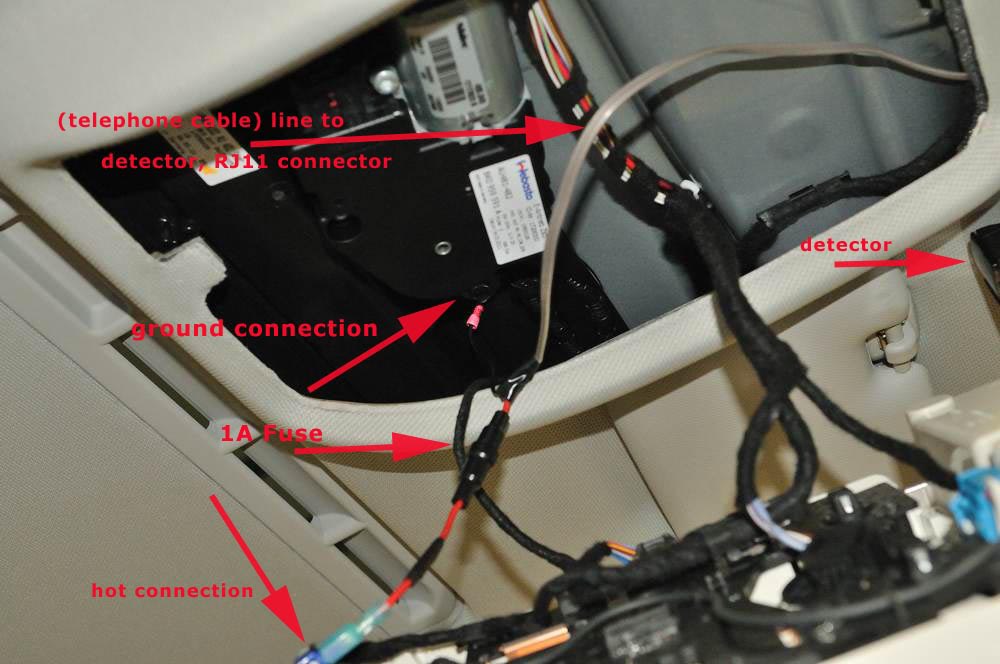
After you pull the console down, you'll see the HomeLink module at the rear edge. Locate the white/black wire, that's the hot lead and it is switched.
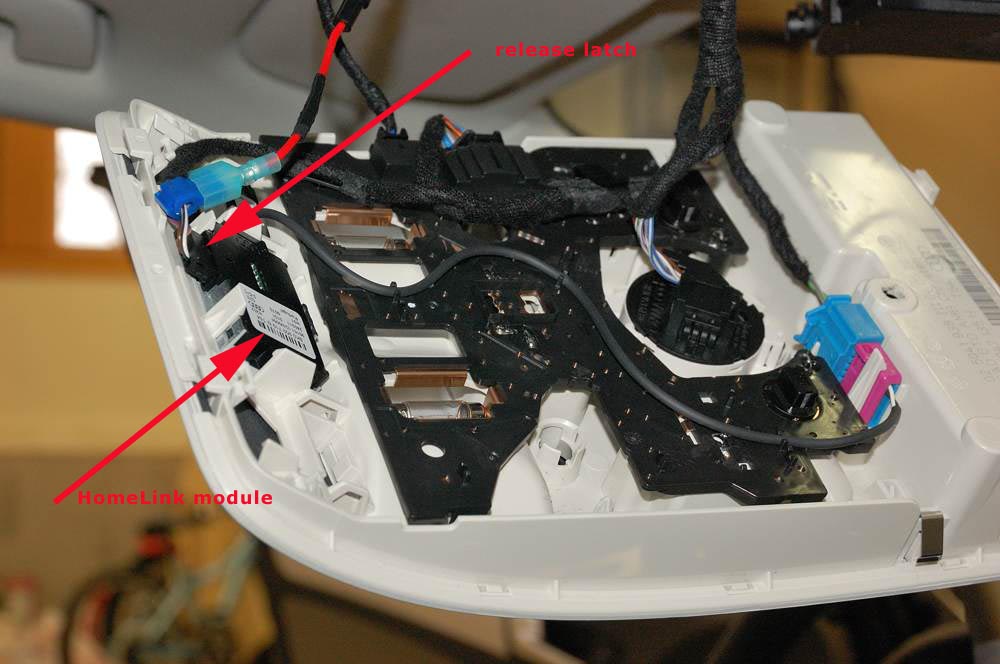
You will likely need to strip or push back an inch or two of the soft cloth wrap that bundles the wires. Use small scissors or a fresh razor blade (careful !!) I found the job a bit easier when I released the connector from the HomeLink module by depressing the tiny release latch (see photo above):
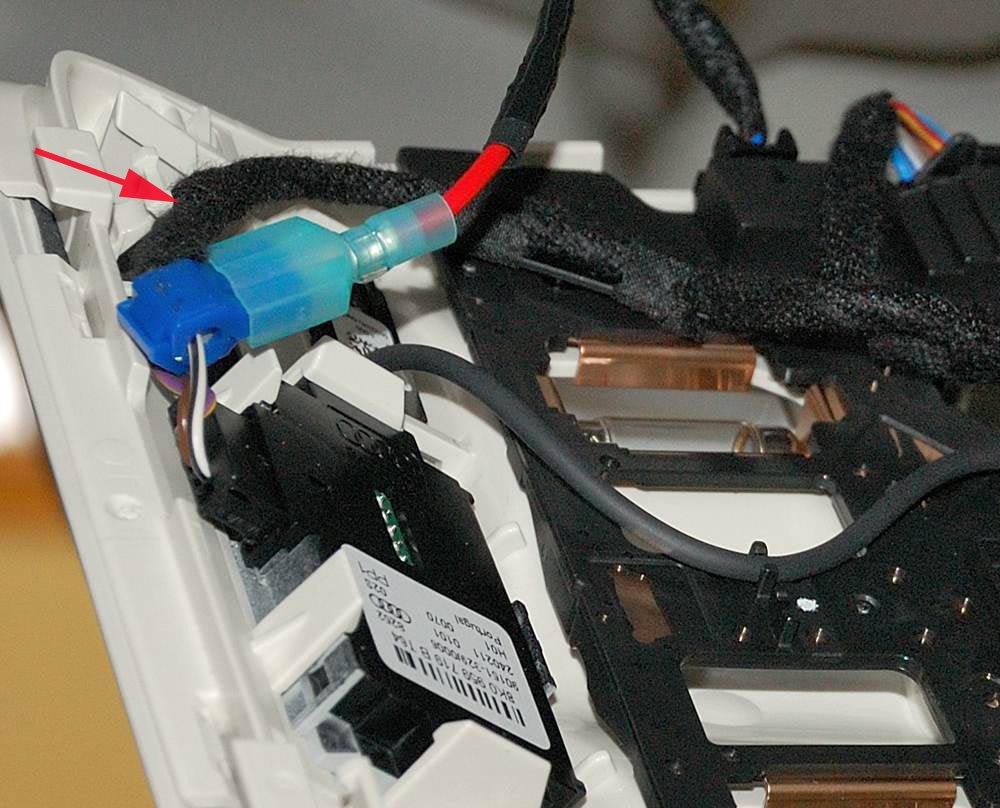
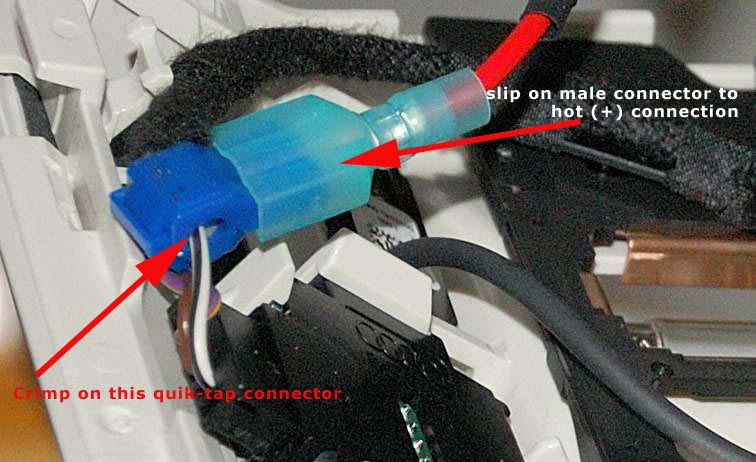
You will crimp the Quik-tap on the black/white hot lead, try to lay it flat against the console when you crush it on with the pliers - - you don't want it sticking up because it will interfere when you re-fit the console. Push on the male connector and complete the hot (+) connection:
Remove the 10mm nut from the stud and attach your ground (-) connection:
Get your wires tucked in. There's plenty of space available in the headliner to hide bundles of wires, if needed. (I keep my runs very short, but I've got the RJ11 crimping tool and virgin RJ11 jacks so I can attach a new connector) Run your wire between the headliner and the windshield and you're basically done. This should not take more than 15 or 20 mins. Enjoy!
Maybe we can keep track of what vehicles this technique applies to. My car is a B8 and we know the Q5 is the same. I'll look at my wife's C6 car tonight. Can people post after they've looked at their own vehicles? Thx.
(I've got three brands of detectors: V1, BEL and a couple of Escorts. All my detectors can use this connection with the exception of an original Passport I have from the 1980s.)
You're going to need a few basic items including a hardwire power kit often included with the purchase of a new detector. I see these on eBay for $10. It will make the job very quick. I fabricated my own including the 1A fuse.
Executive Summary:
In-depth look:
You will need either a 10mm wrench or a 10mm socket to remove the nut when connecting the ground (-) lead to the stud.
You will need pliers (to crimp Quik-tap) and a T25 Torx bit. I know you can find the Torx tools at Autozone, etc. I've seen single Torx drivers (looks like a screwdriver) at auto parts stores. You could buy just the T25 driver. You would find all these tools at Sears, too. These items are common.
You need to get into the sunglass compartment to remove the T25 fastener:
Remove fastener:
T25 fastener:
After you pull the console down, you'll see the HomeLink module at the rear edge. Locate the white/black wire, that's the hot lead and it is switched.
You will likely need to strip or push back an inch or two of the soft cloth wrap that bundles the wires. Use small scissors or a fresh razor blade (careful !!) I found the job a bit easier when I released the connector from the HomeLink module by depressing the tiny release latch (see photo above):
You will crimp the Quik-tap on the black/white hot lead, try to lay it flat against the console when you crush it on with the pliers - - you don't want it sticking up because it will interfere when you re-fit the console. Push on the male connector and complete the hot (+) connection:
Remove the 10mm nut from the stud and attach your ground (-) connection:
Get your wires tucked in. There's plenty of space available in the headliner to hide bundles of wires, if needed. (I keep my runs very short, but I've got the RJ11 crimping tool and virgin RJ11 jacks so I can attach a new connector) Run your wire between the headliner and the windshield and you're basically done. This should not take more than 15 or 20 mins. Enjoy!
Maybe we can keep track of what vehicles this technique applies to. My car is a B8 and we know the Q5 is the same. I'll look at my wife's C6 car tonight. Can people post after they've looked at their own vehicles? Thx.
Last edited by uberwgn; 04-19-2011 at 02:20 PM.


 04-19-2011, 12:06 PM
#3
AudiWorld Super User
Thread Starter
Thanks.
Valentine 1 is direct sales only.
Valentine 1 is direct sales only.
04-19-2011, 01:37 PM
#4
AudiWorld Senior Member

Join Date: Dec 2003
Posts: 1,610
Likes: 0
Received 0 Likes
on
0 Posts
Very cool. This is similar to what I did with my old B6 and a Passport 8500. I routed the cable down the A pillar but the idea was similar. You can check it out on my blog www.diyaudi.com
 04-19-2011, 02:34 PM
#6
AudiWorld Member
Join Date: Sep 2009
Location: Atlanta / GA
Posts: 205
Likes: 0
Received 0 Likes
on
0 Posts
thanks for passing that along! I'd be curious to see if anyone's put together a more concealed way to attach the detector, perhaps to the rear mirror. regardless, this is great progress.
04-19-2011, 02:38 PM
#7
AudiWorld Super User
Thread Starter
Bob, there are mounts that attach to the RVM. I don't know how good they are. I think I've seen a few pictures posted here.
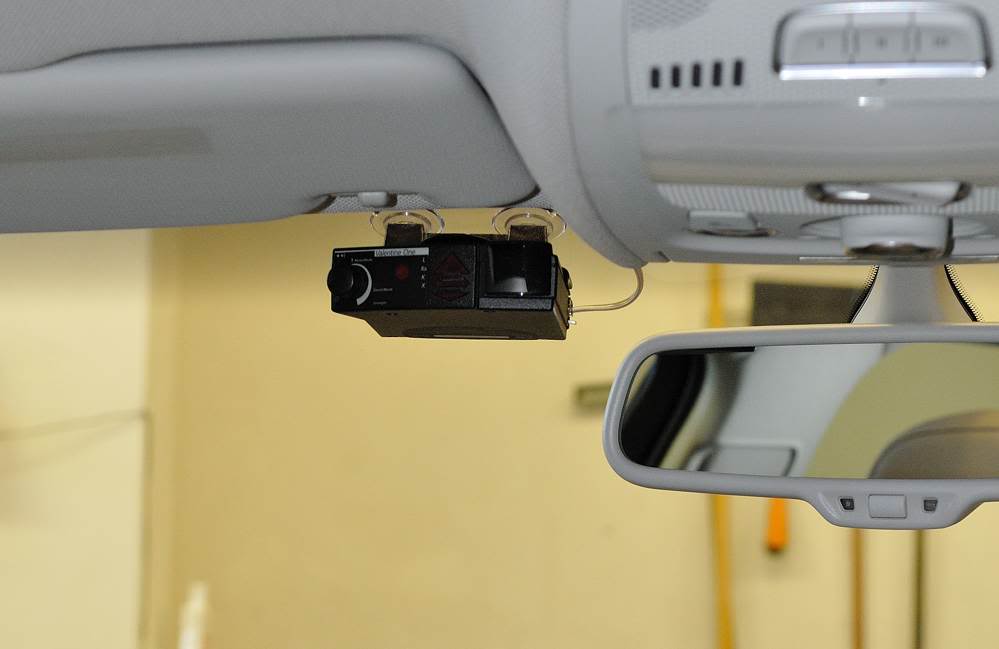
I like the device up high and somewhat shielded behind the tint. It's not (completely) obvious when you walk by the vehicle, seems to add just a bit of security.
I like the device up high and somewhat shielded behind the tint. It's not (completely) obvious when you walk by the vehicle, seems to add just a bit of security.
Trending Topics
04-19-2011, 04:13 PM
#8
AudiWorld Super User
Thread Starter
I checked our 2006 C6 tonight and the job is similar, removing the overhead panel is not as simple and the HomeLink module is different, 5 wires feeding it vs 3 on my B8. The stud for attaching ground is identical.
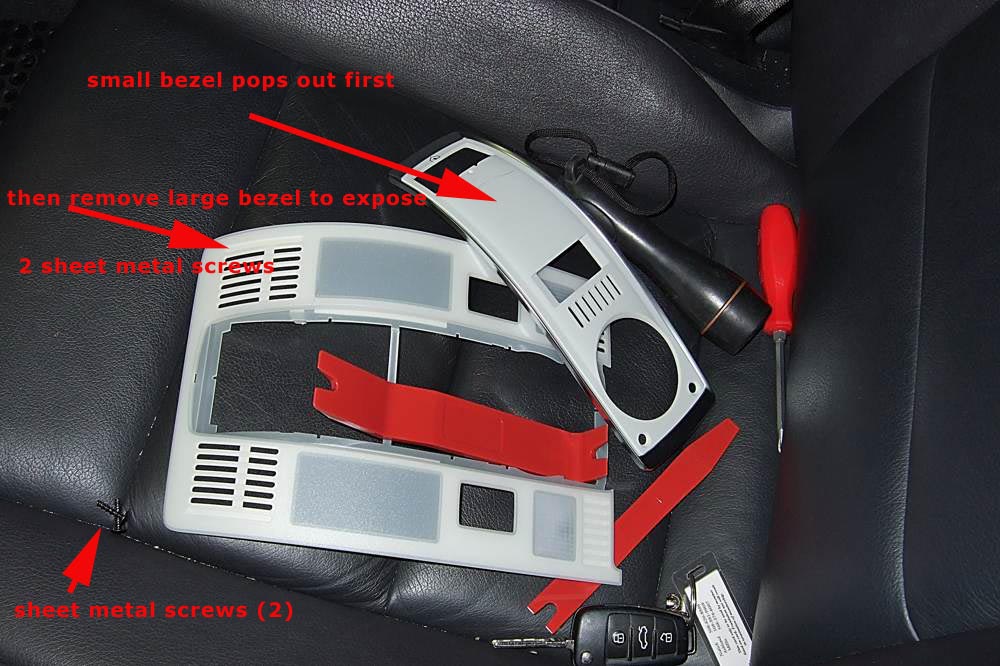
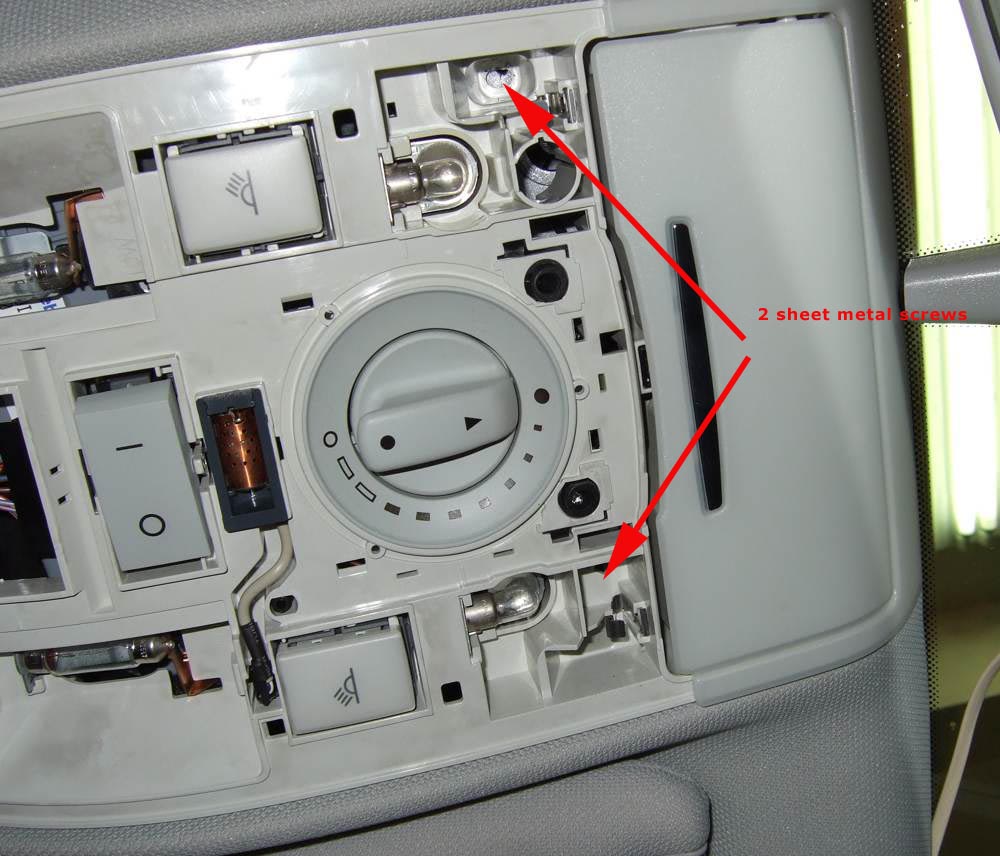
smaller bezel is removed first, large bezel comes out next revealing two phillips sheet metal screws which are removed (note cheap plastic pry tools found on eBay for a couple of bux, priceless ):
):
HomeLink module, 5 wires, color coding is different:
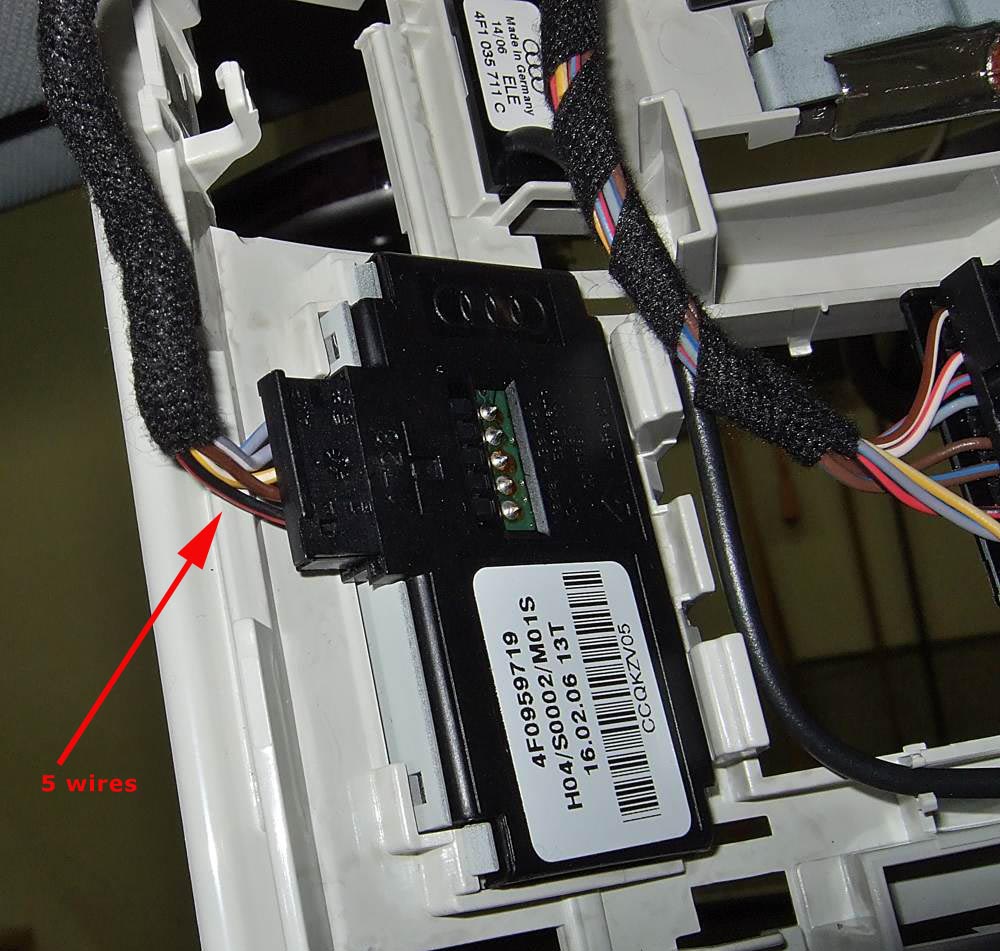
The HomeLink is certainly not the only source of power inside this panel. (The red/black wire is probably the switched source we'd want...easy enough to prove out with a VOM) There might be an easier place to pickup the +12v switched source...perhaps at the lights. Looks like many choices.
smaller bezel is removed first, large bezel comes out next revealing two phillips sheet metal screws which are removed (note cheap plastic pry tools found on eBay for a couple of bux, priceless
):HomeLink module, 5 wires, color coding is different:
The HomeLink is certainly not the only source of power inside this panel. (The red/black wire is probably the switched source we'd want...easy enough to prove out with a VOM) There might be an easier place to pickup the +12v switched source...perhaps at the lights. Looks like many choices.
Last edited by uberwgn; 04-19-2011 at 04:42 PM.

