Log In
Register
Forums
AudiWorld Community
New Member Welcome Area
Vendor Showroom
Audi News Forum
Feedback
Events Discussion
Newsletter Archive
Audi Models
Audi allroad
Audi A1
Audi A2
Audi A3 / S3 / RS 3
Audi A4
Audi S4 / RS4
Audi A5 / S5 / RS 5 Coupe & Cabrio
Audi A6 / S6 / RS 6
Audi A7 / S7 / RS 7
Audi A8 / S8
Audi Q3 /Q5 / Q7 / Q8
Audi R8
Audi TT / TT-S / TT-RS
Other Audi
Audi e-tron
Technical Discussion
Electronics
Engines
Wheels & Tires Discussion
Performance and Tuning
Suspension Tuning Discussion
Brakes Discussion
General Car Discussion
Auto Detailing Discussion
Audi Euro Delivery Program Discussion
Motorcycles Discussion
Motorsport Discussion
Other (Non-Audi) Autos Discussion
Classifieds
The New Marketplace (All new FS items go in here)
Vehicles For Sale - Archive (NO NEW POSTS HERE)
Parts For Sale - Archive (NO NEW POSTS HERE)
Want To Buy - Archive (NO NEW POSTS HERE)
Miscellaneous - Archive
Regional & ACNA Discussion
North America Discussion
Pacific Northwest Discussion
Australia Discussion
European Discussion
Test & Admin
Test Forum
News
Gallery
Tools
Car Payment Calculator
Tire Rim Calculator
Vin Decoder
Members List
Live Feed
Marketplace
Vendor Directory
AudiWorld Marketplace
Become a Vendor
Site Store
New Posts
Features
News Archive
2014
2013
2012
2011
2010
2009
2008
2007
2006
2005
2004
2003
2002
2001
2000
1999
1998
Show Coverage
Road Tests
Featured Cars
Project Cars
Model Guide
About Us
Overview
Contact
Terms of Use
Privacy Policy
How-Tos
Tech Articles
View Dark Mode
Please register or login to enable Dark Mode.
Log In
Register
Threads
Google
Threads
Posts
Advanced
Dark Mode
Please register or login to enable Dark Mode.
Log In
Forgot your Password?
By logging into your account, you agree to our
Terms of Use
and
Privacy Policy
, and to the use of cookies as described therein.
or
Login with Google
Login with Facebook
Recent
Commented
Albums
My Pictures
DIY C6 Tail light rear bulb self replacement condensation" width="1" he
MainlandMig
April 1, 2010
9
0
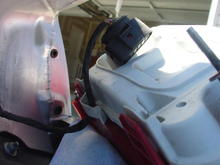
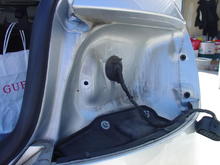
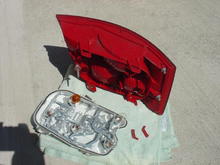
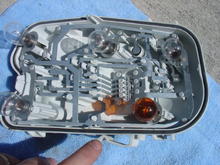
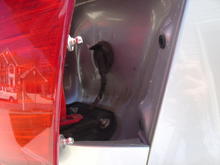
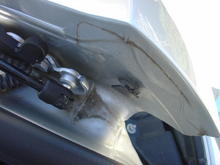
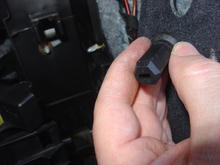
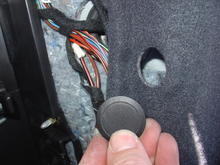
Step by step pics of C6 2005 a6 tail light removal and bulb replacement
Read more ยป
Sort:
Default
Default
Most Recent
image005b main screw and wiring (Unplug wiring and unclip cable) (Terry cloth used to avoid damage to paint)
0
2010/04/05 19:43:12
image006 completely off (notice the main screw hole n 2 prong holes)
0
2010/04/05 19:43:12
image007 Notice the broken clip. there is 2 in the pic bc both LnR were broken (Condensation was forming bc the clip was broken n a tight seal was not being made)
0
2010/04/05 19:43:12
image008 Notice the seal around the perimeter (bulbs r easily removed by a slight turn/twist
0
2010/04/05 19:43:12
image005 Beside the 1 main screw each tail light has 2 prongs that keep assembly in place (removal technique is pull the tail light as straight back as possible care full not to lean off to the side, up or down bc that can damage the screw)
0
2010/04/05 19:44:59
image004 proof of water and dirt making its way under the cover
0
2010/04/05 19:45:51
image003 plastic cover to channel run off from roof away from light housing (helps with debris and ice but does not do a great job with water)(not sure of exact technique but I gently lifted up and out and it snapped off with no damage to holding clips) *this was the hardest step of the whole process
0
2010/04/05 19:50:53
image002 Other models may have Phillips head but mine had a flat-head but to avoid damage i used a socket wrench
0
2010/04/05 19:51:33
image001 Pop off plastic cover
0
2010/04/05 19:52:02