Log In
Register
Forums
AudiWorld Community
New Member Welcome Area
Vendor Showroom
Audi News Forum
Feedback
Events Discussion
Newsletter Archive
Audi Models
Audi allroad
Audi A1
Audi A2
Audi A3 / S3 / RS 3
Audi A4
Audi S4 / RS4
Audi A5 / S5 / RS 5 Coupe & Cabrio
Audi A6 / S6 / RS 6
Audi A7 / S7 / RS 7
Audi A8 / S8
Audi Q3 /Q5 / Q7 / Q8
Audi R8
Audi TT / TT-S / TT-RS
Other Audi
Audi e-tron
Technical Discussion
Electronics
Engines
Wheels & Tires Discussion
Performance and Tuning
Suspension Tuning Discussion
Brakes Discussion
General Car Discussion
Auto Detailing Discussion
Audi Euro Delivery Program Discussion
Motorcycles Discussion
Motorsport Discussion
Other (Non-Audi) Autos Discussion
Classifieds
The New Marketplace (All new FS items go in here)
Vehicles For Sale - Archive (NO NEW POSTS HERE)
Parts For Sale - Archive (NO NEW POSTS HERE)
Want To Buy - Archive (NO NEW POSTS HERE)
Miscellaneous - Archive
Regional & ACNA Discussion
North America Discussion
Pacific Northwest Discussion
Australia Discussion
European Discussion
Test & Admin
Test Forum
News
Gallery
Tools
Car Payment Calculator
Tire Rim Calculator
Vin Decoder
Members List
Live Feed
Marketplace
Vendor Directory
AudiWorld Marketplace
Become a Vendor
Site Store
New Posts
Features
News Archive
2014
2013
2012
2011
2010
2009
2008
2007
2006
2005
2004
2003
2002
2001
2000
1999
1998
Show Coverage
Road Tests
Featured Cars
Project Cars
Model Guide
About Us
Overview
Contact
Terms of Use
Privacy Policy
How-Tos
Tech Articles
View Dark Mode
Please register or login to enable Dark Mode.
Log In
Register
Threads
Google
Threads
Posts
Advanced
Dark Mode
Please register or login to enable Dark Mode.
Log In
Forgot your Password?
By logging into your account, you agree to our
Terms of Use
and
Privacy Policy
, and to the use of cookies as described therein.
or
Login with Google
Login with Facebook
Recent
Commented
Albums
My Pictures
My Post Pictures
handsofftheaudi
December 14, 2014
166
0
Sort:
Default
Default
Most Recent
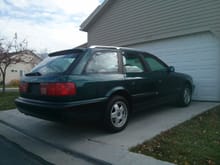
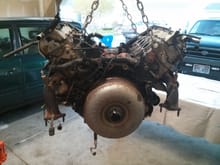
The day i drove her home.
0
2014/12/14 03:59:13
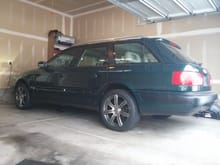
The wheels? Come on can ya blame me?
0
2014/12/14 04:01:19
After a full tune up running pretty good but havent discovered the metallic oil yet.
0
2014/12/14 04:03:07
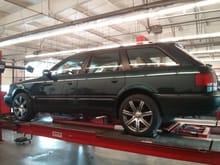
Getting a fresh alignment :)
0
2014/12/14 04:17:55
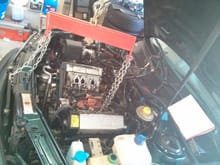
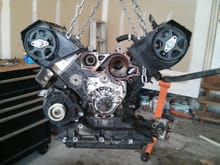
Obviously the intake has come offcompletely and power steering pump. The only thing i strongly recommend is when you take the engine to trans bolts out you make, draw, etch a sketch, whatever a diagram of which bolt goes where. I think they had my wife design this portion cause some are short some are long some are big and some small some go in front to back and some back to front. No rym or reason here just straight up chaos.
0
2014/12/14 04:27:59
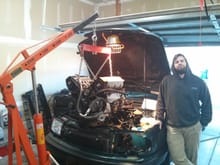
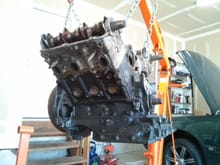
My partner in crime lil brother. Freshly pulled out of the engine bay complete with all accessories. A/C compressor, alternator, the starter is there but hanging. The starter is held in place by two bolts which also connect the engine to the trans. But for some reason i couldnt get the starter out given my access so i pulled the engine with it hanging on by its stubbornness.
0
2014/12/14 04:33:46
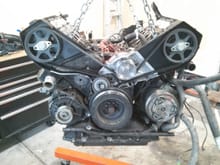
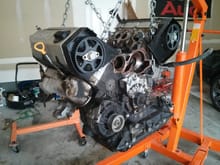
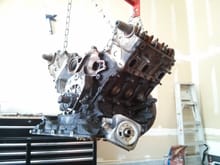
Let the tear down begin! Note the A/ C compressor is still attached and becasue of that i couldnt have access to the engine mount nut, so i instead unbolted the mount from the frame of the car and pulled it that way. Well it was shot so i got new ones anyways but going back in i will probably leave the compressor off till i get the engine mounts all snugged to the engine then the compressor will go on.
0
2014/12/14 04:38:49
0
2014/12/14 04:44:37
0
2014/12/14 04:45:52
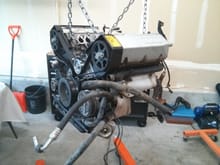
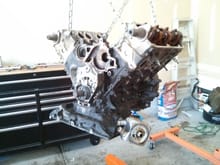
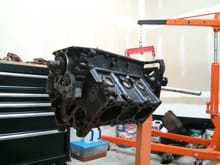
These last pics are right after i took it out. I think its important to know what can stay and what has to go for it to come out.
0
2014/12/14 04:46:31
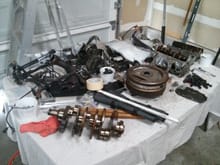
Day 1 tear down all parts were placed on a table with all asociated hardware in a bag ziptied to the part.
0
2014/12/14 04:49:11
0
2014/12/14 04:53:11
0
2014/12/14 04:53:59
End of day 1. What came off. A/C compressor, and compressor to block bracket, exhaust heat sheil and manifold, engine mount bracket, T belt, water pump, and thermo housing,and pipe, and engine cooling pipes.
0
2014/12/14 04:56:17
0
2014/12/14 09:28:21
0
2014/12/14 09:29:18
0
2014/12/14 09:30:21
0
2014/12/14 09:31:27
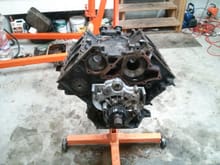
Ok second day teardown went pretty well it looks like alot but its really not. The alternator, cam sprockets and covers came off along with the valve covers and lower oil pan. Like almost every project ive worked on the dissasembly is always the quickest process. Its the reassembly that'll get ya. Take caution as to where everything goes and the hardware for it.
0
2014/12/14 09:33:01
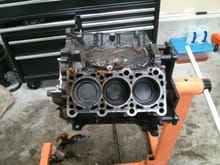
And now were down to the block with all the pistons still in of course. Before i transfered it over to the stand i took off the torque converter and rear main seal carrier. Pay close attention when removing the torque converter as there are two metal shims that need to go back on the reverse order so make sure you know where they go.
0
2014/12/15 02:05:33
0
2014/12/15 02:10:06
0
2014/12/15 02:12:00
0
2014/12/15 02:13:07
0
2014/12/15 02:14:00
0
2014/12/15 02:15:01
0
2014/12/15 02:15:51
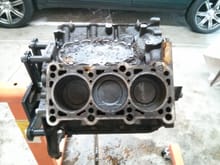
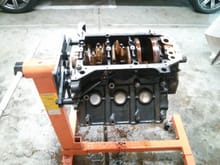
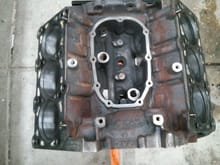
End of day 3 we are left with the short block with the rotating assembly still inside. Before i transfered the engine from the hoist to the stand i removed the torque converter and the rear main seal carrier. Pay close attention when removing the torque converter as there are two metal shims that need to go back on in the same order they came off. I have a good friend who is going to do the machine work for me on the heads.
0
2014/12/15 02:17:19
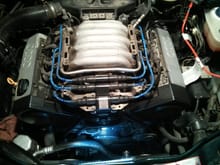
Fresh back from the machine shop im very impressed with how it turned out. This cost me about 150 bucks
0
2014/12/15 02:41:00
0
2014/12/15 02:43:13
If you arent aware of whats hiding beneath the vallet pan here ya go. There are two oil check valves that go in here tbat keep oil from draining down to the oil pan upon engine shutdown. There are a few threads on replacing them if you have alot of valve noise.
0
2014/12/15 02:44:05
0
2014/12/15 02:47:27
And this is my parts table as stated befoe each part has a baggie ziptied to it with its associated attaching hardware. Each part will be thoroughly cleaned along with its hardware and painted if i deem it necessary.
0
2014/12/15 02:48:11
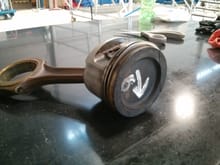
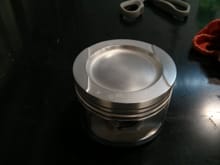
This ole #6 in all its glory. Now up until now i have not found anything in disassembly that would be tbe coulprit of metallic oil the rod and main bearings looked great with no gouges at all. However this piston along with every other piston have 8 oil ring lubrication ports. 8 per piston 4 on each side and every one of them were plugged these pistons were receiving no lubrication at all to the oil control ring.
0
2014/12/15 03:06:34
First i dissmantled the piston from the connecting rod and wrist pin. Keep an eye on the retaining springs as they like to fly really far. I put a rag over mine to keep them close.
0
2014/12/15 03:12:24
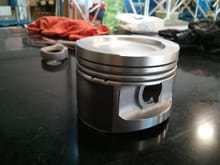
Second i put a very stout aircraft aluminum tape over tbe teflon coating on both sides of the piston, then i blasted them with a fine plastic media. Now before we go crazy about how to clean pistons. This is just how i did it mainly because it was available to me to use. But they dont come out of the bead blaster looking like this.
0
2014/12/15 03:16:51
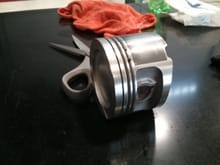
Each piston took another hour and a half of polishing by han first with a green scotch brite then a white scotch brite pad coated in a fine lubricating oil. The teflon coating remained untouchedand these are pics of the final product.
0
2014/12/15 03:21:09
0
2014/12/15 03:48:08
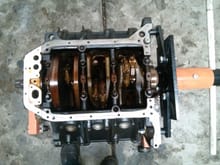
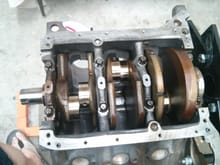
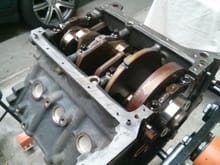
The crankshaft installed in the block with new bearings. As for torque specs and patterns for installation i did not have a bentley. I bought a subscription on a website called. Alldatadiy.com for my specific car it had everything i needed and more i think it was 26 dollars for a year and cheaper after that this next subscription will cost me 10 bucks for the next year.
0
2014/12/15 04:02:51
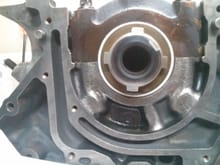
The main bearing carrier bolts take an extreme amount of torque at there final you feel like theyre gonna snap in half but they dont. :)
0
2014/12/15 04:07:38
I bead blasted the two inner bearing carriers but decided it was useless they were dirty and hopefully i never see them again so they all got solvent cleaned and thats it. The two ends of the crank were buffed with scotch brite to allow i nice surface for the seals to seat on.
0
2014/12/15 04:10:21
First
Page
1 of 5
Last
Go To
Page
1
2
3
4
5
1 of 5
Go To
GO
Go to page
of 5
pages
1
2
3
4
5