Audi A6 C5: How to Repair Door Contact Sensor
This article will walk you through the process of replacing that worn out door contact sensor and get everything working properly once again.
This article applies to the Audi A6 C5 (1998-2004).
Door contact sensors control a lot of components in modern vehicles, from interior lights and alarm systems to the annoying "door open" warning light on the dashboard. When these sensors stop working properly, it can be one of the most aggravating problems you'll ever face as a car owner. And unfortunately, the A6 C5 has a reputation for this problem, as the circuit boards tend to corrode over time as they take on moisture through a not-so-waterproof electrical box. Thankfully, replacing the sensor isn't a terribly difficult task – just a time-consuming one. Here's how to get it done.

Materials Needed
- T10, 20, and 45 Torx bits and driver
- M8 bit
- Soldering gun
- Electrical cleaner
- Multimeter
- Wire crimps and crimping tool
Step 1 – Remove the door contact sensor
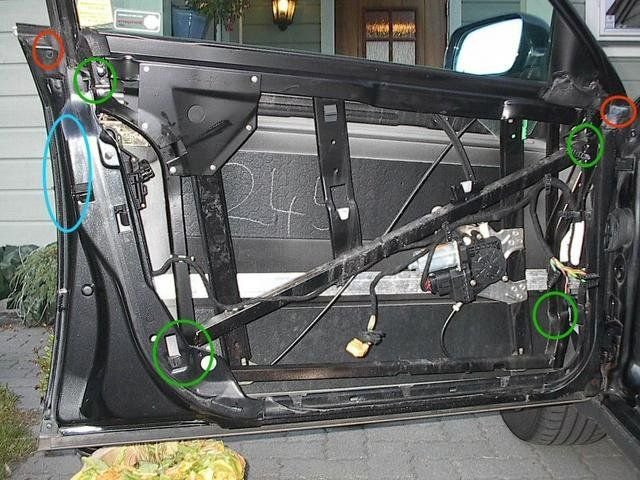
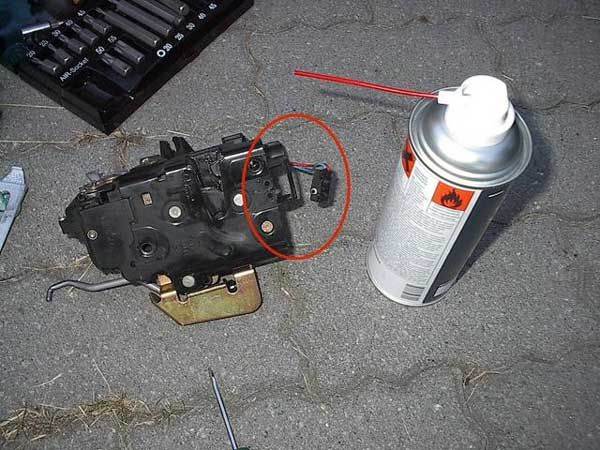
Begin by removing the door panel and trim to gain access to the inside of the door. It's not absolutely necessary to remove the window mount at this point, but it does make accessing the connector, key rod, and lock rod much easier. If you decide to do so, the bolts required for removal are circled in green in Figure 1.
Remove the two M8 screws that hold the latch in place, then pull off the plastic that holds the lock rod and remove the rod. The piece shown in the upper right red ring in Figure 1 has a screw that must be removed before pulling it out. Remove the latch and take it to your workbench.
Step 2 – Inspect the sensor
Open up the sensor and take a look inside. If it's corroded, you will probably need to replace it. If dirty, you can try cleaning it up with some electrical cleaner and see if that does the trick. Test it using a multimeter on the diode settings. If the sensor is bad, simply cut the wires leading into it and crimp in the wires from the new one.
Step 3 – Other considerations
If your sensor is working properly and you still have issues, the problem could reside in the locking system itself. There is a mechanism that locks the door, as well as a small electric motor that drives the system. You can open these boxes (carefully, as there are a lot of loose parts inside) and inspect the circuit boards for corrosion.
If you don't find any corrosion, check the voltage to see if everything is functioning properly. It's common for wires to simply come off the circuit board over time, and they can be soldered back on if needed.
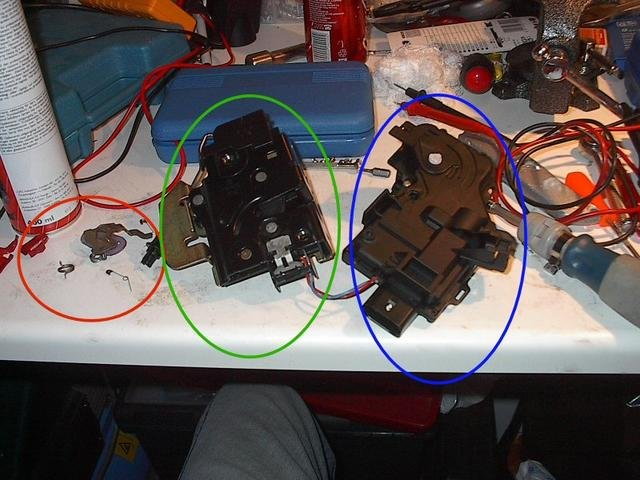
Figure 3. The locking mechanisms removed. 
Figure 4. Solder any loose or disconnected wires inside the mechanisms.
Related Discussion
- Door Contact Sensor Repair - AudiWorld.com