
 09-06-2016, 12:47 PM
Last edit by: IB Advertising
See related guides and technical advice from our community experts:
- Audi A6 C6 How to Remove and Install MMI and Center Console Plus Audio Streaming<br>Step by step instructions for do-it-yourself repairs.

DIY for center console removal?
08-30-2012, 12:27 PM
#1
Audiworld Junior Member
Thread Starter

Join Date: Aug 2012
Posts: 33
Likes: 0
Received 0 Likes
on
0 Posts
Anyone have one or a video? The previous owner of my car obviously spilt something on the MMI controls and I would like to go in and clean em up but can not for the life of me find a DIY on removing it or even a video.
 08-30-2012, 02:39 PM
#2
AudiWorld Senior Member

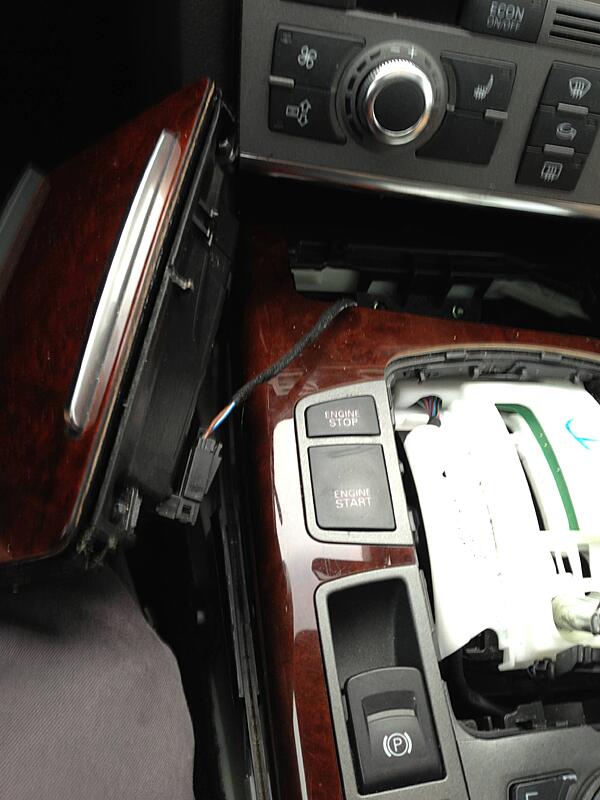
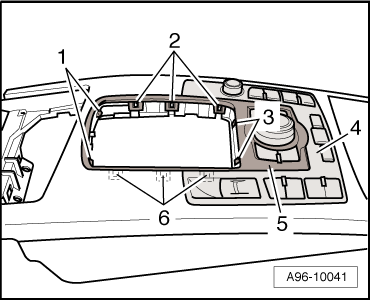
<TABLE class="cc einzug-standard abstand-standard "><TBODY><TR><TD class=einzug-liste>� </TD><TD>Carefully release retaining clips -1 ... 3- and -6- on trim frame -5- using a narrow-bladed screwdriver.</TD></TR></TBODY></TABLE><TABLE class="cc einzug-standard abstand-standard "><TBODY><TR><TD class=einzug-liste>� </TD><TD>Lift off trim frame for multimedia system operating unit -E380-.</TD></TR></TBODY></TABLE><TABLE class="cc einzug-standard abstand-standard "><TBODY><TR><TD class=einzug-liste>� </TD><TD>Detach multimedia system operating unit -E380--item 4-.</TD></TR></TBODY></TABLE>

</TD></TR></TBODY></TABLE>
<TABLE class="cc einzug-standard abstand-standard absatz-hervor"><TBODY><TR><TD>Installing</TD></TR></TBODY></TABLE><TABLE class="cc einzug-standard abstand-standard "><TBODY><TR><TD>Installation is carried out in the reverse order; note the following:</TD></TR></TBODY></TABLE><TABLE class="cc einzug-standard abstand-standard "><TBODY><TR><TD class=einzug-liste>� </TD><TD>Install centre console (front)</TD></TR></TBODY></TABLE><TABLE class="cc einzug-standard abstand-standard absatz-hervor"><TBODY><TR><TD>Tightening torque
</TD></TR></TBODY></TABLE>
<TABLE class="abstand-tabelle layoutnormal frameall" border=1 cellSpacing=0 cellPadding=0 align=bleedleft><TBODY><TR class=th vAlign=top><TD class=cellborderrightbottom-th vAlign=top align=left>Component</TD><TD class=cellborderbottom-th vAlign=top align=middle>Nm</TD></TR><TR class=td vAlign=top><TD class=cellborderright vAlign=top>Multimedia system operating unit -E380- to centre console (front)</TD><TD class=cellbordernone vAlign=top align=middle>3</TD></TR></TBODY></TABLE>
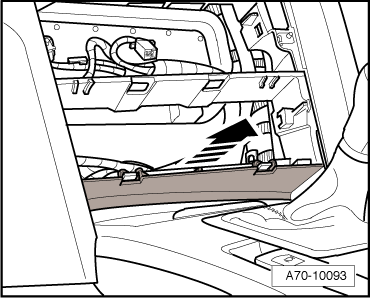
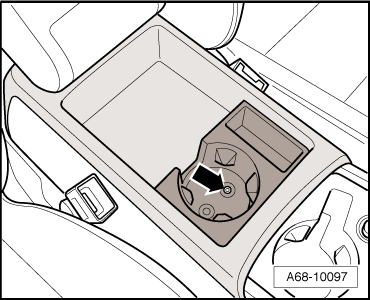
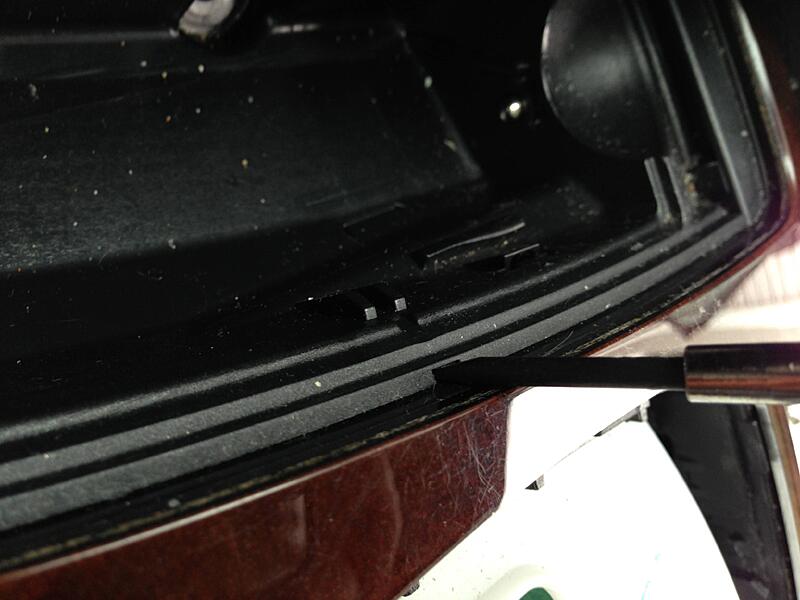
<TABLE cellSpacing=0 cellPadding=0 width="100%"><TBODY><TR><TD class=spalte-text><TABLE class="cc abstand-kap einzug-standard"><TBODY><TR><TD class=titel-kap>Removing and installing centre console (front)</TD></TR></TBODY></TABLE><TABLE class="cc einzug-standard abstand-standard absatz-hervor"><TBODY><TR><TD>Removing</TD></TR></TBODY></TABLE><TABLE class="cc einzug-standard abstand-standard "><TBODY><TR><TD class=einzug-liste>� </TD><TD>On vehicles with automatic gearbox move selector lever to position �S�.</TD></TR></TBODY></TABLE><TABLE class="cc einzug-standard abstand-standard "><TBODY><TR><TD class=einzug-liste>� </TD><TD>Switch off ignition.</TD></TR></TBODY></TABLE><TABLE class="cc einzug-standard abstand-standard "><TBODY><TR><TD class=einzug-liste>� </TD><TD>Remove centre console (rear)</TD></TR></TBODY></TABLE><TABLE class="cc einzug-standard abstand-standard "><TBODY><TR><TD class=einzug-liste>� </TD><TD>Remove Climatronic control unit -J255</TD></TR></TBODY></TABLE></TD><TD class=spalte-pfeil></TD><TD class=spalte-marg></TD></TR></TBODY></TABLE><TABLE cellSpacing=0 cellPadding=0 width="100%"><TBODY><TR><TD class=spalte-text><TABLE class="cc einzug-standard abstand-standard "><TBODY><TR><TD class=einzug-liste>� </TD><TD>Detach trim cover -arrow- from above ashtray.</TD></TR></TBODY></TABLE></TD></TR></TBODY></TABLE>
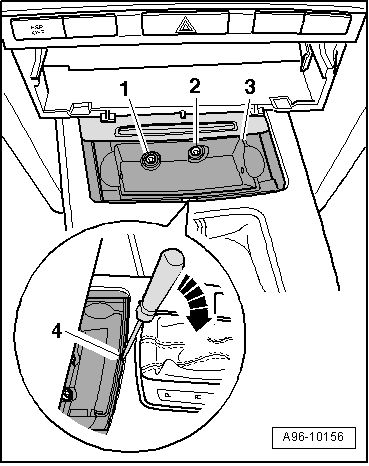
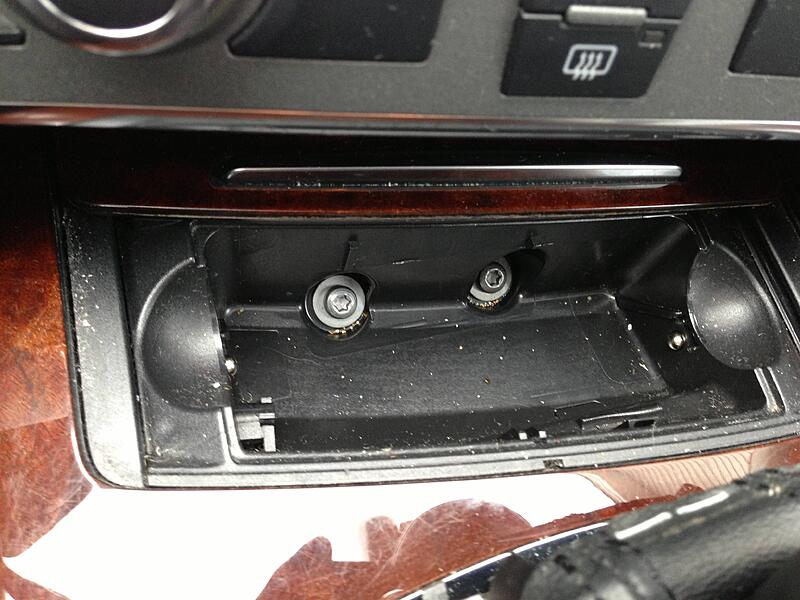
<TABLE cellSpacing=0 cellPadding=0 width="100%"><TBODY><TR><TD class=spalte-text><TABLE class="cc einzug-standard abstand-standard "><TBODY><TR><TD class=einzug-liste>� </TD><TD>Open ashtray (front).</TD></TR></TBODY></TABLE><TABLE class="cc einzug-standard abstand-standard "><TBODY><TR><TD class=einzug-liste>� </TD><TD>Take insert out of ashtray (front).</TD></TR></TBODY></TABLE><TABLE class="cc einzug-standard abstand-standard "><TBODY><TR><TD class=einzug-liste>� </TD><TD>Remove bolts -1- and -2-.</TD></TR></TBODY></TABLE><TABLE class="cc einzug-standard abstand-standard "><TBODY><TR><TD class=einzug-liste>� </TD><TD>Use a screwdriver -arrow- to release ashtray -3-. To do so, apply screwdriver in opening -4-.</TD></TR></TBODY></TABLE><TABLE class="cc einzug-standard abstand-standard "><TBODY><TR><TD class=einzug-liste>� </TD><TD>Remove housing for ashtray (front).</TD></TR></TBODY></TABLE><TABLE class="cc einzug-standard abstand-standard "><TBODY><TR><TD class=einzug-liste>� </TD><TD>If fitted, unplug electrical connector.</TD></TR></TBODY></TABLE>
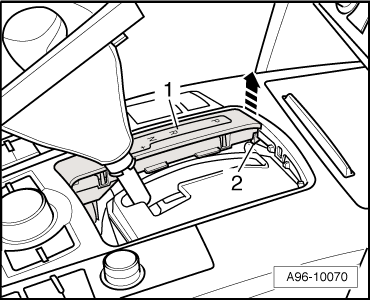
<TABLE cellSpacing=0 cellPadding=0 width="100%"><TBODY><TR><TD class=spalte-text><TABLE class="cc einzug-standard abstand-standard "><TBODY><TR><TD class=einzug-liste>� </TD><TD>Unclip boot -1- for gear lever or selector lever on both sides and lift it off -arrows-.

<TABLE class="cc einzug-standard abstand-standard absatz-hervor"><TBODY><TR><TD>Vehicles with automatic gearbox:</TD></TR></TBODY></TABLE><TABLE class="cc einzug-standard abstand-standard "><TBODY><TR><TD class=einzug-liste>� </TD><TD>Release retaining spring -2- and detach selector scale -1--arrow-.</TD></TR></TBODY></TABLE><TABLE class="cc einzug-standard abstand-standard "><TBODY><TR><TD class=einzug-liste>� </TD><TD>Unplug electrical connector.</TD></TR></TBODY></TABLE>
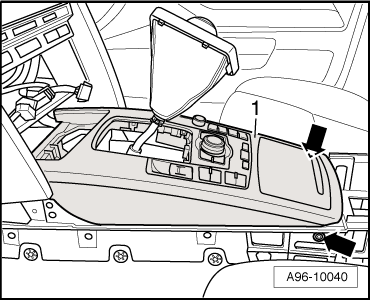
<TABLE cellSpacing=0 cellPadding=0 width="100%"><TBODY><TR><TD class=spalte-text><TABLE class="cc einzug-standard abstand-standard absatz-hervor"><TBODY><TR><TD>All vehicles:</TD></TR></TBODY></TABLE><TABLE class="cc einzug-standard abstand-standard "><TBODY><TR><TD class=einzug-liste>� </TD><TD>Remove bolts -arrows-.</TD></TR></TBODY></TABLE><TABLE class="cc einzug-standard abstand-standard "><TBODY><TR><TD class=einzug-liste>� </TD><TD>Lift centre console (front) slightly at rear edge and then pull centre console off dash panel towards the rear.</TD></TR></TBODY></TABLE><TABLE class="cc einzug-standard abstand-standard "><TBODY><TR><TD class=einzug-liste>� </TD><TD>Unplug electrical connectors.</TD></TR></TBODY></TABLE>
</TD></TR></TBODY></TABLE>
<TABLE class="cc einzug-standard abstand-standard absatz-hervor"><TBODY><TR><TD>Installing</TD></TR></TBODY></TABLE><TABLE class="cc einzug-standard abstand-standard "><TBODY><TR><TD>Installation is carried out in the reverse order; note the following:</TD></TR></TBODY></TABLE><TABLE class="cc einzug-standard abstand-standard "><TBODY><TR><TD class=einzug-liste>� </TD><TD>Install centre console (rear)</TD></TR></TBODY></TABLE><TABLE class="cc einzug-standard abstand-standard "><TBODY><TR><TD>If connector at electronic parking brake button is unplugged, a fault is entered in the electronic parking brake control unit.</TD></TR></TBODY></TABLE><TABLE class="cc einzug-standard abstand-standard "><TBODY><TR><TD class=einzug-liste>� </TD><TD>Switch on ignition.</TD></TR></TBODY></TABLE><TABLE class="cc einzug-standard abstand-standard "><TBODY><TR><TD class=einzug-liste>� </TD><TD>Apply and release electronic parking brake.</TD></TR></TBODY></TABLE><TABLE class="cc einzug-standard abstand-standard "><TBODY><TR><TD class=einzug-liste>� </TD><TD>Erase fault in electronic parking brake control unit.
</TD></TR></TBODY></TABLE><TABLE cellSpacing=0 cellPadding=0 width="100%"><TBODY><TR><TD class=spalte-text><TABLE class="cc einzug-standard abstand-standard absatz-hervor"><TBODY><TR><TD>Tightening torques</TD></TR></TBODY></TABLE></TD><TD class=spalte-pfeil></TD><TD class=spalte-marg></TD></TR></TBODY></TABLE><TABLE class="abstand-tabelle layoutnormal frameall" border=1 cellSpacing=0 cellPadding=0 align=bleedleft><COLGROUP><COL width="75%"><COL width="24%"></COLGROUP><TBODY><TR class=th vAlign=top><TD class=cellborderrightbottom-th vAlign=top align=left>Component</TD><TD class=cellborderbottom-th vAlign=top align=middle>Nm</TD></TR><TR class=td vAlign=top><TD class=cellborderrightbottom vAlign=top>Centre console (front) to mounting frame for centre console</TD><TD class=cellborderbottom vAlign=top align=middle>3</TD></TR><TR class=td vAlign=top><TD class=cellborderright vAlign=top>Housing for ashtray (front) to mounting frame for centre console</TD><TD class=cellbordernone vAlign=top align=middle>3</TD></TR></TBODY></TABLE>
</TD></TR></TBODY></TABLE></TD></TR></TBODY></TABLE>
</TD></TR></TBODY></TABLE>
<TABLE class="cc abstand-kap einzug-standard"><TBODY><TR><TD class=titel-kap>Removing and installing centre console (rear)</TD></TR></TBODY></TABLE>
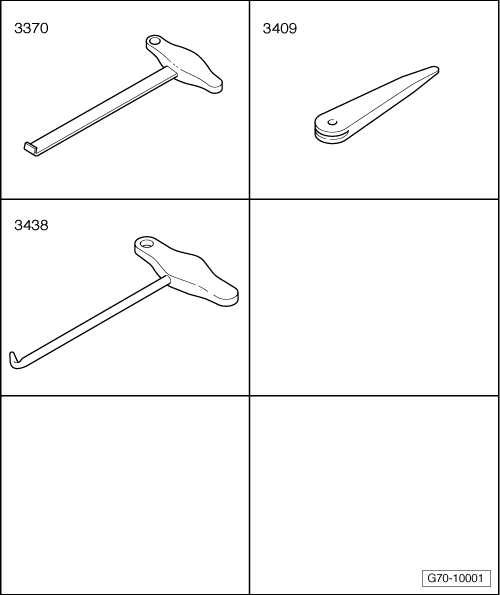
<TABLE class="cc abstand-standard einzug-standard"><TBODY><TR><TD class=wz-liste-kopf>Special tools and workshop equipment required</TD></TR></TBODY></TABLE>
<TABLE class="cc abstand-standard einzug-standard "><TBODY><TR><TD class=einzug-liste>t </TD><TD>Front-end hook -3370-</TD></TR></TBODY></TABLE>
<TABLE class="cc abstand-liste einzug-standard "><TBODY><TR><TD class=einzug-liste>t </TD><TD>Removal wedge -3409-</TD></TR></TBODY></TABLE>
<TABLE class="cc abstand-liste einzug-standard "><TBODY><TR><TD class=einzug-liste>t </TD><TD>Hook -3438-</TD></TR></TBODY></TABLE>
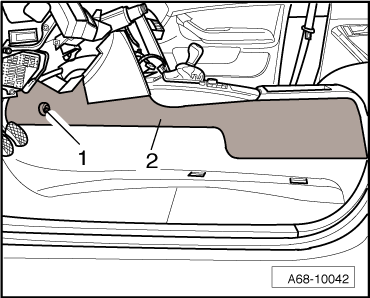
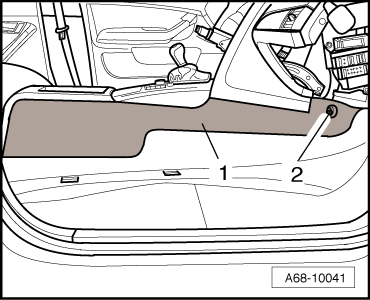
<TABLE cellSpacing=0 cellPadding=0 width="100%"><TBODY><TR><TD class=spalte-text><TABLE class="cc einzug-standard abstand-standard absatz-hervor"><TBODY><TR><TD>Removing</TD></TR></TBODY></TABLE><TABLE class="cc einzug-standard abstand-standard "><TBODY><TR><TD class=einzug-liste>� </TD><TD>Use screwdriver to prise cap off bolt -2-.</TD></TR></TBODY></TABLE><TABLE class="cc einzug-standard abstand-standard "><TBODY><TR><TD class=einzug-liste>� </TD><TD>Remove bolt.</TD></TR></TBODY></TABLE><TABLE class="cc einzug-standard abstand-standard "><TBODY><TR><TD class=einzug-liste>� </TD><TD>Unclip side trim for centre console -1- using removal wedge -3409- and lift out.

<TABLE cellSpacing=0 cellPadding=0 width="100%"><TBODY><TR><TD class=spalte-text><TABLE class="cc einzug-standard abstand-standard "><TBODY><TR><TD class=einzug-liste>� </TD><TD>Use screwdriver to prise cap off bolt -1-.</TD></TR></TBODY></TABLE><TABLE class="cc einzug-standard abstand-standard "><TBODY><TR><TD class=einzug-liste>� </TD><TD>Remove bolt.</TD></TR></TBODY></TABLE><TABLE class="cc einzug-standard abstand-standard "><TBODY><TR><TD class=einzug-liste>� </TD><TD>Unclip side trim (left-side) for centre console -2- using removal wedge -3409- and lift out.
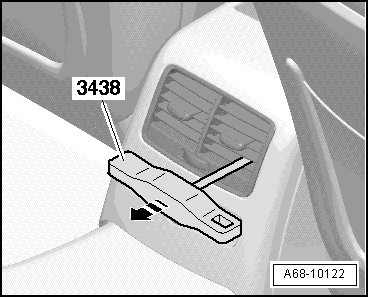
<TABLE class="cc einzug-standard abstand-standard "><TBODY><TR><TD class=einzug-liste>� </TD><TD>Bring louvres in vent on centre console (rear) into a horizontal position.</TD></TR></TBODY></TABLE>
Note
<TABLE class="cc abstand-liste-erster einzug-standard hinweis-rumpf"><TBODY><TR><TD>The vent on the centre console (rear) has holes for inserting the hook -3438-.</TD></TR></TBODY></TABLE><TABLE class="cc einzug-standard abstand-standard "><TBODY><TR><TD class=einzug-liste>� </TD><TD>Use hook -3438- to pull vent on centre console (rear) out of centre console (rear) in direction of -arrow-.</TD></TR></TBODY></TABLE><TABLE class="cc einzug-standard abstand-standard "><TBODY><TR><TD class=einzug-liste>� </TD><TD>If applicable, unplug electrical connector at vent on centre console (rear).
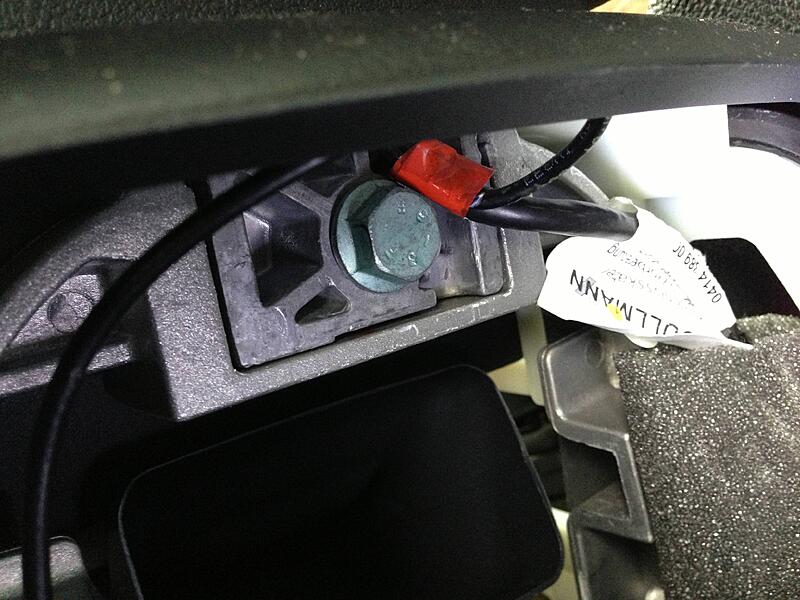
<TABLE class="cc einzug-standard abstand-standard absatz-hervor"><TBODY><TR><TD>Vehicles with centre armrest (front):</TD></TR></TBODY></TABLE><TABLE class="cc einzug-standard abstand-standard "><TBODY><TR><TD class=einzug-liste>� </TD><TD>If fitted, unplug electrical connectors -1- and -2-.</TD></TR></TBODY></TABLE><TABLE class="cc einzug-standard abstand-standard "><TBODY><TR><TD class=einzug-liste>� </TD><TD>Remove bolt -arrow-.</TD></TR></TBODY></TABLE><TABLE class="cc einzug-standard abstand-standard "><TBODY><TR><TD class=einzug-liste>� </TD><TD>Lift out centre armrest (front).</TD></TR></TBODY></TABLE>
</TD></TR></TBODY></TABLE>
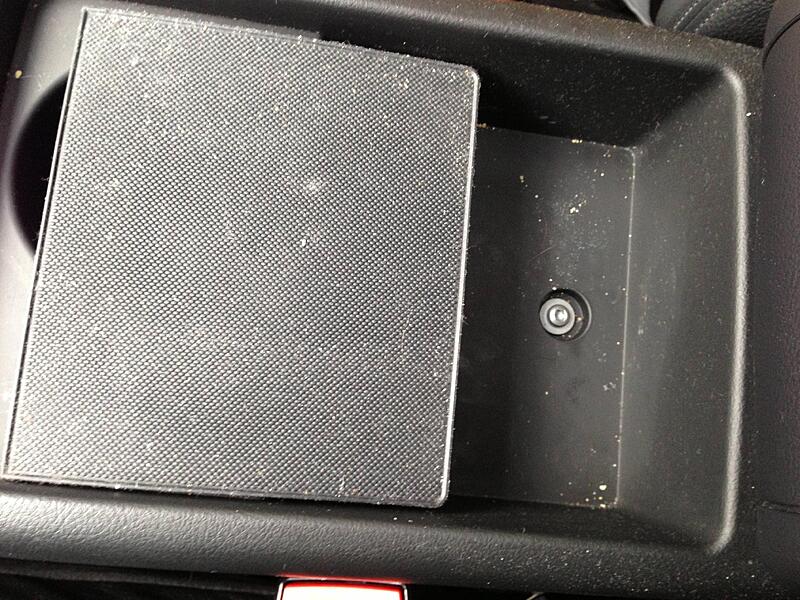
<TABLE class="cc einzug-standard abstand-standard absatz-hervor"><TBODY><TR><TD>Vehicles with cup holder (rear):</TD></TR></TBODY></TABLE><TABLE class="cc einzug-standard abstand-standard "><TBODY><TR><TD class=einzug-liste>� </TD><TD>Remove mat.</TD></TR></TBODY></TABLE><TABLE class="cc einzug-standard abstand-standard "><TBODY><TR><TD class=einzug-liste>� </TD><TD>Remove bolt -arrow-.</TD></TR></TBODY></TABLE><TABLE class="cc einzug-standard abstand-standard "><TBODY><TR><TD class=einzug-liste>� </TD><TD>Pull cup holder (rear) out of centre console (rear).</TD></TR></TBODY></TABLE>
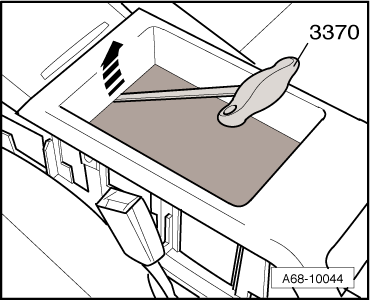
<TABLE class="cc einzug-standard abstand-standard absatz-hervor"><TBODY><TR><TD>All vehicles:</TD></TR></TBODY></TABLE><TABLE class="cc einzug-standard abstand-standard "><TBODY><TR><TD class=einzug-liste>� </TD><TD>Use front-end hook -3370- to lift mat for storage compartment (rear) out of centre console (rear) in direction of -arrow-.</TD></TR></TBODY></TABLE>
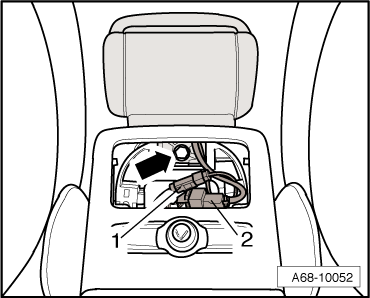
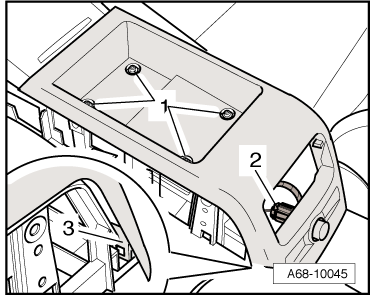
<TABLE cellSpacing=0 cellPadding=0 width="100%"><TBODY><TR><TD class=spalte-text><TABLE class="cc einzug-standard abstand-standard "><TBODY><TR><TD class=einzug-liste>� </TD><TD>Unplug electrical connector -2-.</TD></TR></TBODY></TABLE><TABLE class="cc einzug-standard abstand-standard "><TBODY><TR><TD class=einzug-liste>� </TD><TD>Unscrew bolts -1-.</TD></TR></TBODY></TABLE><TABLE class="cc einzug-standard abstand-standard "><TBODY><TR><TD class=einzug-liste>� </TD><TD>Release centre console (rear left and right) by pulling retaining hooks -3-. Then lift out centre console (rear).</TD></TR></TBODY></TABLE><TABLE class="cc einzug-standard abstand-standard "><TBODY><TR><TD class=einzug-liste>� </TD><TD>If fitted, unplug electrical connectors of rotary control for seat heating (rear).
</TD></TR></TBODY></TABLE><TABLE class="cc einzug-standard abstand-standard absatz-hervor"><TBODY><TR><TD>Installing</TD></TR></TBODY></TABLE><TABLE class="cc einzug-standard abstand-standard "><TBODY><TR><TD>Installation is carried out in the reverse order; note the following:</TD></TR></TBODY></TABLE><TABLE class="cc einzug-standard abstand-standard "><TBODY><TR><TD class=einzug-liste>� </TD><TD>When installing centre console (rear) make sure the two retainers (rear left and right) engage correctly.</TD></TR></TBODY></TABLE><TABLE class="cc einzug-standard abstand-standard absatz-hervor"><TBODY><TR><TD>Tightening torques</TD></TR></TBODY></TABLE><TABLE class="abstand-tabelle layoutnormal frameall" border=1 cellSpacing=0 cellPadding=0 align=bleedleft><COLGROUP><COL width="74%"><COL width="25%"></COLGROUP><TBODY><TR class=th vAlign=top><TD class=cellborderrightbottom-th vAlign=top>Component</TD><TD class=cellborderbottom-th vAlign=top align=middle>Nm</TD></TR><TR class=td vAlign=top><TD class=cellborderrightbottom vAlign=top>Centre console (rear) to mounting frame for centre console</TD><TD class=cellborderbottom vAlign=top align=middle>3</TD></TR><TR class=td vAlign=top><TD class=cellborderrightbottom vAlign=top>Side trim to air conditioner unit</TD><TD class=cellborderbottom vAlign=top align=middle>3</TD></TR><TR class=td vAlign=top><TD class=cellborderrightbottom vAlign=top>Cup holder (rear) to centre console (rear)</TD><TD class=cellborderbottom vAlign=top align=middle>2</TD></TR><TR class=td vAlign=top><TD class=cellborderright vAlign=top>Centre armrest (front) to support bracket</TD><TD class=cellbordernone vAlign=top align=middle>25</TD></TR></TBODY></TABLE>
</TD></TR></TBODY></TABLE>
</TD></TR></TBODY></TABLE></TD></TR></TBODY></TABLE>
</TD></TR></TBODY></TABLE></TD></TR></TBODY></TABLE>
Last edited by royclark; 08-31-2012 at 10:12 AM.
08-30-2012, 09:11 PM
#4
AudiWorld Super User

I replaced my center console wood trim section, which requires complete removal of the center console section, including the MMI control unit. If you STFAs, you would have found a very good write�up (pics don't show now, but are view taken from ETKA) of performing this R&R (I used it along with my Bentley Manual):
https://www.audiworld.com/forums/sho....php?t=2607343
https://www.audiworld.com/forums/sho....php?t=2607343
08-30-2012, 11:00 PM
#5
Audiworld Junior Member
Thread Starter
Join Date: Aug 2012
Posts: 33
Likes: 0
Received 0 Likes
on
0 Posts
I replaced my center console wood trim section, which requires complete removal of the center console section, including the MMI control unit. If you STFAs, you would have found a very good write�up (pics don't show now, but are view taken from ETKA) of performing this R&R (I used it along with my Bentley Manual):
https://www.audiworld.com/forums/sho....php?t=2607343
https://www.audiworld.com/forums/sho....php?t=2607343
08-31-2012, 10:02 AM
#6
AudiWorld Senior Member
I use ElsaWin.
You do have to search around.
This item is got to by following,
Workshop repair guide - Body - general body repairs, interior - Centre console, front. or Centre console, rear.
Last edited by royclark; 08-31-2012 at 10:29 AM.
Trending Topics
09-01-2012, 02:06 AM
#9
Audiworld Junior Member
Thread Starter
Join Date: Aug 2012
Posts: 33
Likes: 0
Received 0 Likes
on
0 Posts
10-31-2012, 07:11 PM
#10
AudiWorld Senior Member
Join Date: Jun 2009
Location: Atlantic City Metro Area
Posts: 792
Likes: 0
Received 2 Likes
on
2 Posts
royclark has helped me and others quite a bit
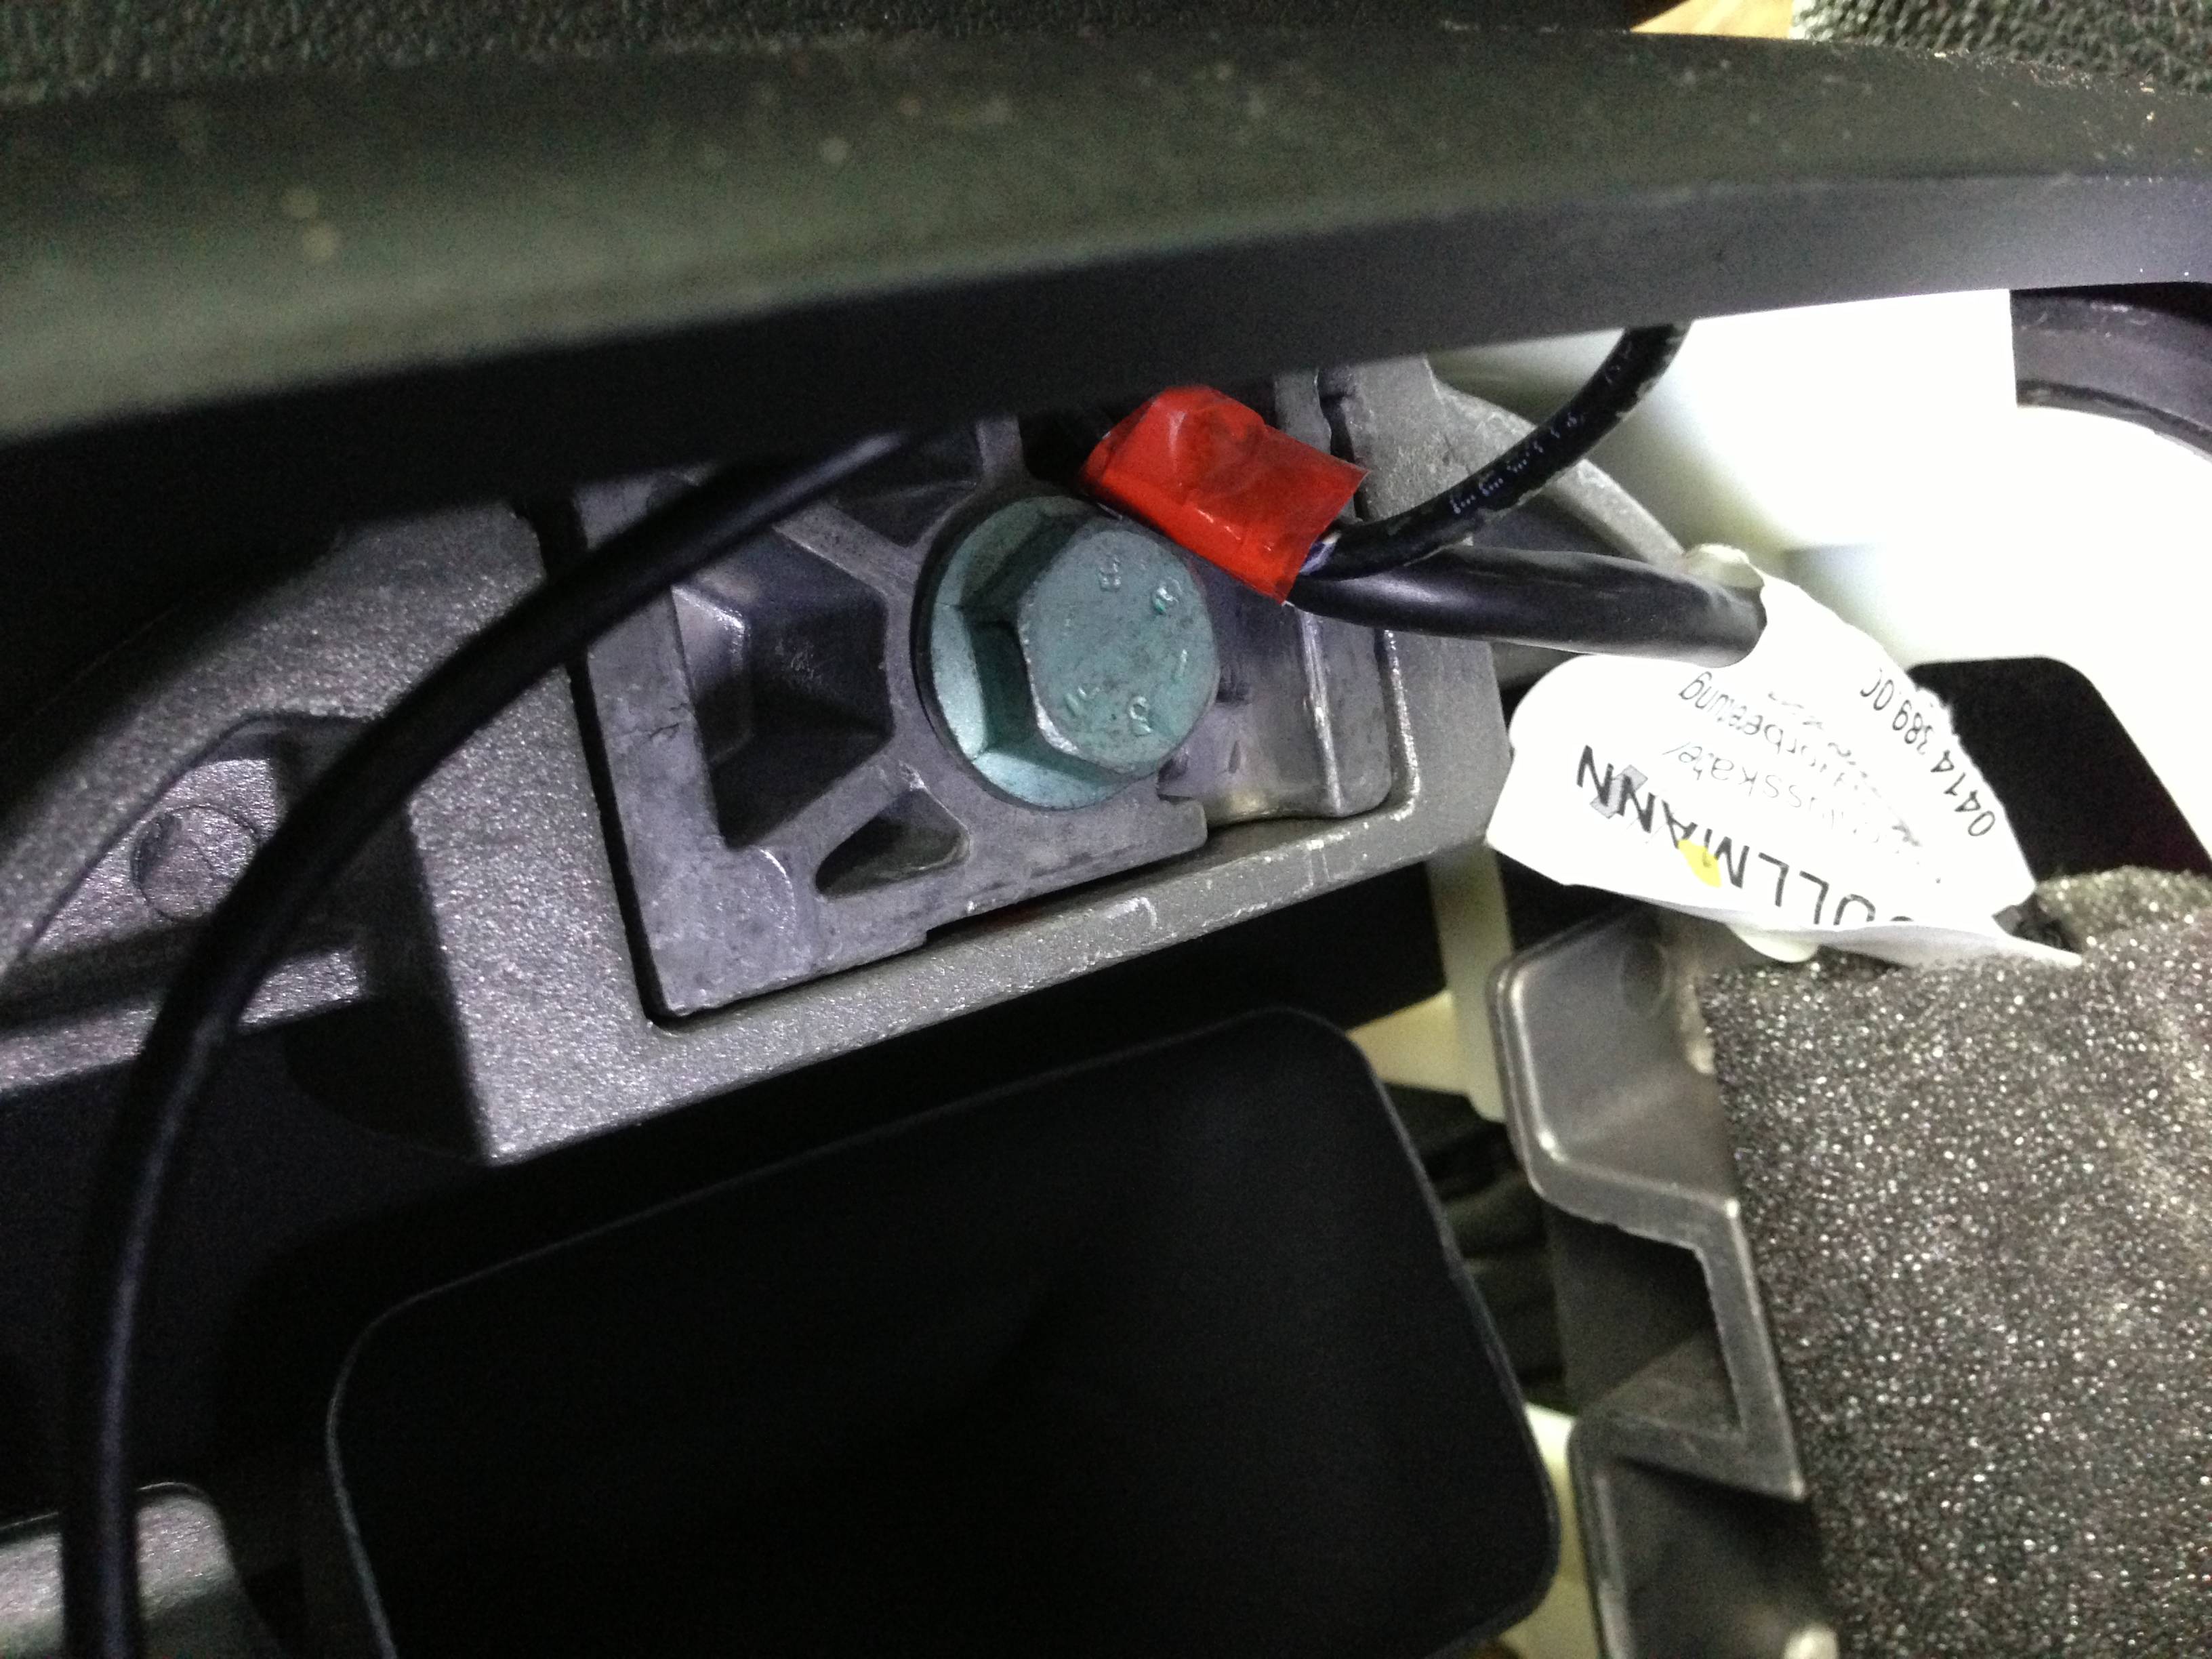
heres some photos of what i encountered
Foreword
*This is not super easy and takes some time...Use the pics to help u judge difficulty.
*Excessive force can damage fragile plastic parts and cosmetic pieces and electronic plugs.
Required
-Torx T-25 Screwdriver
-Torx T-20 Screwdriver
-Racheting Wrench w 13mm Socket and Extension
-Mini/narrow screwdriver
-Trim Removal Tools
-Mini Hook or 3438 Tool OEM tool for removing vent
Helpfull
-Flashlight
-Flexible Magnetic Pickup Tool
-Flexible Spring Claw Pickup Tool
-Water Spray Bottle *For Cleaning
-Micro Fiber Towel *For Cleaning
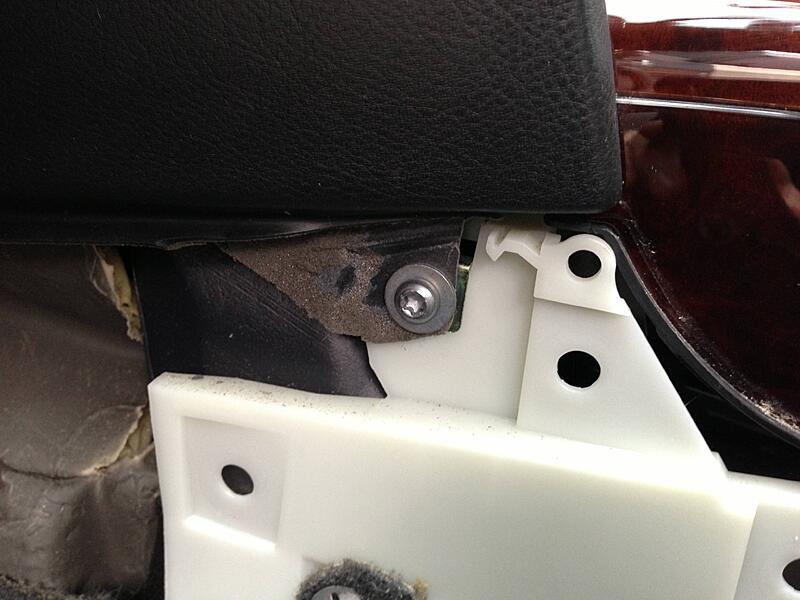
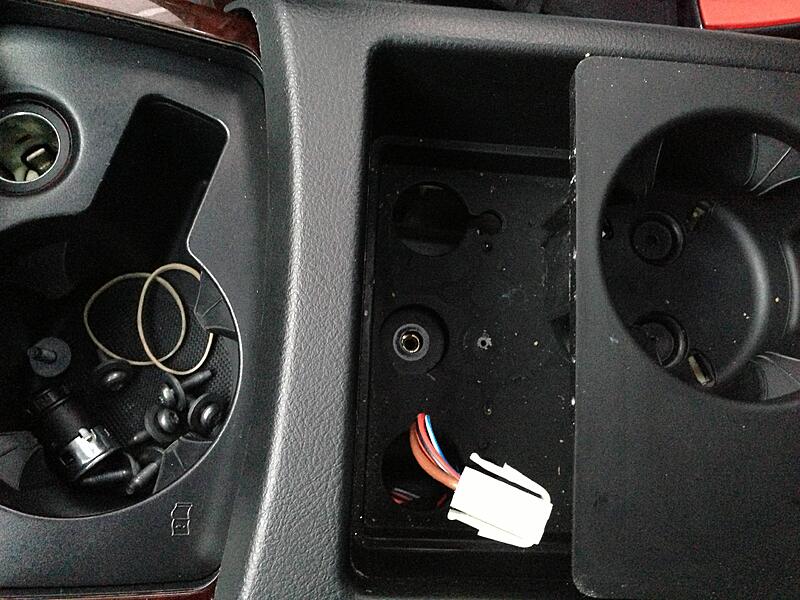
i started with this

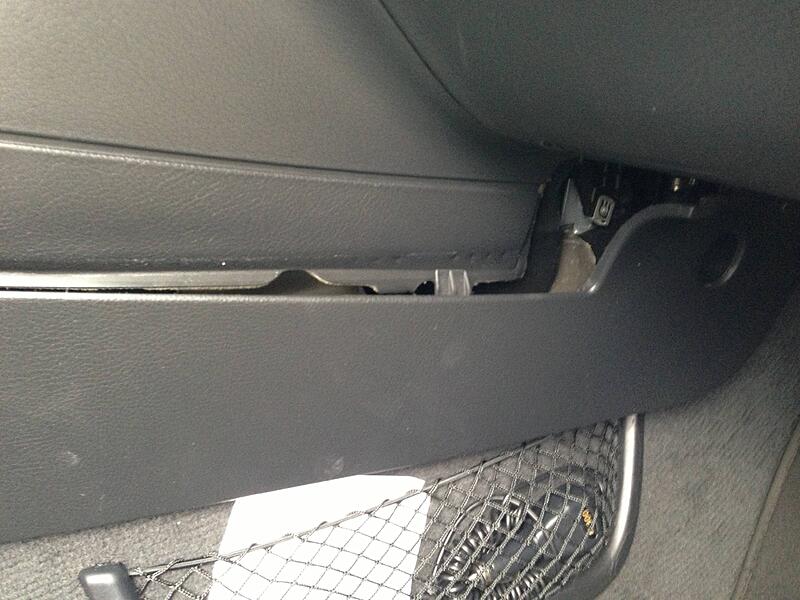
do not pull on this with out unscrewing bc u will break the clips
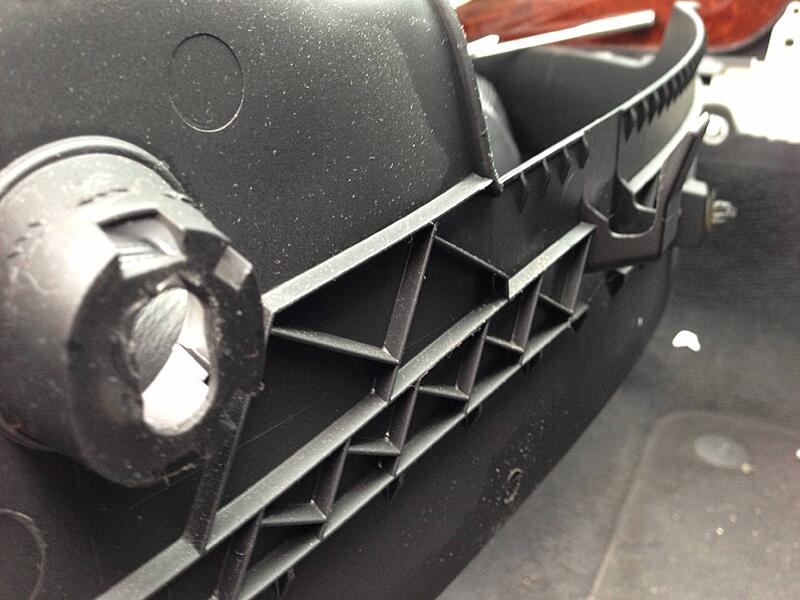
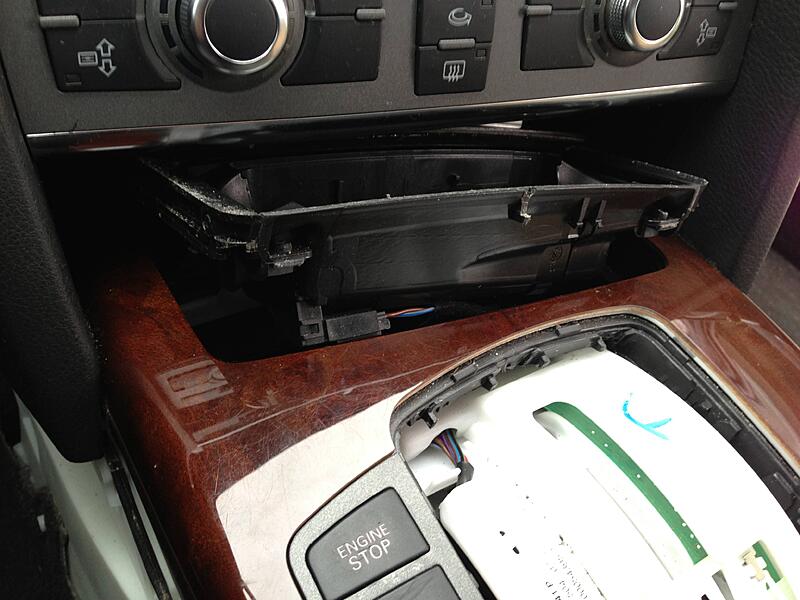
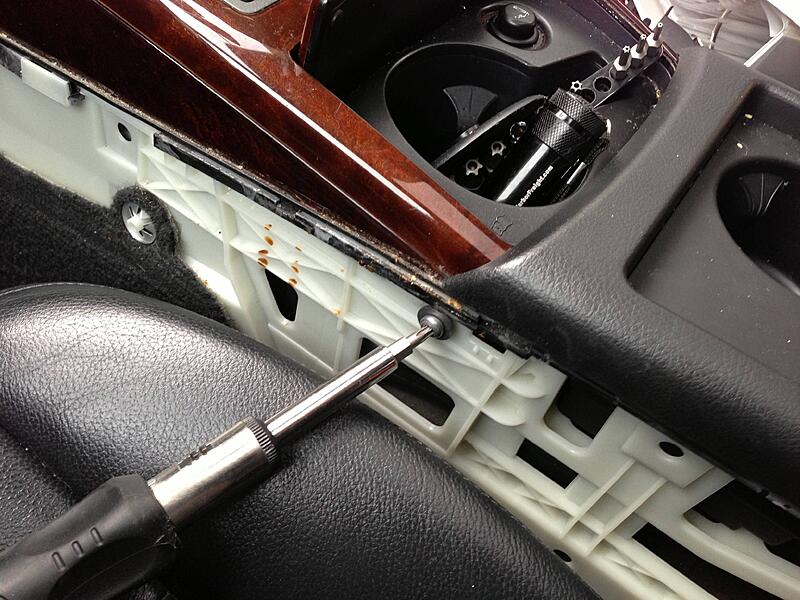

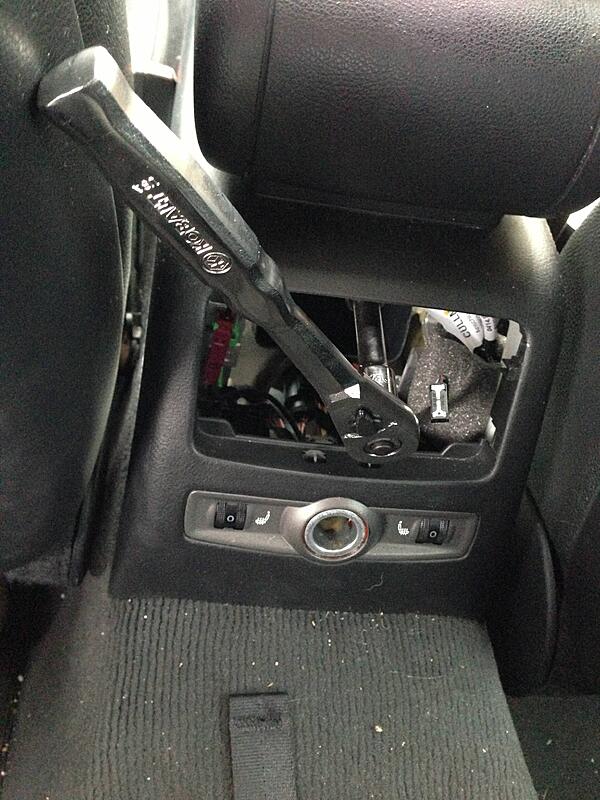
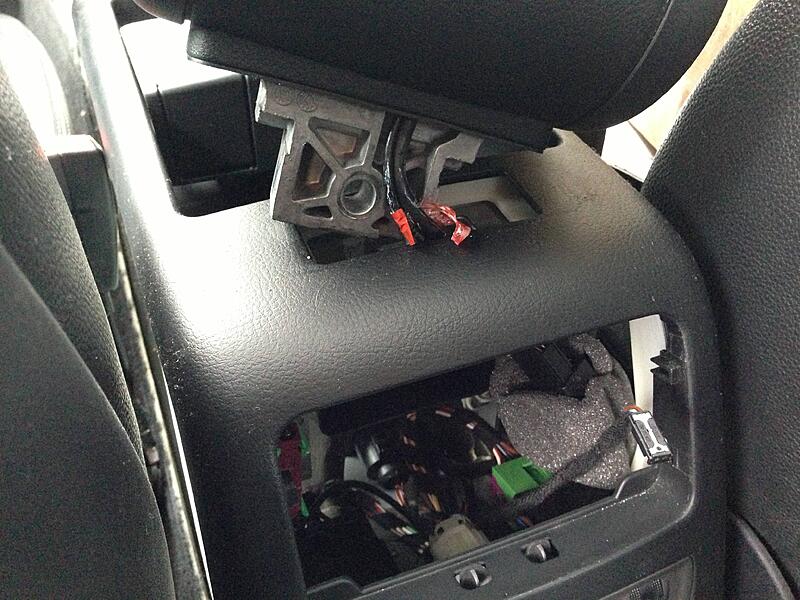
be sure the wires do not block the vent when re installing
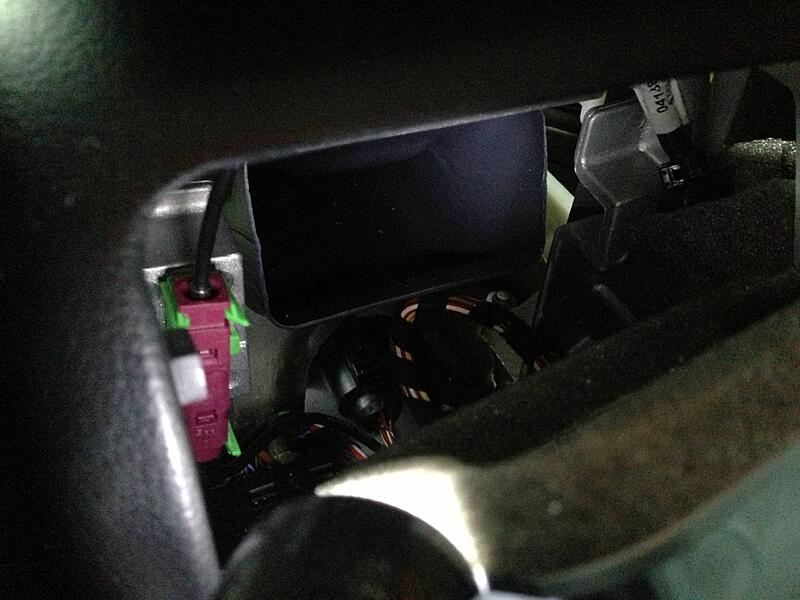
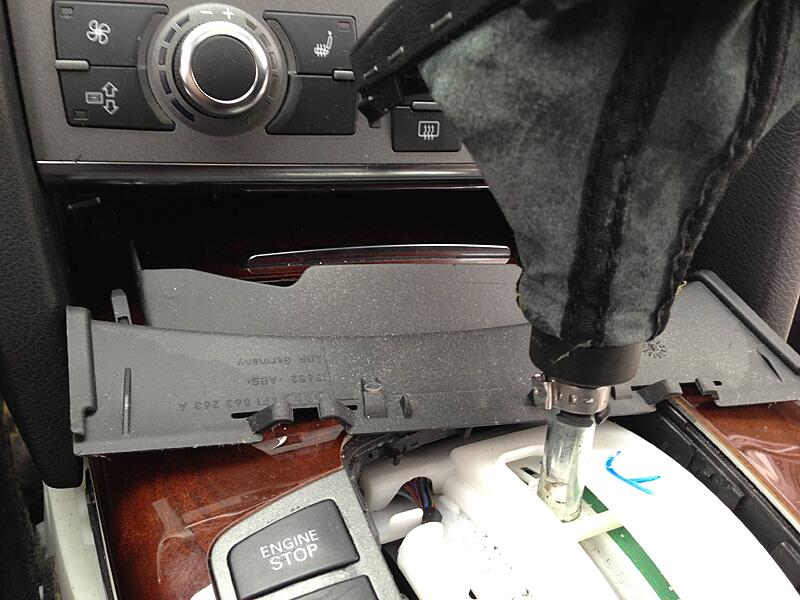
i just pulled straight up and untucked it out


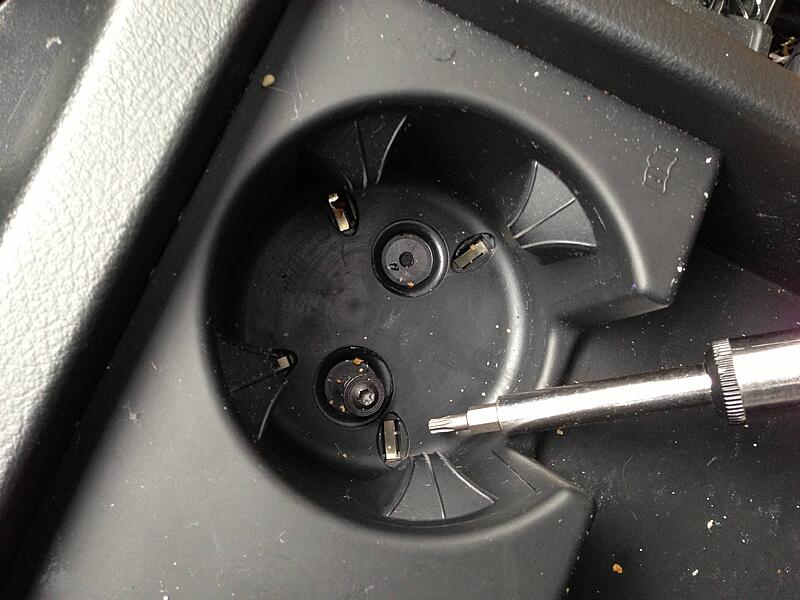
i had some slight differences.. *one screw not 4..etc etc

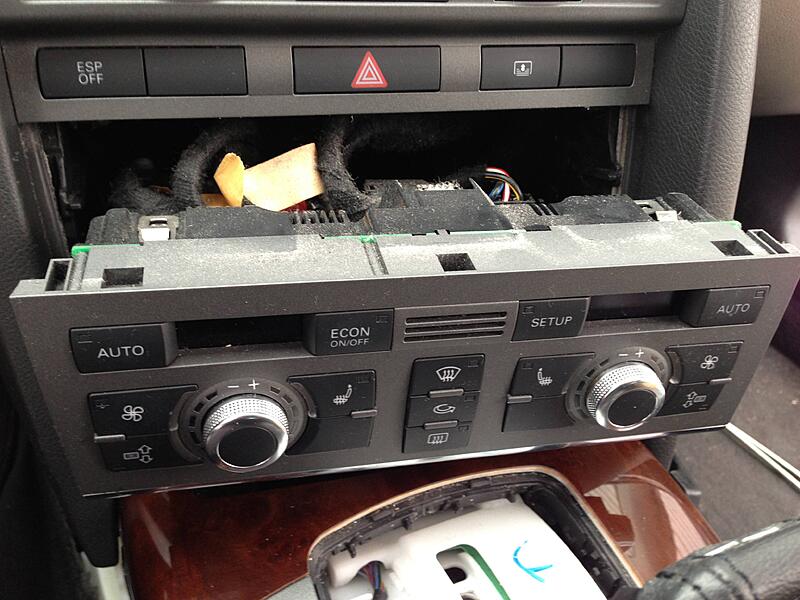
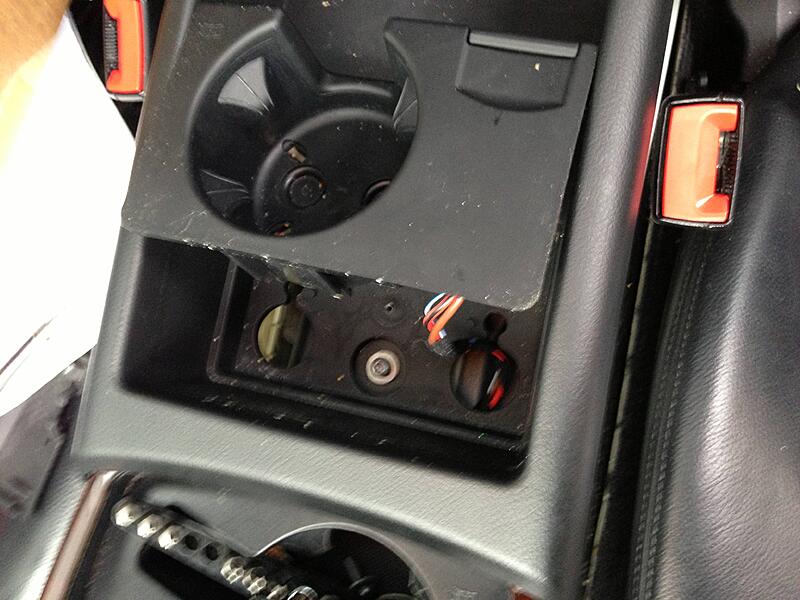
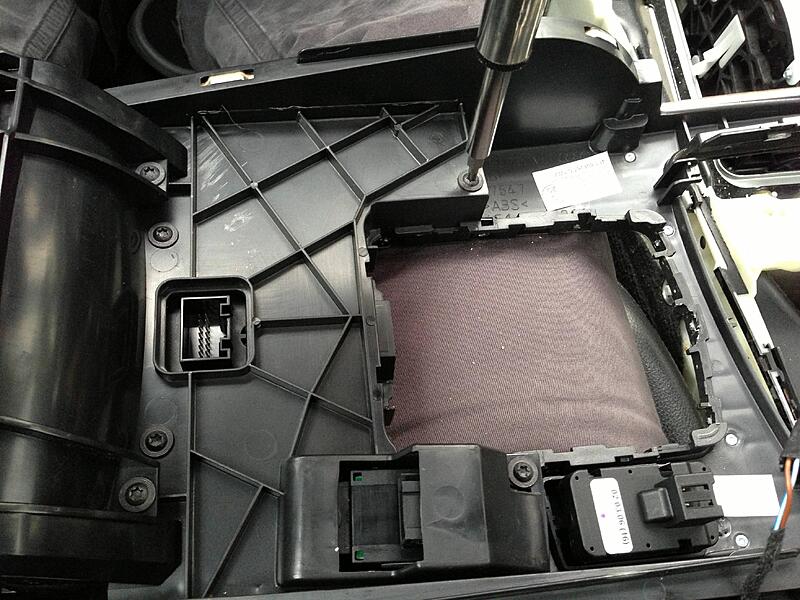
i did not fully remove Climatronic unit... the rear arm rest and although i did remove the silver plastic trim.. that may not be required on all jobs
and i believe you would be better off to do things in the same order that i did
i will add some more text / helpfull tps later
heres some photos of what i encountered
Foreword
*This is not super easy and takes some time...Use the pics to help u judge difficulty.
*Excessive force can damage fragile plastic parts and cosmetic pieces and electronic plugs.
Required
-Torx T-25 Screwdriver
-Torx T-20 Screwdriver
-Racheting Wrench w 13mm Socket and Extension
-Mini/narrow screwdriver
-Trim Removal Tools
-Mini Hook or 3438 Tool OEM tool for removing vent
Helpfull
-Flashlight
-Flexible Magnetic Pickup Tool
-Flexible Spring Claw Pickup Tool
-Water Spray Bottle *For Cleaning
-Micro Fiber Towel *For Cleaning
i started with this


do not pull on this with out unscrewing bc u will break the clips


be sure the wires do not block the vent when re installing

i just pulled straight up and untucked it out


i had some slight differences.. *one screw not 4..etc etc
i did not fully remove Climatronic unit... the rear arm rest and although i did remove the silver plastic trim.. that may not be required on all jobs
and i believe you would be better off to do things in the same order that i did
i will add some more text / helpfull tps later
Last edited by MainlandMig; 10-31-2012 at 07:20 PM.